
A missing cooling fan doesn’t make every overhang impossible, but it can lower the angle your printer handles cleanly. For overhang angle limits without a print cooling fan, use 45° as the conventional FDM guideline, and expect a low-cooling setup to need a gentler slope.
It’s easy to assume that a sharper overhang only needs a slower print. Speed matters, but so do filament, layer height, nozzle temperature, part orientation and geometry. A small design change can sometimes produce a cleaner result without supports.
This guide covers four practical ways to improve overhangs: design support-friendly angles and chamfers, adjust print settings, account for material and cooling differences, and troubleshoot common defects. You’ll get a useful starting point for your setup and learn when a test print, design change or supports make the most sense.
Key Takeaways
- Shape overhangs with gentler slopes or chamfers to reduce unsupported material, and use supports when the geometry exceeds your printer’s limits.
- Fine-tune layer height, print speed and perimeter count to help each new layer hold its shape.
- Set realistic expectations by considering how filament and cooling performance affect the overhang angle your printer can handle.
- Look for curling, sagging and rough edges to identify where cooling or print settings may need adjustment.
- For challenging overhangs, review nozzle temperature and speed together, then use a small test print to assess the result.
1. Designing support-friendly angles and chamfers
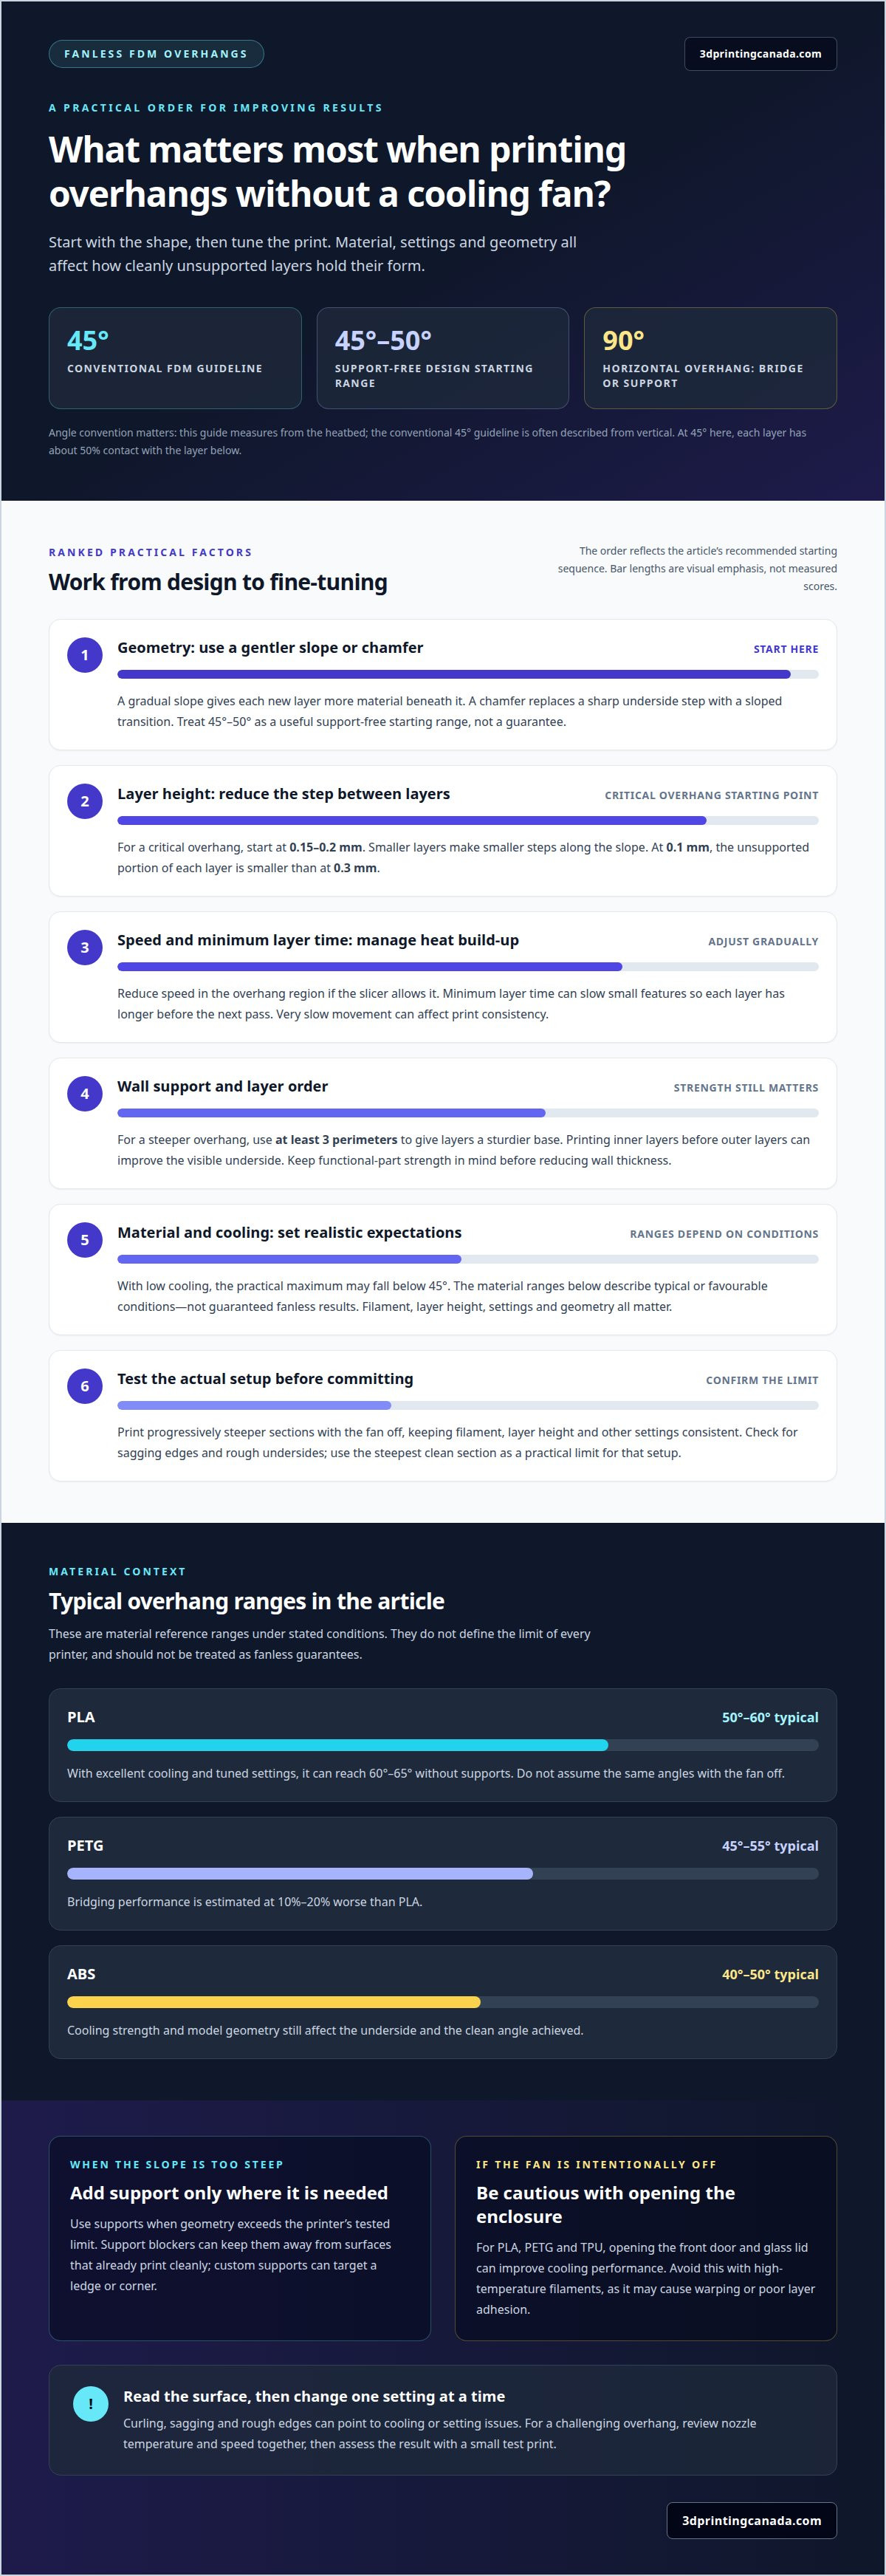
Start with the shape, not a slicer setting. A gradual slope gives each new layer more material beneath it, which matters when no part-cooling fan is available. For most FDM printers, a 45°-50° overhang is a useful support-free starting range. Treat it as a design guide, not a guarantee for every filament or machine.
Check how the model or slicer measures angles before changing geometry. This guide measures the angle between the inclined surface and the heatbed; a conventional FDM guideline describes 45° from vertical. At a 45° overhang, each layer has about 50% contact with the layer below. A perfectly horizontal overhang is 90° here, and needs bridging or supports.
How can calibration tests find the maximum fanless overhang angle? Print a test model with progressively steeper sections, keeping the filament, layer height and other settings consistent while the fan stays off. Inspect each section for sagging edges or rough undersides, then use the steepest clean result as a practical limit for that setup.
Use a chamfer to replace a sharp underside step with a sloped transition. For example, changing a square ledge into a diagonal face lets successive layers extend outward gradually. When the part’s function allows, revise the slope rather than relying on supports. For a steeper overhang, use at least three perimeters to give the layers a sturdier base.
Layer height also changes how much each extrusion extends beyond the layer below. At 0.1 mm, the unsupported portion of each layer is smaller than at 0.3 mm. That can make a challenging slope easier to print, though it doesn’t remove the need to test the actual geometry. A smaller overhang angle is harder because each layer has less support beneath it.
If the design exceeds the printer’s tested limit, add supports where the underside needs them. Use support blockers to keep supports away from areas that already print cleanly, such as a broad chamfer or vertical wall. Custom supports can target a specific ledge or corner instead of filling the entire space beneath the model.
Before printing the full part, compare the test result with the part’s functional needs. A visible curved surface may need a cleaner underside than a hidden bracket. Save the best-fitting angle, layer height and perimeter settings together in a profile, so you can reproduce the same fanless design consistently.
2. Settings for printing overhangs
Without a part-cooling fan, settings need to limit how much warm plastic each layer deposits. Start with a layer height of 0.15-0.2 mm for a critical overhang. A thinner layer creates smaller steps along the slope and reduces the material extending beyond the layer below. This can help, though it won’t replace the cooling that a fan would provide.
How does layer height affect the maximum overhang angle without a cooling fan? Smaller layers reduce how much material each pass adds beyond the layer below, which can help an overhang hold its shape. A larger layer height deposits more material at once, making a steep slope harder to control.
Reduce print speed in the overhang region if your slicer allows it. Slower speeds give deposited plastic more time to settle before the nozzle adds another layer. With no part-cooling fan, this cannot create directed airflow, but it can reduce the rate of heat buildup. Adjust gradually, since very slow movement can affect print consistency.
Use minimum layer time to manage small features that would otherwise receive layers in quick succession. The slicer can slow these areas, giving each layer more time before the next pass. This is especially useful on a narrow tip or small ledge, where the nozzle may return quickly. Check the preview to see where the setting changes speed.
Layer order can also affect the visible underside. Printing inner layers before outer layers can improve overhang surface quality by giving the outer edge a more stable base. More perimeters add support within the wall, while reducing wall thickness can lower the material mass in each layer. Keep strength requirements in mind before thinning a functional part.
For PLA, PETG and TPU, opening the printer’s front door and glass lid can improve cooling performance. Avoid this with high-temperature filaments, because it may cause warping or poor layer adhesion. Material choice matters: airflow that helps one filament may disrupt another. Change one setting at a time so you can identify which adjustment improves the overhang.
If the printer’s fan has stopped working rather than being intentionally disabled, settings alone won’t repair the hardware. 3D Printer Repair Services can address printer hardware issues that interfere with consistent printing.
3. Typical overhang angle limits by material and cooling performance
Material and cooling work together, so no single angle fits every printer. Standard FDM setups commonly handle overhangs around 45° to 60°, depending on filament, layer height and settings. With low cooling performance, the practical maximum may fall below 45°. Without a working part-cooling fan, use a more conservative slope and judge results from your own test print.
PLA generally performs well on overhangs when cooling is strong. A typical maximum is 50° to 60°, while excellent cooling and tuned settings can push PLA to 60°-65° without supports. Those figures describe favourable conditions, not fanless results. With the fan off, don’t assume your PLA spool will reach the same steep angle.
PETG typically handles 45° to 55° overhangs, while ABS typically manages 40° to 50°. PETG bridging performance is estimated at 10-20% worse than PLA. These ranges give useful context when selecting a filament, but they don’t define the limit for every printer. Cooling strength and the model’s geometry still affect the underside.
For a fanless setup, compare those material ranges with the lower-cooling guidance: maximum angles may drop below 45°. That means an ABS overhang near its usual upper range could still sag without cooling. A PETG ledge may also need a gentler slope than its typical range suggests. Use supports or redesign the surface when the required angle exceeds your setup’s clean-print limit.
Think of the listed ranges as starting points, not interchangeable targets. A 55° PLA result with strong airflow doesn’t predict a 55° PETG result without a fan. Filament, layer height and print settings all change how much support each new extrusion receives. Keep those conditions consistent when comparing results, or the angle test won’t show which variable caused the difference.
To establish a useful material-specific limit, print the same overhang test with each filament and the fan disabled. Change only the material between tests, then record the steepest section without visible sagging or rough edges. Repeat at the intended layer height and print speed before using the result for a functional part. This separates material effects from setting changes.
Cooling can also vary across a model. A part facing the airflow may hold an edge better than one turned away, even with identical filament and settings. With no part-cooling fan, orientation cannot restore active airflow, but it can help show how available air movement affects the part. Keep orientation consistent during comparisons.
Use the least steep clean angle from your tests as the design limit for that material and setup. If the final component needs a steeper surface, revise its geometry or add supports rather than relying on a result achieved with better cooling. This makes the test results practical guidance for your printer.
4. Common overhang defects and solutions
With fanless overhangs, sagging, curling and rough undersides usually point to heat, geometry or extrusion settings. Without directed cooling, fresh filament stays soft longer, so unsupported edges can droop before the next layer arrives. The defect’s location helps narrow the cause: a drooping edge suggests insufficient support, while an upturned edge points to deformation.
For sagging, inspect the overhang’s underside and compare it with the model’s slope. A long, shallow underside may need supports or a design change, especially if the tested angle prints cleanly elsewhere. If only one section droops, check its toolpath and nearby geometry. A tight corner or small ledge can behave differently from a broad, uninterrupted surface.
Curling has another possible cause. According to the European Commission, differential cooling at an overhang’s thinner edge can deform the newly printed layer upward. The lifted edge may catch the nozzle on a later pass. Look for a curled lip along the thin edge, then check whether the deformation repeats in the same place on successive layers.
A rough underside often shows individual extrusion lines that have sagged or failed to meet cleanly. Check the slicer preview for abrupt changes in layer path, wall thickness or speed near that area. Reduce speed in the affected region and assess the result on a small test. If the defect is limited to one unsupported edge, add support there rather than beneath the entire model.
When extra airflow is available, an external fan can cool an overhang. Aim airflow at the problem area, then compare a test print using the same geometry and settings. Don’t change airflow and nozzle temperature at the same time, or the comparison won’t show which adjustment helped. A fan may improve the underside, but it won’t correct a steep design with insufficient support.
Use a simple troubleshooting sequence: identify the defect, note where it appears, then change one relevant setting. For sagging, check the unsupported span and print speed. For curling, inspect the thin edge and airflow direction. For rough lines, review extrusion paths and local settings. Reprint the same test section after each adjustment to keep the results comparable.
If defects appear across unrelated models, inspect the printer rather than treating every failure as a geometry problem. A fan that isn’t operating, inconsistent extrusion or loose hardware can affect multiple overhangs. Check the machine’s operation and print a familiar test part. A repeated defect across different designs suggests a printer issue; one isolated to a single model points to its shape or settings.
5. How do nozzle temperature and print speed affect overhangs without part cooling?
Nozzle temperature controls how fluid the filament is as it leaves the hot end. For a fanless overhang, excess heat can leave the new extrusion soft, allowing its unsupported edge to sag. Lowering the nozzle temperature by 5-10°C can help the filament hold its shape sooner. Make small adjustments, then compare the same overhang section.
For challenging PLA overhangs, 200-205°C is a suggested printing temperature. Treat that range as a starting point, not a universal setting. Filament and printer behaviour matter, so watch for weak extrusion or poor layer bonding after lowering temperature. If either appears, raise the temperature and retest rather than pushing it lower.
Print speed affects how long each layer has before the nozzle returns. Slowing the overhang can give warm plastic more time to settle, but it doesn’t replace directed airflow. A general overhang speed range is 10-60 mm/s. Start within that range based on the print’s existing profile, then reduce speed in the affected region if the edge still droops.
Change temperature and speed separately. For example, print one test at the current temperature with reduced overhang speed. Then print another with the original speed and temperature lowered by 5°C. Compare sagging, surface roughness and layer bonding. Changing both settings together makes it harder to tell which adjustment helped.
Use the slicer preview to identify overhang paths before printing. If the software allows regional speed control, slow only those paths instead of the whole model. A small ledge and a broad underside may need different treatment. Keep other settings consistent between tests, including filament, orientation and layer height.
Temperature and speed also affect each other. A slower pass gives each extrusion more time before the next layer, while a cooler extrusion can become firm sooner. But lowering the nozzle temperature too much can weaken layer bonding. Look beyond the underside: a clean edge isn’t an improvement if the part develops poor adhesion.
Use the same small test model to compare settings before printing a functional part. Record the nozzle temperature and overhang speed beside each result, then select the combination with the best balance of edge shape and layer bonding. If temperature control or extrusion remains inconsistent across tests, get help with printer repair services to address possible hardware issues.
3D Printing Canada: 3D Printer Repair Services
3D Printing Canada provides 3D Printer Repair Services for hardware issues affecting print consistency, including a part-cooling fan that has stopped working. If the fan is disabled by choice, changing the design or print settings is the relevant next step; repair is for a machine fault, not a substitute for fanless printing adjustments.
When overhang defects persist across different models, or the fan fails to operate, printer hardware may need attention. Repair can help address equipment issues that make it harder to achieve consistent results. Share the symptoms and when they occur, such as whether the fan runs or whether sagging appears across several prints.
For help with a printer hardware issue affecting your overhangs, contact 3D Printing Canada.
Make your next print a useful test
Turn your next fanless overhang into a controlled experiment, not a guess. Choose one representative feature from your project to check how your current setup performs. Keep a short record of the filament, orientation and settings alongside the result. That gives you a practical reference when you revisit the design or print another part.
Think of overhang angle limits without a print cooling fan as a boundary to work with, not a barrier to creativity. A design can often adapt to the printer: adjust the shape, refine the settings or use supports where needed. If the fan has failed or print quality varies across unrelated models, the hardware may need attention. The right next step depends on whether the issue comes from the design or the machine.
Contact 3D Printing Canada if you need help with a printer hardware issue. Keep testing one change at a time, and your next overhang can bring you closer to a dependable result.
Frequently Asked Questions
What is an Overhang?
An overhang is a section of a 3D model that extends outward beyond the material supporting it underneath. Picture a shelf projecting from a wall: the shelf’s underside has no solid surface directly below it. In a sliced model, each new layer must partly rest on the layer beneath. A longer unsupported projection puts more demand on the printer and may call for a design change or supports.
What overhang angle can PLA print without a cooling fan?
There isn’t one dependable fanless angle for PLA across all FDM printers. The typical 50° to 60° range applies to PLA with good cooling, so don’t treat it as a fan-off rating. Print an angle test using the same spool and profile as your planned part. If the steep sections sag, choose a gentler face or support the affected area.
What overhang angle can PETG print without a cooling fan?
No fixed PETG angle applies to every fanless setup. PETG typically prints overhangs around 45° to 55°, but that range depends on conditions and isn’t a fan-off guarantee. Its bridging performance is estimated at 10-20% worse than PLA. For a PETG part with a broad underside, test the actual orientation and geometry, then add support if the result sags.
What overhang angle can ABS print without a cooling fan?
ABS typically handles overhangs around 40° to 50°, but that range doesn’t set a universal limit without part cooling. Treat the material range as a starting reference, then assess the exact part and printer setup. A small test with the same ABS profile can reveal whether a specific underside stays clean. If it droops, revise the slope or use supports.
How should overhang angle be measured in 3D printing: from vertical or horizontal?
Both conventions appear, so identify the reference before comparing angles. The conventional FDM guideline measures from vertical; this guide measures between the sloped face and the heatbed. These are complementary measurements, and they coincide at 45°. For another angle, the two readings differ. Check the test model or slicer’s convention, then use that same baseline for design decisions.
How can slicer settings improve overhangs when printing without a cooling fan?
For overhang angle limits without a print cooling fan, use the slicer to reduce how much hot filament is deposited at once. Try a lower overhang speed, adjust minimum layer time for small features, and preview the toolpath around the unsupported edge. Change one setting per test so you can attribute the result. If your slicer supports regional speed control, apply the slower speed only to overhang paths.
When should supports be used for overhangs printed without cooling?
Use supports when the intended geometry exceeds the clean angle your printer can manage with the fan off, or when a test shows sagging beneath the part. They’re also useful for isolated ledges that can’t be redesigned without affecting the part’s function. Place supports only where the underside needs them, and use blockers to keep support material away from surfaces that already print successfully.