
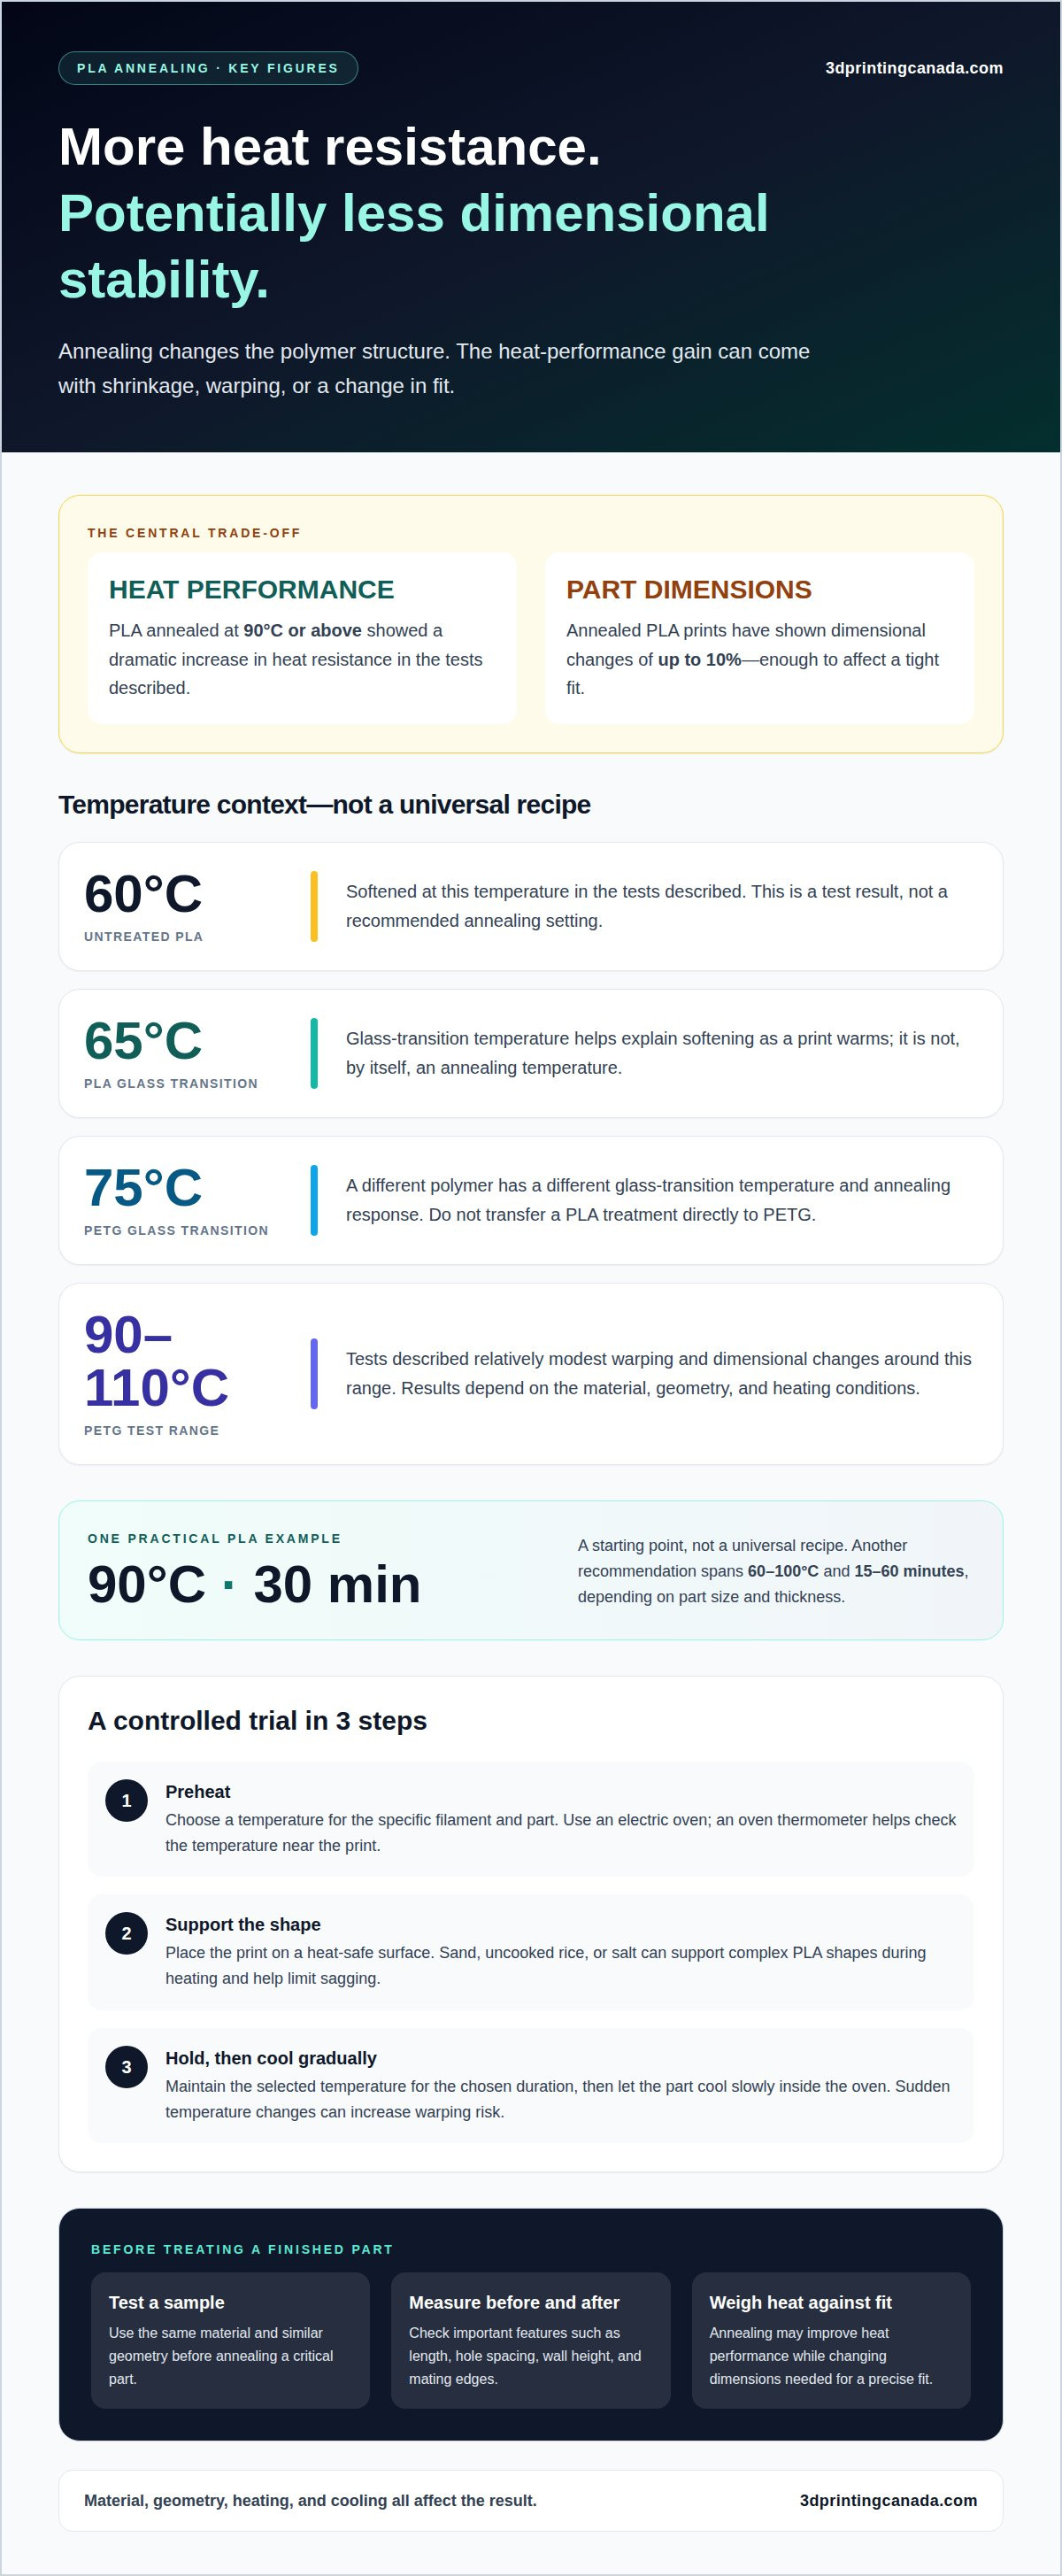
Annealing can help PLA parts keep their shape at higher temperatures, but the heat treatment can also change their dimensions. In tests, untreated PLA softened at 60°C, while PLA annealed at 90°C or above showed a dramatic increase in heat resistance. That’s the core trade-off behind annealing 3D-printed parts for heat resistance: improved heat performance can come with shrinkage or warping.
That trade-off matters whether you’re making a functional bracket, a fixture, or a part that will operate in a warm environment. The material, geometry, and support used during heating all affect the result. Annealing doesn’t simply make a print “stronger”; it changes the polymer structure, which can affect heat performance, strength, fatigue behaviour, and fit.
This guide explains how annealing affects printed polymers, what it can do for heat resistance and mechanical performance, and why dimensional stability deserves equal attention. You’ll also learn when annealing may be worth trying, how salt can support a part during heating, and when the risk of changing a finished print may outweigh the potential benefit.
Key Takeaways
- Use glass-transition temperature as context, not a universal annealing setting: PLA’s is 65°C and PETG’s is 75°C, while the right treatment depends on the material and part.
- Annealing increases PLA crystallinity, which can improve some mechanical properties and heat performance, but the change can also affect the print’s shape.
- Expect a trade-off between strength and fit: annealed parts may perform better in some tests, while shrinkage or warping can affect critical dimensions.
- Consider annealing for parts that need more heat resistance, but weigh the operating conditions and the cost of dimensional changes before treating a finished print.
- Salt can support a PLA print from all sides during heating, helping limit sagging; slow cooling remains important for managing warping.
So is annealing busted?
No. Annealing can improve heat resistance, but it isn’t a universal fix: heat, time, material, and part geometry all affect the result. PLA has a glass transition temperature of 65°C, and PETG’s is 75°C. ABS can also be annealed, but its temperature needs to suit the specific material and part rather than follow a PLA setting.
Glass transition temperature helps explain why a print may soften as it warms, but it isn’t a recommended annealing temperature by itself. Annealing changes the polymer structure through controlled thermal exposure. Too much heat can cause deformation, while uneven heating can affect layers and dimensions. A print can gain heat resistance and still lose the fit it needs. That trade-off is central to annealing 3D printed parts for heat resistance.
Annealing temperatures vary by polymer, so there is no single setting that suits every material. Another PLA recommendation spans 60-100°C, showing why a single setting shouldn’t be treated as universal. Start with the filament’s material guidance, then consider the part’s size, thickness, shape, and dimensional requirements. The temperature must be high enough to produce a structural change without softening the part into a new shape.
For PLA, one practical example uses 90°C for 30 minutes, while another recommendation allows 15 to 60 minutes depending on size and thickness. These are starting points, not interchangeable recipes. A thicker part takes longer to heat through than a thin one, and a detailed shape may need support. For complex PLA geometry, sand or uncooked rice can help hold the form during heating.
For oven annealing, use an electric oven rather than a gas oven. Avoid convection ovens for PLA because airflow can create uneven heating. An oven thermometer helps track the temperature near the part, rather than relying only on the control setting. This makes the process more controlled, but the best choice for annealing 3D printed parts for heat resistance still depends on the polymer and the part’s required fit.
- Preheat the oven to the temperature chosen for the filament and part.
- Place the print on a heat-safe surface, adding support around complex PLA shapes.
- Hold the temperature for the selected duration, then let the part cool gradually inside the oven.
The cooling stage matters: a sudden temperature change can increase the risk of warping. For a first trial, use a sample made from the same material and with similar geometry, then compare its dimensions before and after treatment. This simple test shows whether annealing suits the part’s intended fit.
How annealing changes polymer structure
Fused-filament printing leaves polymer strands and layers joined as a part cools. In PLA, controlled annealing can increase crystallinity: more polymer chains form ordered regions instead of remaining mostly disordered. This structural change can improve some mechanical properties and heat resistance. It doesn’t melt the object; it gives the polymer time and thermal energy to reorganize while the print remains solid.
That reorganization can also shift the part’s dimensions. Annealed PLA prints have shown dimensional changes of up to 10%, so a model designed around a tight fit may no longer fit its mating component. The direction and amount of change depend on the material, print geometry, and heating conditions. A broad flat panel, a thin clip, and a block won’t necessarily respond alike.
Build support into the process. Sand or uncooked rice can cradle complex PLA shapes during heating, helping the object retain its form as the polymer changes. Salt annealing is another option: salt surrounds the part, supporting it from all sides as it heats. After either method, slow cooling helps reduce the risk of warping. Support can limit sagging, but it can’t prevent every dimensional change.
For PETG, tests described relatively modest warping and dimensional changes around 90-110°C. That response differs from PLA’s, so don’t transfer a PLA treatment directly to PETG. A fixture or gauge that must hold a precise dimension needs its own material-specific trial. For critical dimensions, produce an annealing sample before full production, then compare the sample with the original design.
Measure the part before and after treatment. Record key features such as overall length, hole spacing, wall height, and the width of a mating edge. Use the same measuring points and tool each time, and let the print cool fully before taking the second set of readings. This helps distinguish permanent changes from those caused by residual heat. A small test coupon can also show whether the selected method changes dimensions consistently enough for the intended use.
- For a press-fit part: measure the mating surfaces and openings before and after annealing.
- For a flat component: check its length, height, and whether it still sits flat on a reference surface.
- For repeated production: use the test part’s measured change to adjust the model before printing a full batch.
When a part’s fit matters as much as its heat performance, treat dimensional checks as part of the process. Explore 3D printing support if you need help thinking through the material and part requirements.
Effects on strength, fatigue resistance, and dimensional stability
Annealing can change a plastic part’s strength, but the effect depends on its shape and print orientation. In PLA tensile tests, average strength rose from 63.5 MPa untreated to 68.2 MPa after annealing, an increase of about 7.5%. The result points to a possible gain, not a guarantee for every printed part.
Orientation matters. A lying PLA test hook held 75 kg before annealing and failed at 87 kg afterward, carrying 16.2% more load. Upright hooks failed at an average load of 42 kg both before and after treatment. The contrast shows why a stronger material test doesn’t automatically mean every part design improves equally.
Strength also isn’t the same as fatigue resistance. A part that survives one load may still behave differently under repeated bending or vibration. The reported PLA impact specimens absorbed roughly the same energy before and after annealing, while previous tensile tests showed about a 7% stiffness increase. Treat these results separately: greater stiffness doesn’t establish longer fatigue life, and impact performance didn’t rise in those tests.
Dimensional change is another part of the trade-off. Standard PLA typically shrinks by 1-2% under the described annealing conditions. In one oven test, an untreated model began warping at 70°C and shrank about 2 mm in length; its height increased by 0.5 mm. The annealed model’s height changed by 0.02 mm after oven testing. These outcomes illustrate why length, height, and flatness should be measured independently.
For PLA parts used in a car in the sun, annealing reduced warping by at least 70%, but didn’t eliminate it. That may matter for a trim piece, but a small change could still interfere with a precision fit. Salt-annealed PLA may shrink by 1-3%, so account for the support method when assessing dimensions.
Heating plastic can create fumes if the material is overheated, and uncontrolled heating can pose a fire risk. Keep the temperature controlled, use an appropriate oven, and don’t leave the heating process unattended. The main risk to the part is permanent shrinkage, expansion, or warping that affects its fit.
- For a load-bearing part: consider print orientation alongside any strength gain.
- For a repeated-load part: don’t treat a single strength result as proof of fatigue performance.
- For a fitted component: compare key dimensions before and after annealing, once the part has cooled to room temperature.
When to anneal 3D-printed parts
Consider annealing when a printed part must retain its shape in warmer conditions and its fit can tolerate dimensional change. For example, a PLA component used near a heat source may benefit from a trial treatment. The key question isn’t simply whether annealing improves mechanical properties. It’s whether the part’s operating conditions justify changing its dimensions and structure.
Consider the environment first. Printed parts used in machinery operating at 80°C may deform over time. If a component experiences heat during regular use, annealing may help it retain its shape. But assess the actual part, not just the material name. A thin bracket, a thick mount, and a snap-fit clip can react differently because their geometry and loads differ.
Annealing is worth exploring when heat performance matters more than an exact as-printed fit. A non-mating cover or display part may tolerate some dimensional movement. A gear, an enclosure with tight clearances, or a connector may not. For parts that must fit another component, test a sample with similar geometry first. Measure critical features after it has cooled, then decide whether the change is acceptable.
Annealing may also make sense when a part has a clear mechanical purpose, such as supporting a load in a warm setting. But it isn’t a substitute for choosing a suitable material or redesigning a part that experiences excessive stress. Heat can reorganize polymer chains, while the part’s orientation, walls, and shape still influence its performance. Match the treatment to the part’s job, rather than simply aiming for a higher temperature limit.
Skip annealing when dimensional accuracy is the top priority and there’s no room to adjust the model. The same applies when a part depends on flexible features that could become less reliable after heating. A sample is especially useful before making several matching parts: it shows whether the process changes fit consistently enough for the application.
Time and support matter, too. PLA treatments may run from 15 to 60 minutes depending on the print’s size and thickness. A small, simple test piece can help select a suitable process before treating a functional component. During the trial, support complex shapes and let the print cool gradually. Further testing should reflect the real use case, including heat exposure and mechanical load.
- Consider annealing: heat is a known performance issue, and modest dimensional change is acceptable.
- Test first: the part has mating features, a load-bearing role, or repeated production requirements.
- Choose another approach: a precise fit or flexible feature matters more than potential heat resistance.
How does annealing improve heat resistance in 3D printed parts?
Annealing improves heat resistance by changing the arrangement of polymer chains inside a printed part. In PLA, heating can increase crystallinity, creating more ordered regions within the plastic. These regions help the material resist softening as temperature rises. The treatment changes the polymer’s structure; it doesn’t simply add a heat-proof layer to the print.
That distinction matters because a part’s glass transition temperature and its performance after annealing aren’t the same measure. PLA’s glass transition temperature is 65°C, while salt annealing can raise its softening point from approximately 55°C to 80-100°C. These figures describe different properties and shouldn’t be read as interchangeable ratings. A part’s shape, print orientation, and load still affect whether it holds its function when heated.
Salt annealing uses salt as support around the print. The salt surrounds the PLA part, helping hold it from all sides as it heats and reducing the chance of sagging. For salt annealing PLA, use a controlled oven temperature and avoid excessive heat, which can melt the part. Heating time is 30-60 minutes, depending on the part’s thickness. Slow cooling in the oven helps reduce warping as the print returns to room temperature.
That method can be useful for a shape that needs support during heating, but heat resistance is only one design requirement. A mount exposed to warmth may keep its shape better after treatment, while a precision-fit component may become unusable if its dimensions shift. Salt-annealed PLA parts may shrink by 1-3%, so assess fit alongside temperature performance. Salt supports the shape during treatment; it doesn’t prevent all shrinkage.
Assess the improvement against the part’s actual job. For a part exposed to heat in a car, for example, the relevant question is whether it stays functional in that environment, not just whether the polymer’s softening point has increased. Consider how long it is heated, whether it carries a load, and which dimensions control its fit. Test a representative sample and compare its performance with an untreated part under the same conditions.
- For heat exposure: focus on whether the part retains its shape and function in its intended environment.
- For a tight fit: measure changes as well as heat performance, especially with salt-annealed PLA.
- For complex geometry: consider whether salt support can hold the print while it’s heated.
Annealing can extend the useful temperature range of a PLA print, but it makes sense only when the heat benefit outweighs the dimensional change. Match the material, support method, and test conditions to the part’s actual use.
3D Printing Canada: 3D Printeda
3D Printing Canada offers 3D Printeda for projects that need a printed part, including applications where annealing could affect fit or function. If you’re weighing heat resistance against dimensional stability, start with the part’s intended use, material, and critical measurements. That helps clarify whether a printed solution suits the job or whether post-processing adds unnecessary risk.
For inconsistent printer output, 3D Printer Repair Services address hardware issues that can affect print quality. Bambu Lab Accessories and 3D Scanners support other parts of a printing workflow, from printer setup to capturing an object for a digital model.
If you’re planning a heat-sensitive print or need help with a printer issue, contact 3D Printing Canada to discuss your project.
Put your next print to the test
Choose the next step by starting with the part’s job. Identify the heat it will face, the features that must stay within tolerance, and the consequences if its shape changes. That gives you a practical basis for deciding whether annealing 3D-printed parts for heat resistance is worth testing, or whether the design should remain untreated.
For a new design, build a test piece around its most important feature, such as a mounting hole, clip, or mating edge. Compare its performance before and after treatment under conditions that reflect its intended use. A small, measured trial can guide model changes before you commit to a finished part or repeated production.
If you’re planning a print and want help considering the material, fit, or intended use, contact 3D Printing Canada. Bring your project goals and the constraints that matter most. You can use what you’ve learned to make a more informed design decision and move your next print forward with confidence.
Frequently Asked Questions
How does it work?
Annealing gives polymer chains time and heat to rearrange within a printed object. For PLA, this can increase crystallinity and change how the part responds to heat and mechanical stress. Imagine a bracket that softens in a warm enclosure: a treated sample may hold its shape better, but its dimensions can shift. Compare treated and untreated samples under the same conditions to see which performs better for your use.
How do you choose the right temperature?
Choose a temperature based on the filament’s polymer, the part’s shape, and the desired result. PLA’s glass transition temperature is 65°C, and PETG’s is 75°C, but these are not annealing settings. For PLA, reported annealing ranges vary from 60-100°C to 80-120°C. Use a small test piece to assess shape changes before treating a part whose fit or function depends on precise dimensions.
What temperatures and times are recommended for annealing PLA, PETG, ABS, ASA, and nylon?
For PLA, guidance includes 80-120°C, with treatment lasting 15 to 60 minutes depending on size and thickness. PETG and ABS need material-specific settings, so choose a treatment suited to the filament and part. ASA and nylon need material-specific settings, so don’t apply PLA or ABS values to them by assumption. Part thickness and geometry also affect how long heating takes.
How much can annealing increase a 3D-printed part’s heat deflection temperature?
There isn’t one increase that applies to every polymer or printed design. Salt annealing can raise PLA’s softening point from approximately 55°C to 80-100°C, but softening point and heat deflection temperature aren’t interchangeable measurements. A car interior trim piece and a loaded bracket may behave differently. Judge the result by whether a representative part keeps its intended shape and function under its actual heat and load conditions.
How much do 3D-printed parts shrink or warp during annealing, and how can this be controlled?
Standard PLA typically shrinks by 1-2% under the described annealing conditions, while salt-annealed PLA may shrink by 1-3%. PLA parts can also show dimensional changes of up to 10%, so the outcome depends on the part and treatment. Support complex shapes with sand or uncooked rice, cool the print slowly, and measure a test sample before relying on critical dimensions.
Should 3D-printed parts be annealed in sand, salt, or another support medium?
Choose support based on the part’s geometry and how much support it needs. Sand or uncooked rice can help hold complex PLA shapes; salt surrounds the part and supports it from all sides during heating. A simple, stable shape may not need a support medium. Whichever method you choose, test a similar sample first: support reduces the risk of sagging but doesn’t prevent all shrinkage or warping.