
A probe can make bed levelling easier without physically levelling the bed. That distinction is easy to miss when you’re comparing auto bed leveling probe vs manual mesh leveling, especially if your first layer still looks uneven after repeated adjustments. A probe measures the bed at selected points; firmware uses those readings to create a mesh and compensate for small variations as the printer moves.
If you’re looking for more reliable first layers, the right approach depends on your printer, firmware and setup. Manual mesh levelling offers hands-on control without probe hardware, while an automatic probe handles much of the measuring. Neither method can correct loose components, a badly warped bed or an incorrectly set Z-offset.
This guide explains what each method does, where its limits are and how to choose a workflow that fits your printer and comfort level. It also covers how mesh compensation works and what to check when levelling alone doesn’t solve the problem, from mechanical basics to firmware and probe setup.
Key Takeaways
- Compare auto bed leveling probe vs manual mesh leveling by checking your printer’s firmware support, available hardware and how much hands-on setup you prefer.
- Use the printer maker’s documentation to confirm the supported levelling method before installing hardware or changing firmware settings.
- Check the printer’s mechanics before recalibrating. Loose parts or alignment issues can undermine either levelling workflow.
- If the first layer still struggles, check the build surface, nozzle condition and material settings instead of assuming the mesh is at fault.
- If repeated first-layer problems suggest a mechanical issue, consider having the printer assessed by an experienced repair technician.
Auto Bed Leveling Probe vs Manual Mesh Leveling: What Is the Difference?
An inconsistent gap between the nozzle and build surface can spoil the first layer, even when the rest of your print is well designed. The terms probe and mesh are sometimes used as if they mean the same thing, but they describe different parts of the process. In the auto bed leveling probe vs manual mesh leveling comparison, the key difference is how bed measurements are collected, not whether the printer compensates for unevenness.
A probe is a sensor that measures selected points on the bed. A mesh is the height data firmware uses to compensate for variations as the print head moves. This distinction matters in Fused Deposition Modeling, where the deposited material needs to adhere consistently to the build surface.
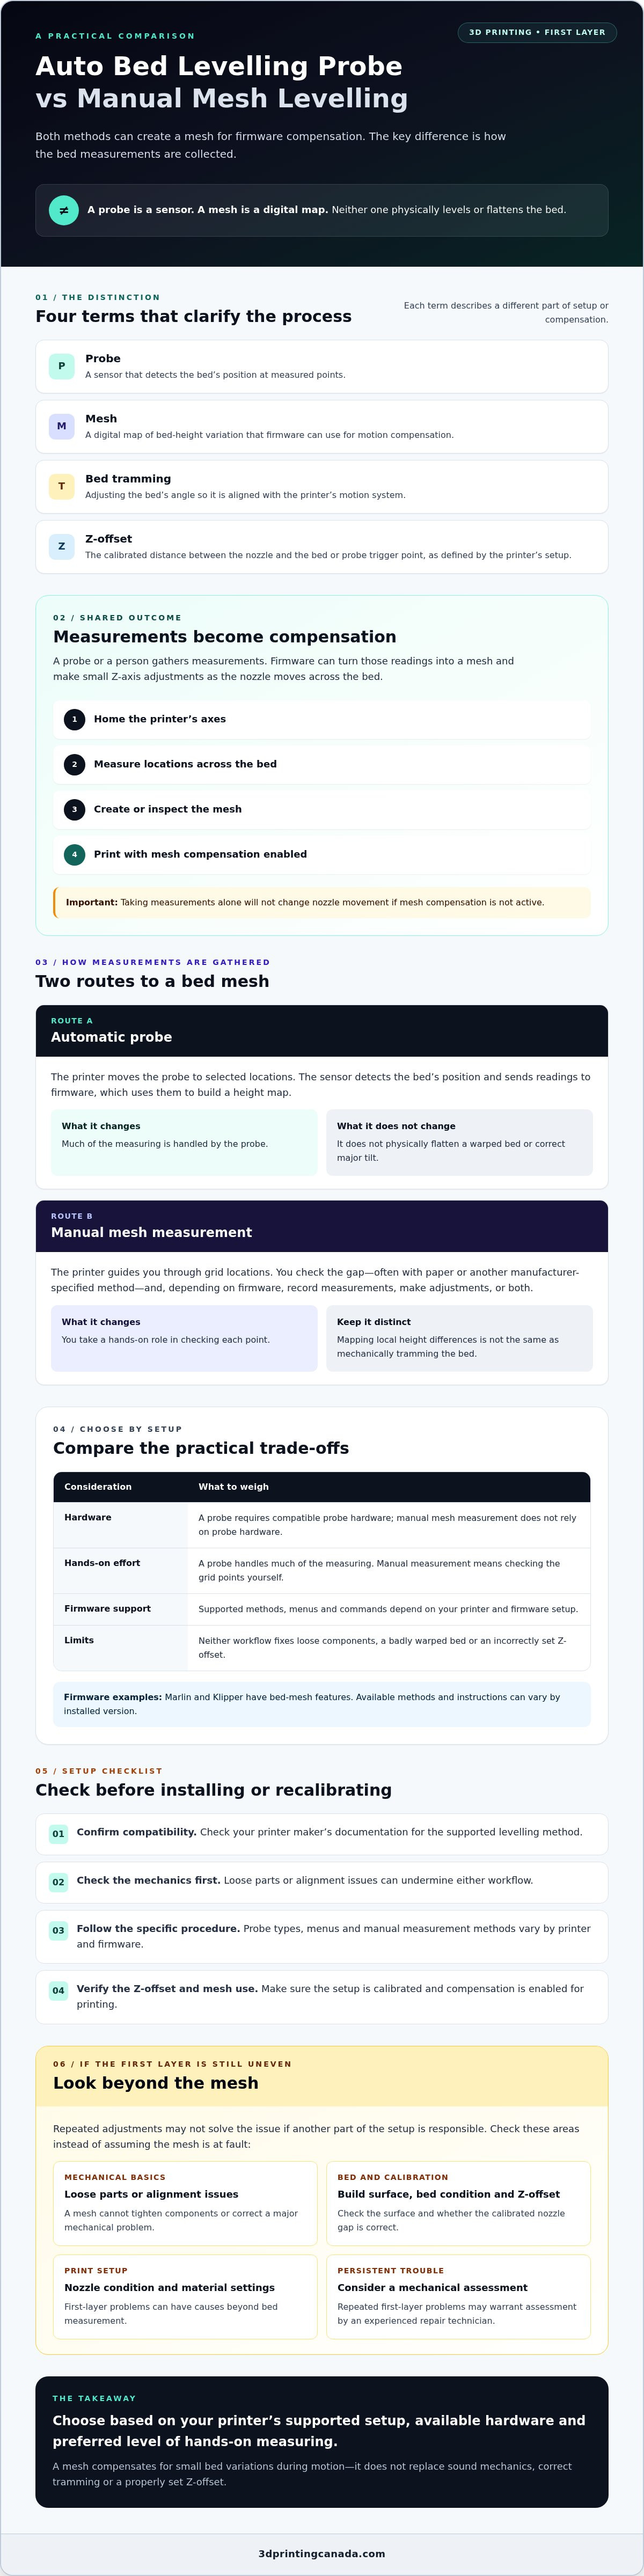
Four terms to know
- Probe: A sensor that detects the bed’s position at measured points.
- Mesh: A digital map of bed-height variation used for motion compensation.
- Bed tramming: Adjusting the bed’s angle so it is aligned with the printer’s motion system.
- Z-offset: The calibrated distance between the nozzle and the bed or probe trigger point, as defined by the printer’s setup.
What does an auto bed leveling probe actually do?
The printer moves the probe to selected locations, records relative measurements and passes the data to the firmware. The firmware can then build a mesh and adjust Z movement during printing to follow small differences across the bed. Sensor types and measurement methods vary by printer design and firmware, so check your printer’s documentation rather than assuming every probe works or is installed the same way.
A probe doesn’t physically flatten a warped bed or correct a major tilt. It measures and compensates. You may still need mechanical adjustment to bring the bed into a suitable range.
What does manual mesh leveling involve?
With manual mesh levelling, you check points across a grid yourself. Depending on the firmware, you might move the nozzle to each location through the printer interface, use paper to assess the gap, and follow prompts to record or adjust each point. The firmware then uses the resulting measurements as a compensation mesh.
This is different from turning adjustment knobs to tram the bed. Tramming aligns the bed mechanically; manual mesh measurement maps local height differences. Menus and procedures vary, so follow the instructions for your specific printer rather than treating one paper-based method as universal.
How Probes and Manual Meshes Measure and Compensate for Bed Variation
Both workflows turn measurements into instructions the printer can use, but they differ in how those measurements are gathered. A typical sequence is to home the printer’s axes, measure locations across the bed, create or inspect the mesh, then start a print with mesh compensation enabled. If compensation isn’t active, taking measurements alone won’t change the nozzle’s movement.
A bed mesh records surface variation for firmware compensation, not mechanical repair. It helps the printer account for small height differences while depositing material as part of the additive manufacturing process. It can’t tighten a loose part or correct a major alignment problem.
How a probe creates a bed mesh
After homing, the printer moves a probe over selected points. The sensor detects the bed’s position at each point and sends the readings to the firmware, which uses them to build a height map. Some printer and firmware configurations support measuring points more than once, but available options depend on the specific setup.
During a print, firmware uses the sampled heights to make small Z-axis adjustments as the nozzle travels across the surface. Marlin and Klipper are examples of firmware with bed-mesh features, but menus, commands and supported methods can vary by installed version. Check your printer and firmware instructions before changing settings.
How manual mesh measurement and adjustment work
In a manual workflow, the printer guides you through grid locations and you check the gap, often using paper or another method specified by the manufacturer. Depending on the firmware, you may record measurements, make adjustments or do both. Unlike automated probing, manual measurement relies on you to check each point.
Don’t confuse generating a mesh with bed tramming. Tramming adjusts the bed’s angle relative to the printer’s motion system; mesh measurement records remaining height variation across it. Paper feel is a practical reference, not a precise universal measurement, so follow your printer’s guidance for the recommended paper, feel and procedure.
Mesh compensation and Z-offset also do different jobs. The mesh describes how bed height varies across locations. Z-offset sets the nozzle’s starting height relative to the bed or probe trigger point. A useful mesh can’t make up for an incorrect offset, so confirm both are configured and that compensation is enabled before judging the first layer. If persistent problems suggest a mechanical fault or need diagnosis, professional 3D printer repair services may be a next step.
Probe vs Manual Mesh Leveling: Compare Accuracy, Effort, and Reliability
Choosing between these methods isn’t a simple choice between “accurate” and “inaccurate.” A probe automates measuring bed points, while a manual mesh workflow asks you to check them yourself. Either can support a consistent first layer when the printer is mechanically sound and the firmware is configured correctly. The better fit depends on your printer’s support, the setup effort you’re willing to take on and how comfortable you are troubleshooting.
| Factor | Probe-based workflow | Manual mesh workflow |
|---|---|---|
| Setup effort | Requires supported probe hardware and configuration, then automates bed sampling. | Avoids probe installation, but requires point-by-point checks or adjustments. |
| Repeatability | Can repeat measurements consistently when the sensor and setup are working properly. | Depends more on careful, consistent user technique at each point. |
| Hardware | Needs a compatible sensor and mounting arrangement if one isn’t already installed. | Doesn’t require a bed probe, though the printer must support manual mesh levelling. |
| User control | Less hands-on during measurement, with results shaped by firmware settings. | More direct involvement in checking or recording grid points. |
| Ongoing checks | Inspect the sensor, its mounting and configuration if readings become unreliable. | Recheck the grid if manual measurements or adjustments don’t seem consistent. |
Repeatability isn’t the same as guaranteed accuracy. Probe results depend on sensor condition, secure mounting, firmware configuration and the printer’s mechanics. Manual results depend on applying the measurement method consistently. With either approach, verify the Z-offset and confirm the mesh is being used for the print.
When a probe-based workflow is the better fit
Consider a probe if your printer and firmware support it and you want bed sampling handled automatically. It can reduce repeated manual measuring, but it doesn’t remove setup checks. Before changing hardware, confirm the sensor is supported and follow the printer maker’s installation and firmware guidance.
When manual mesh levelling makes more sense
Manual mesh levelling can suit you if your printer supports it and you prefer hands-on control or don’t want to add probe hardware. The trade-off is spending more time checking points and keeping your technique consistent. If you’re comparing auto bed leveling probe vs manual mesh leveling, remember that neither method fixes loose hardware, poor tramming or an incorrect Z-offset. There’s no universal winner: choose the supported workflow you can set up and maintain reliably.
Choose and Set Up a Leveling Method: A Practical Checklist
Before choosing between a probe and manual mesh levelling, confirm what your printer supports and make sure its mechanics are ready for calibration. Changing several settings at once makes first-layer problems harder to diagnose. Follow this sequence to narrow down the cause and set up a reliable workflow.
- Identify your printer and firmware. Check the printer model and installed firmware version in its menu or documentation. Firmware features and instructions can differ, even between printers from the same manufacturer.
- Confirm the supported levelling method. Find out whether your printer supports a probe, manual mesh levelling or both. Before installing hardware or changing firmware settings, consult the printer maker’s documentation. Verify sensor wiring, mounting requirements and firmware support. Don’t assume a particular probe is compatible without checking.
- Inspect the mechanics first. Check that the bed and gantry are stable and that the motion system moves as expected. If parts shift during operation, mesh readings may not reflect a consistent setup. Follow the manufacturer’s procedure to tram the bed before relying on compensation.
- Calibrate in the recommended order. Use the printer-specific procedure for creating a mesh and setting Z-offset. After changing a probe, nozzle, build surface or other relevant hardware, check whether the mesh and Z-offset need to be recalibrated. Change one setting at a time and record the result so you can tell what improved the first layer.
Keep troubleshooting focused. If one side of a first layer looks different from another, check the bed’s alignment and mesh procedure. If the nozzle seems too close or too far across the whole surface, review Z-offset. If the first layer won’t adhere consistently, levelling may not be the only factor. Surface preparation and print settings matter too; the article Understanding Build Plate Adhesion for Large Prints covers adhesion symptoms and other checks to consider.
The same order applies when weighing auto bed leveling probe vs manual mesh leveling: confirm compatibility, check the mechanics, then calibrate and test. If first-layer trouble persists or you suspect a mechanical issue, explore professional 3D printer repair services for support from experienced technicians.
Troubleshoot First-Layer Problems & Next Steps
An uneven first layer doesn’t automatically mean the mesh is wrong. Gaps, rough patches, inconsistent squish or spots that lift can point to different issues, so treat the appearance as a clue rather than a diagnosis. Check likely causes in a steady order instead of running calibration repeatedly and hoping the problem disappears.
What to check when the first layer still looks uneven
- Look at the build surface. Dust, residue or a surface that has shifted or become damaged can affect adhesion. Clean it using the printer maker’s recommended method, and check that it’s seated correctly.
- Inspect the nozzle and material. Buildup or wear at the nozzle can change how filament is deposited. Confirm the nozzle is clear and review material-specific temperature and first-layer settings.
- Check the gap and mesh. If the nozzle seems too close or too far across the whole bed, revisit the Z-offset. If the difference varies by location, check that the current mesh is active and was created for the present setup.
- Check stability before recalibrating. Confirm the bed and gantry don’t shift or wobble. A mesh can’t repair loose components, a damaged build surface or major mechanical alignment problems.
After changing the build surface, nozzle or other relevant hardware, follow your printer’s instructions to check whether the Z-offset or mesh needs updating. Change one factor at a time and note the result. For more on symptoms that can look like levelling trouble, see Understanding Build Plate Adhesion for Large Prints.
When to get help with a printer issue
If basic checks don’t resolve the problem, revisit the printer documentation and inspect the mechanics before repeating calibration. Then follow the manufacturer’s procedure for creating the mesh and setting the offset. Avoid mixing instructions for different printer models or firmware versions. With auto bed leveling probe vs manual mesh leveling, neither approach can compensate for every underlying fault.
If diagnosis involves wiring, firmware changes or mechanical repairs beyond your comfort level, pause rather than risk damaging the printer. Repeated checks that don’t improve the first layer are also a reason to seek qualified technical help. Not every levelling issue requires repair, but persistent symptoms may need a closer assessment.
Explore 3D Printing Canada’s Expert 3D Printer Repair Services in Canada and educational resources if you need help deciding on a next step. A clear description of the symptoms and the checks you’ve already completed can help guide the discussion.
Choose a Reliable First-Layer Workflow
The right answer to the auto bed leveling probe vs manual mesh leveling question depends on your printer, firmware and preferred level of hands-on control. A probe automates bed measurements; manual mesh levelling gives you a more active role in checking points. Both rely on sound printer mechanics, a correctly set Z-offset and an active mesh. Neither can fix a loose component or damaged build surface.
If the first layer still looks uneven, check the build surface, nozzle and material settings before repeating calibration. Follow your printer maker’s instructions, and revisit the mesh and Z-offset after relevant hardware or surface changes. A methodical troubleshooting process can help you find the cause without changing several settings at once.
For hobbyist and professional users across Canada, 3D Printing Canada offers 3D printing products and support, along with professional printer repair services provided by experienced technicians. Explore 3D printing products and support to find resources or get help deciding on a next step.
Choose a workflow you can set up and maintain with confidence. If you need support with printer troubleshooting, contact 3D Printing Canada about products and repair services.
Frequently Asked Questions
Is auto bed leveling better than manual mesh leveling?
Neither method is automatically better; the right choice depends on your printer’s support and the workflow you can set up reliably. In the auto bed leveling probe vs manual mesh leveling comparison, a probe automates measuring bed points, while manual mesh levelling involves more hands-on checks. Both rely on sound mechanics, correct firmware settings and a suitable Z-offset. Check your printer’s documentation before choosing or installing hardware.
Does an auto bed leveling probe fix a warped bed?
No. A probe measures bed-height differences, and firmware can use those readings to compensate for small variations during printing. It doesn’t physically flatten the bed or correct severe warping. If the bed is significantly warped or tilted, address the mechanical issue as far as the printer’s design allows before relying on a mesh. Compensation works best when the bed is stable and within the printer’s adjustment range.
Can you use manual mesh leveling without a probe?
Yes, if your printer’s firmware supports a manual mesh procedure. The printer may guide you to points across the bed, where you check the nozzle-to-surface gap and record or adjust readings through its interface. Paper is commonly used as a reference, but follow the method specified for your printer. Manual mesh levelling doesn’t require a probe, though it does require careful, consistent user input.
What is the difference between bed leveling and bed mesh leveling?
Bed levelling is a broad term that can refer to aligning the bed with the printer’s motion system or compensating for surface variation. Bed tramming is the mechanical adjustment that aligns the bed’s angle. Bed mesh levelling maps height differences across multiple points so firmware can adjust nozzle movement while printing. A mesh compensates for variation; it doesn’t physically align or repair the bed.
Do you still need to set Z-offset with an auto bed leveling probe?
Usually, yes. Z-offset sets the nozzle’s starting height relative to the bed or the probe’s trigger point, while the mesh describes how bed height varies across the surface. A probe can measure points accurately and still produce a poor first layer if the offset is wrong. Follow your printer’s calibration instructions, and check the offset again after relevant changes to the nozzle, probe or build surface.
Why is my first layer uneven after auto bed leveling?
An uneven first layer can have causes beyond the mesh. Check that the mesh is active, review the Z-offset, and inspect the bed and gantry for movement. Clean the build surface as recommended, check the nozzle for buildup or wear, and verify the material’s first-layer settings. Gaps, rough areas or poor adhesion are clues, not definitive diagnoses. Avoid repeating calibration until you’ve checked for mechanical looseness or a changed surface.
How often should I create a new bed mesh?
There isn’t one schedule that suits every printer. Create or refresh the mesh when your printer’s instructions call for it, or after a relevant change such as moving or adjusting the bed, replacing the build surface, or changing bed-related hardware. If results change unexpectedly, check bed stability and confirm the correct mesh is loaded before recalibrating. Repeating measurements without a change or symptom may not solve an underlying mechanical issue.