
A water-resistant filament can still produce a leaky print. Finding the best filament for watertight prints is only part of the job: tiny gaps between layers can let water through even when the material itself resists moisture. To choose well, consider both the material and how you’ll print, inspect and test the part.
The right choice depends on what the part will face and what your printer can handle. PETG is a common option to investigate for water resistance, ASA may suit outdoor exposure, and PP or PC may fit more demanding applications if your setup supports them. No FDM material or setting guarantees a watertight result straight off the printer, so plan to test the finished part before relying on it.
This guide compares materials for different uses and printer capabilities, then covers design choices, slicer settings and post-processing that can reduce leak paths. You’ll also find practical ways to test a print and identify problems before putting it into service.
Key Takeaways
- Choose a material for the part’s exposure, temperature and flexibility needs, as well as your printer’s capabilities. No single option suits every job.
- The best filament for watertight prints can still leak if layer gaps, inconsistent extrusion, thin walls or seams create paths for water.
- Use a step-by-step workflow: define the conditions, check the model, follow manufacturer guidance when tuning settings, then print and inspect a test part.
- Test the finished print under the conditions it will face before relying on it. Consider post-processing if the application needs a more dependable seal.
- Before purchasing filament, confirm its availability and compatibility with your printer.
What makes a 3D print watertight, and why filament is only part of the answer
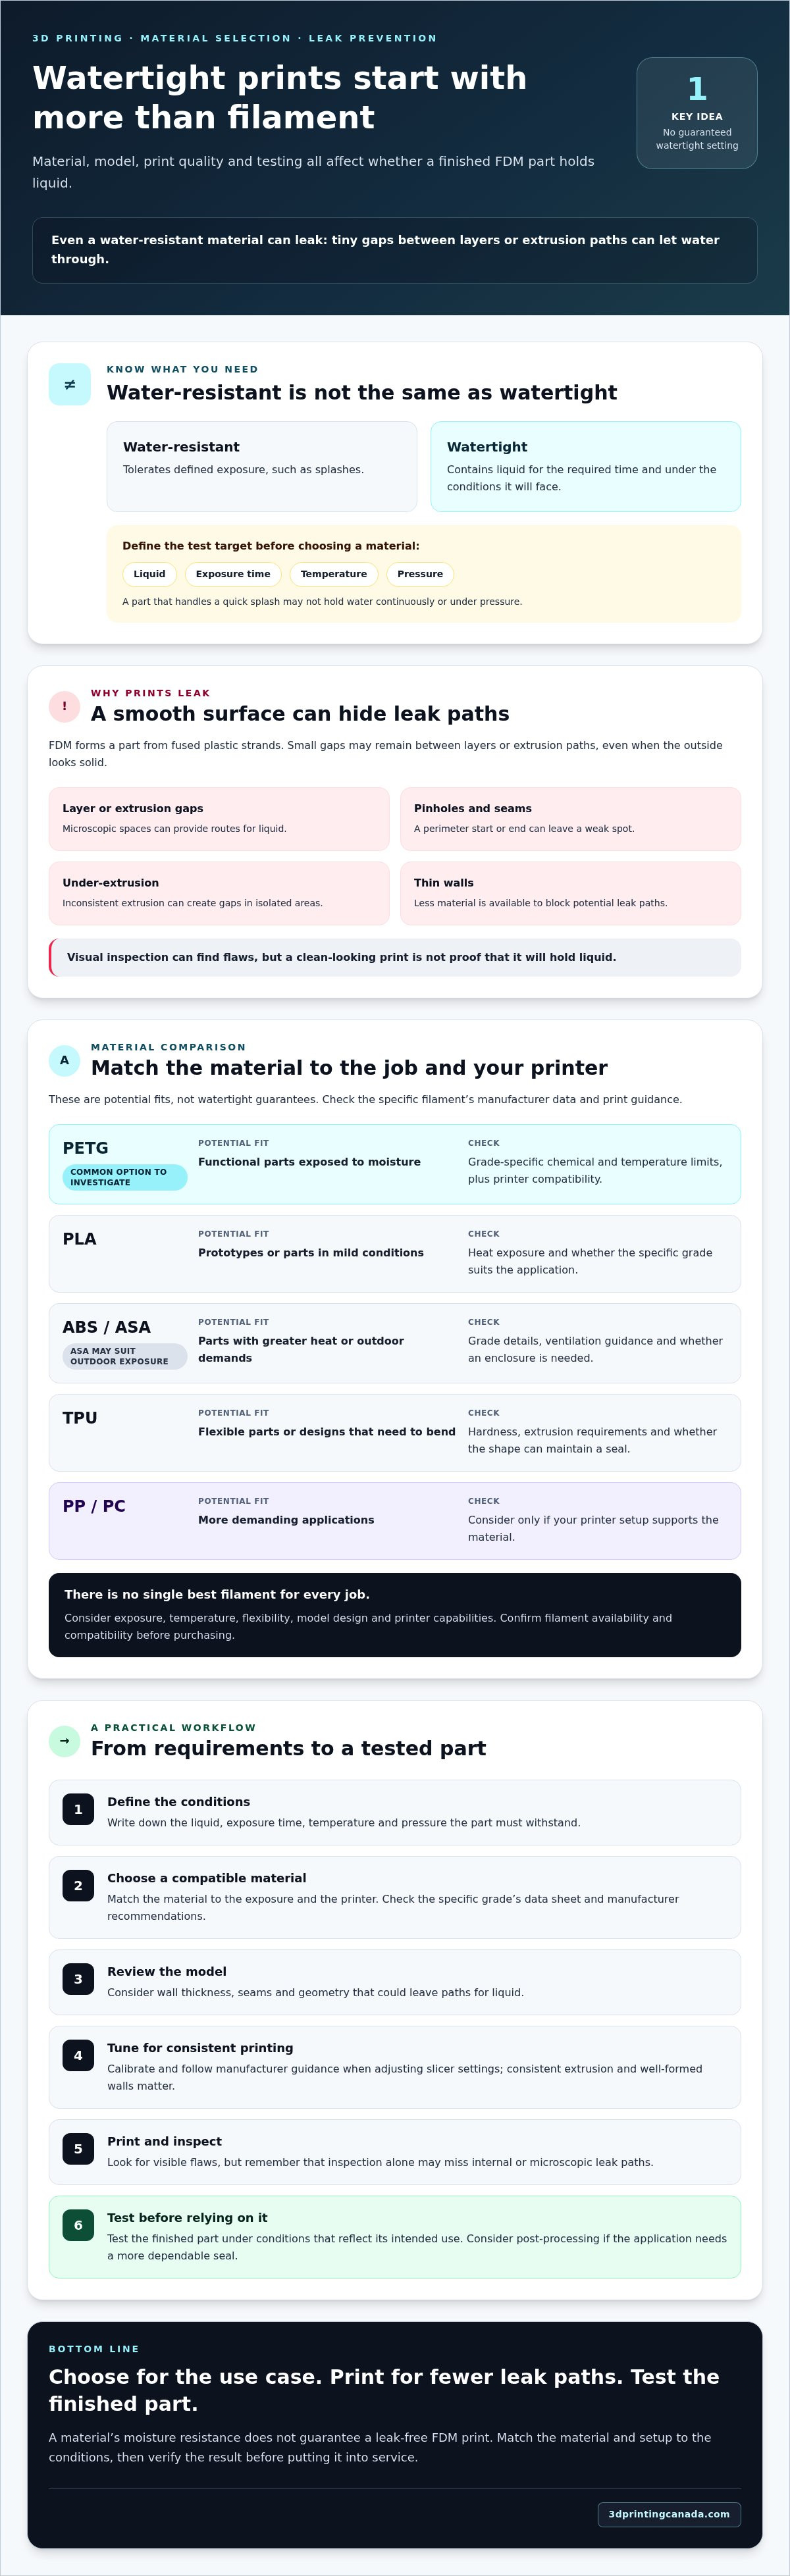
A 3D printed part is watertight in practical terms if it contains a specific liquid for the required time, at the temperature and pressure it will encounter, without leaking. That’s different from being water-resistant: a part may handle splashes yet seep when filled or held under pressure. No single FDM material or setting promises leak-free performance in every situation. The result depends on the part’s design, material, printer calibration, slicer settings and test conditions.
Start by defining the actual job. A cover exposed to occasional splashes has different demands from a container that stays full for hours or a component that holds liquid under pressure. Note the liquid, exposure time, temperature and pressure the part must withstand. These conditions give you a practical target for choosing and testing a print, rather than treating “watertight” as an all-purpose rating.
What does watertight mean for a 3D printed part?
Water-resistant means a print can tolerate defined exposure; watertight means it contains liquid under defined conditions. The distinction matters because a part that resists a quick splash may not hold water continuously. Pressure can also make small defects more likely to leak. Set a clear test condition that reflects the intended use, including the liquid, temperature, duration and pressure. Assess the finished part against that condition, not against an assumption that one material or setting works for every application.
Why can a solid-looking print still leak?
FDM builds a part by laying down fused strands of plastic. The outer surface can look smooth while microscopic gaps remain between layers or extrusion paths. Layer lines, pinholes, a weak seam where a perimeter starts or ends, and under-extrusion can all create routes for liquid. Thin walls leave less material to block those routes, while inconsistent extrusion can create gaps in isolated areas even when the rest of the print looks sound.
That’s why the best filament for watertight prints isn’t enough on its own. The material must suit the part’s geometry and the printer’s ability to extrude it consistently. Calibration and slicer settings affect how well the strands bond and how completely the walls form. Inspect the print for visible flaws, but don’t treat a clean appearance as proof: visual checks can miss internal or microscopic leak paths. Test the finished part under conditions that match its intended use before relying on it.
Best filament for watertight prints: compare common material options
The best filament for watertight prints depends on the part’s job, not just how well a plastic resists moisture. A material’s properties describe the polymer; they don’t guarantee that an FDM part will seal. Print quality, wall design, exposure conditions and printer capability all matter. Use this comparison to narrow your options, then check the manufacturer’s current data sheet for the specific filament grade and recommended print conditions.
| Material | Potential fit | What to check |
|---|---|---|
| PETG | Functional parts exposed to moisture | Grade-specific chemical and temperature limits, plus printer compatibility |
| PLA | Prototypes or parts in mild conditions | Heat exposure and whether the application suits the specific grade |
| ABS or ASA | Parts with greater heat or outdoor demands | Grade details, ventilation guidance, and whether an enclosure is needed |
| TPU | Flexible parts or designs that need to bend | Hardness, extrusion requirements, and whether the shape can maintain a seal |
When might PETG or PLA be a practical starting point?
PETG is a common material to investigate for functional parts that may encounter water. It can be a practical starting point, but the result still depends on the exact filament, model and print quality. Don’t assume that a spool labelled PETG suits every liquid or use. Check the manufacturer’s specifications and confirm that your printer supports the material.
PLA is often straightforward to print, which can make it useful for prototypes or applications with modest demands. Heat can affect whether a PLA part remains suitable in service, so consider where it will be used and how warm it may get. Neither material should be treated as universally waterproof or appropriate for every kind of liquid contact.
When should you consider ABS, ASA, or TPU?
ABS or ASA may be worth considering if the part needs to handle more heat or outdoor exposure. ASA is commonly selected for outdoor applications, but check the specific grade’s weather and temperature data. ABS and ASA can have different printer requirements from easier-to-print materials. Confirm that your setup, including any enclosure needs, matches the filament maker’s guidance.
TPU’s flexibility can suit a part that needs to bend, but flexible material won’t automatically seal gaps or joints. Consider how the part’s shape, stiffness and fit affect its function. Match those needs with your printer’s ability to feed and print flexible filament reliably.
Compare the manufacturer’s data for the actual filament you plan to use, and confirm printer compatibility before purchasing. Explore 3D printing filament options as you narrow your material choice.
Will changing filament stop leaks? Understand the limits and common misconceptions
Not necessarily. A different filament may offer properties that better suit your application, but it won’t automatically close gaps caused by under-extrusion, poor layer bonding or a weak seam. Before switching materials, look for where the leak begins and check the print for defects. The best filament for watertight prints still needs consistent extrusion and a design that can form continuous walls.
Leak resistance depends on material choice, part geometry, nozzle condition, extrusion consistency, wall thickness, seams and slicer settings working together. Treat a leak as a clue to investigate, not a reason to change every setting at once. Adjust one factor, reprint and compare the result so you can identify what helped.
Which print defects commonly create leak paths?
Start with the print. Under-extrusion can leave gaps between deposited lines, while weak layer bonding can create paths through the walls. Check for inconsistent first-layer adhesion too: if the base isn’t formed evenly, liquid may escape at the bottom edge or through a poor join. Inspect the nozzle for a clog or wear that could disrupt extrusion.
Look closely at seams, sharp corners and thin walls. A seam concentrates the start and stop points of a perimeter; corners and narrow sections can expose weaknesses if the toolpath doesn’t form continuous walls. Use the slicer preview and the finished part to locate suspect areas. Then test a targeted change rather than raising temperature or flow across the board. Excessive adjustments can cause other defects, including stringing, blobs or dimensional changes, and may obscure the original cause.
What can filament labels and claims actually tell you?
A filament label and manufacturer’s technical data sheet can help you compare stated properties, recommended print conditions and limitations for a particular grade. Check those details against your intended liquid, temperature and environment. Material-level water resistance describes the plastic, not the quality or sealing performance of your finished FDM part.
Keep special applications separate. Food contact, potable-water use and pressure-bearing parts each raise their own safety and performance questions. Don’t infer suitability from a generic claim that a filament resists water. Verify whether the specific material and finished part are appropriate for the intended use, and test the print under relevant conditions before relying on it.
How to print and test a part for better water resistance
A repeatable process makes leak troubleshooting easier. Define the part’s intended conditions first, then choose a compatible material, inspect the model, check the printer, print and test. Keep a note of the filament and settings used so you can compare results. The best filament for watertight prints won’t compensate for a poor model or inconsistent extrusion, so treat material choice and print quality as one system.
Before printing, confirm the use conditions, material and printer compatibility, model walls and seams, nozzle condition, and manufacturer guidance. Then test the finished part in a controlled setup that matches its intended use.
Which slicer and design adjustments should you test first?
Begin with the basics: check extrusion calibration, inspect the nozzle, and look for signs of inconsistent flow or weak layer bonding. Review the model for thin areas, abrupt corners and seams in places where a leak would matter. Where the design allows, use consistent wall thickness and reduce unnecessary seams. Additional perimeters can build more continuous walls, but neither more walls nor thicker walls guarantees a seal.
Follow your printer and filament manufacturer’s guidance before changing nozzle temperature or flow. A small temperature increase or flow adjustment may help address poor bonding or gaps, but excessive heat or material can create stringing, blobs and dimensional problems. Make one change at a time, then record the setting and result. This makes it easier to tell which adjustment helped.
How can you test a printed part safely?
Match the test to the intended liquid, exposure time and pressure. For a simple container, place it on a dry tray or absorbent surface, fill it carefully, and check for seepage around the base, walls and seams. Start with a low-risk test and increase exposure only as appropriate. Don’t improvise a pressurized test. Use an appropriate, controlled setup, and stop if the print deforms, cracks or shows other damage.
Repeat the test if the part is meant to perform reliably over time, and note any changes between trials. A single successful test only supports performance under the conditions tested. It doesn’t establish suitability for different liquids, higher pressure or longer use. Don’t rely on an unvalidated FDM print for safety-critical containment.
Ready to compare materials for your next test print? Explore 3D printing filaments, and confirm current specifications and printer compatibility before purchasing.
Choose filament for your use case and plan your next print
There isn’t one universally best filament for watertight prints. Start with the part’s job, then balance its exposure, temperature, flexibility, geometry and your printer’s capabilities. A material that suits a flexible part may be the wrong fit for a rigid container, and a filament that your printer can’t process consistently is unlikely to solve leak problems.
Which questions should you answer before selecting a spool?
Before choosing a material, write down what the part will contain, how long it needs to hold liquid, and the temperature and pressure it may face. Then check the filament manufacturer’s specifications alongside your printer documentation. Confirm the machine supports the material and whether it requires an enclosure or other hardware your setup doesn’t have.
Decide which property matters most: flexibility, heat tolerance, ease of printing or another requirement. Check that the part’s geometry supports its job, too. Once you’ve narrowed your options, verify the current specifications and availability for the specific filament before ordering. A material name alone doesn’t tell you whether a particular grade suits your application.
What should you do if prints still leak?
Go back to the test. Confirm it reflects the intended liquid, exposure time and pressure, then inspect the print for seepage, weak seams, thin areas or visible extrusion problems. Use what you find to identify a likely cause before reprinting. Change one setting or design feature at a time, and keep notes so you can compare results instead of making several untracked adjustments.
If the problem persists, consult the printer and filament documentation. A recurring extrusion issue may point to a hardware problem; professional 3D printer repair services may be an option if the printer needs attention. For a part whose failure could create a safety risk, don’t rely on repeated trial prints as proof of suitability. Investigate a fabrication method and component designed and validated for the application.
Ready to compare materials for your next project? Explore the filament range, then confirm the specific filament’s availability and compatibility with your printer before purchasing.
Plan your next print with confidence
The best filament for watertight prints depends on what your part must contain, its exposure and temperature, the required flexibility, and what your printer can handle. PETG, PLA, ABS, ASA or TPU may suit different jobs, but no material alone guarantees a leak-free FDM print.
Design and print quality matter just as much. Check the model for thin walls and vulnerable seams, follow manufacturer guidance when tuning, and test the finished part under conditions that reflect its intended use. Confirm the specific filament’s specifications and compatibility before ordering. If leaks persist, inspect the print and printer rather than making several changes at once. Technical printer repair services may be useful if you suspect a hardware issue.
Ready to compare materials for your project? Explore 3D printing filaments from 3D Printing Canada, which sells a variety of filament options. Check current availability and specifications as you narrow your choice. Start with a small test print, learn from the result, and build toward a part that meets your needs.
Frequently Asked Questions
What is the best filament for watertight 3D prints?
The best filament for watertight prints depends on the part’s environment and your printer. PETG is a common starting point for functional parts exposed to moisture; ASA may suit outdoor use, while TPU can fit flexible designs. None guarantees a leak-free result. Check the specific filament’s technical data and printer requirements, then consider the part’s geometry, temperature exposure and how long it must contain liquid.
Is PETG waterproof when 3D printed?
PETG can be a practical choice for water-resistant parts, but a printed PETG object isn’t automatically waterproof. FDM layers can leave small gaps, and seams, thin walls or inconsistent extrusion may allow leaks. Check the manufacturer’s specifications for the particular PETG grade and its intended conditions. Then print a test part and assess it with the liquid, exposure time and pressure relevant to your use.
Can PLA hold water without leaking?
PLA may hold water if the part is designed and printed well, but it can still leak through gaps between layers or around seams. Heat exposure can also affect whether a particular PLA part suits its intended setting. Review the filament maker’s specifications, especially for temperature limitations, and test the finished print before relying on it. Don’t assume that a smooth surface means the walls are sealed.
How do I make an FDM print watertight?
Start by defining what the part must contain and under which conditions. Check the model for thin walls and vulnerable seams, confirm the nozzle and extrusion are consistent, and follow printer and filament manufacturer guidance when adjusting settings. Additional perimeters and suitable wall thickness may help reduce leak paths, but they aren’t a guarantee. Test the finished part under controlled conditions that reflect its intended use.
Does adding more walls make a 3D print watertight?
More walls can provide additional material and reduce the chance that a gap passes through a thin section, but they don’t guarantee a seal. A print may still leak because of poor layer bonding, under-extrusion, a weak seam or defects in the base. Check wall consistency and extrusion first. If you change the perimeter count, test the result under the part’s intended conditions.
Can a 3D printed part safely hold drinking water?
Don’t assume an FDM print is suitable for drinking water based only on the filament material. Check the specific filament’s manufacturer information and verify whether the material and finished part are appropriate for potable-water contact. Print quality, surface condition, cleaning and the complete design also matter. If the part is for drinking water or another safety-sensitive use, choose a solution with suitability verified for that application.
Should I use a coating to seal a 3D print?
A coating, such as an epoxy resin or clear acrylic product, may help seal a printed surface, but it needs to be suitable for the part’s material and intended conditions. Follow the coating manufacturer’s preparation and application instructions, and allow it to cure as directed. A coating doesn’t automatically make a part safe for drinking water, pressure use or every liquid. Test the coated part before relying on it.