
What if changing slicer flow is masking an extruder problem instead of fixing it? If you’re unsure whether your printer is feeding the commanded length of filament, it’s easy to second-guess every setting. This e-steps extruder calibration step by step guide starts with measuring actual filament movement, so you can check the machine before adjusting print profiles.
You’ll learn how to mark and measure filament, calculate a corrected E-steps value, and verify the change with a controlled extrusion test. You’ll also see when calibration makes sense and when it doesn’t: E-steps are a machine-specific setting, while flow rate is adjusted for a particular filament in your slicer. Firmware commands and menus vary between printers, so check the manufacturer’s documentation before making changes. This repeatable process helps keep those settings separate and prevents you from troubleshooting the wrong thing.
Key Takeaways
- Learn what E-steps control and which extrusion symptoms may make a calibration check worthwhile.
- Follow e-steps extruder calibration step by step with a measured filament mark and a controlled extrusion command.
- Know when to adjust the printer’s E-steps and when a filament-specific flow setting is the better place to start.
- Repeat the same measurement after an adjustment to check whether commanded and actual filament movement agree.
- Document the verified setting, then run a consistent test before making further print-profile changes.
What E-steps Extruder Calibration Measures and When to Do It
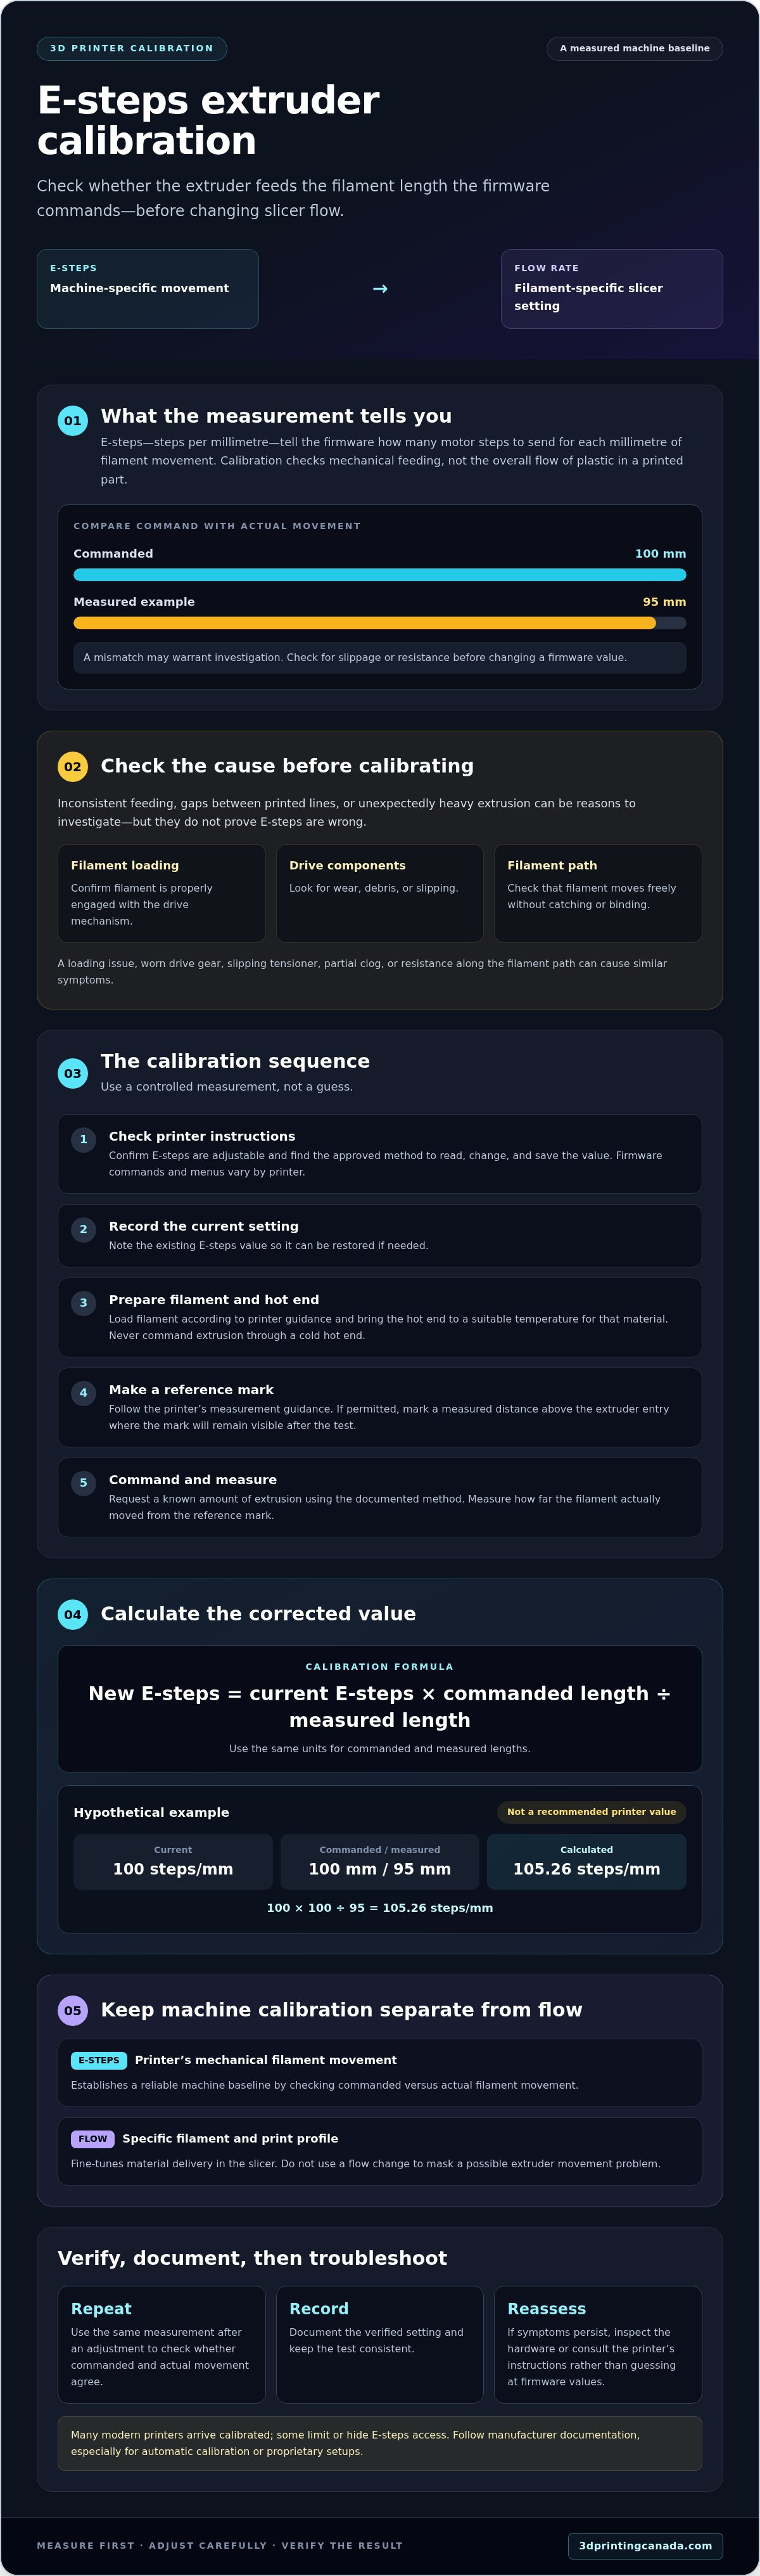
E-steps calibration measures whether the extruder motor feeds the length of filament that the firmware commands. It checks the accuracy of the printer’s mechanical filament movement, not the overall flow of plastic in a printed part. That distinction matters: correct E-steps establish a reliable machine baseline, while flow adjustments fine-tune material delivery for a specific filament and print profile.
Inconsistent feeding, gaps between printed lines, or unexpectedly heavy extrusion can be reasons to investigate. They aren’t proof that E-steps are wrong. A loading issue, worn drive gear, slipping tensioner, partial clog, or resistance along the filament path can produce similar signs. Check for these issues before changing a firmware value.
What does an E-steps value control?
E-steps, or steps per millimetre, tell the firmware how many motor steps to send for each millimetre of filament movement. The extruder stepper motor responds to those commands, driving filament through the printer’s 3D printer extruder. For example, if the printer is commanded to feed 100 mm but measurement shows only 95 mm, the commanded and actual movement don’t match. That result may warrant investigation, but first rule out slippage or resistance.
Think of the value as a movement instruction, not a direct setting for how thick or wide printed lines should be. Menu names and adjustment methods depend on the printer and its firmware. Don’t assume a command or menu path from another machine applies to yours.
When should you calibrate, and when should you not?
Many modern printers arrive calibrated, and some limit or hide access to E-steps. Follow the manufacturer’s documentation before making changes, especially if the printer handles calibration automatically or uses a proprietary setup. The e-steps extruder calibration step by step process is most useful when there’s a clear reason to check commanded movement, such as a hardware change or persistent feeding concerns after basic checks.
- Check filament loading: Confirm the filament is properly engaged with the drive mechanism.
- Inspect drive components: Look for wear, debris, or slipping that could prevent consistent feeding.
- Check the filament path: Make sure the filament can move freely and isn’t catching or binding.
If feeding remains inconsistent after these checks, consult your printer’s instructions to see whether E-steps are user-adjustable. If the setting is inaccessible or symptoms persist, avoid guessing at firmware values. A hardware fault may need closer inspection.
How to Calibrate E-Steps Extruder Step by Step
Use a controlled measurement, not a guess. This e-steps extruder calibration step by step method compares the filament movement you command with the movement you measure, then uses the difference to calculate a corrected value. Printer menus, command syntax, and saving procedures vary, so check your manufacturer’s firmware documentation before starting. For additional background on differences between extruder setups, see the MatterHackers extruder calibration tutorial.
Prepare the printer and measure filament movement
- Check the instructions. Confirm that E-steps are adjustable on your printer and find the approved way to read, change, and save the value. Don’t assume instructions for another model apply.
- Record the current value. Note the existing E-steps setting so you can restore it if needed.
- Prepare the filament and hot end. Load filament according to the printer’s guidance and bring the hot end to a suitable temperature for that material. Never command extrusion through a cold hot end, as resistance can affect the result and may risk damage.
- Make a reference mark. Follow the printer’s measurement guidance. If it permits, mark the filament a measured distance above the extruder entry, far enough away to remain visible after the test.
- Command a controlled length. Use the printer’s documented method to request a known amount of extrusion. Measure how far the filament actually moved from your reference mark, rather than relying on the commanded amount alone.
Calculate, enter, and save the corrected value
Calibration instruction: Measure the actual filament movement after a controlled extrusion, then calculate the new setting as new E-steps = current E-steps × commanded length ÷ measured length. Use the same units for the commanded and measured lengths.
Hypothetical example: Suppose the current value is 100 steps/mm, the printer is commanded to feed 100 mm, and your measurement shows 95 mm of actual movement. The calculation is 100 × 100 ÷ 95 = 105.26 steps/mm. This is an example only, not a recommended value for your printer.
Enter the calculated value only through the method supported by your firmware, then save it as the manufacturer directs. Some setups use a menu; others require a firmware-specific command or configuration change. There’s no universal command that’s safe to assume will work on every printer. Record the new setting and repeat the same controlled measurement to check the result.
If your checks point to a persistent hardware issue rather than a setting mismatch, consider having the printer assessed through 3D printer repair services.
E-Steps vs. Flow Rate: Which Setting Should You Change?
E-steps correct commanded filament movement at the printer; flow rate adjusts material delivery in the slicer’s print settings. Use E-steps to address a measured mismatch between commanded and actual filament movement. Consider flow only after the printer feeds filament consistently and you’re tuning a particular material or print profile.
| Setting | Where it acts | Suitable reason to adjust | Prerequisite |
|---|---|---|---|
| E-steps | Printer firmware and extruder movement | A controlled measurement shows the extruder consistently moves a different length than commanded | Check printer documentation and rule out feed or hardware problems |
| Flow rate | Slicer print settings | Fine-tuning material delivery for a particular filament or print profile | Confirm the extruder feeds consistently and review the filament and material profile |
What E-steps calibration can, and cannot, correct
E-steps calibration evaluates extruder movement through a measured test. A print that looks under-extruded or over-extruded isn’t enough on its own to diagnose an E-steps problem. Similar results can come from other settings, a feed issue, or a restriction in the filament path. Calibration can correct a confirmed mismatch in commanded movement, but it won’t fix every extrusion-quality problem.
When should you adjust slicer flow instead?
If filament movement is consistent but a particular material or profile still needs adjustment, review the slicer’s flow setting. Filament diameter, the selected material profile, and print conditions can all affect how much plastic reaches the print. Avoid using flow to compensate for an unverified machine setting.
Keep the diagnosis clear: don’t change E-steps and flow at the same time. If both move, you won’t know which adjustment affected the result. Follow the measurement approach in the e-steps extruder calibration step by step process first when you suspect a movement mismatch. Then test the print, change one variable at a time, and record each setting and result before making another adjustment.
How to Verify E-Steps Calibration and Troubleshoot Results
After changing the value, repeat the same controlled measurement you used before. Keep the filament, hot-end temperature, commanded length, and marking method consistent. Compare the amount commanded with the actual filament movement. The goal is repeatable movement, not a perfect-looking print judged by eye alone.
Before returning to regular printing, run a short, consistent extrusion test using your printer’s documented procedure. If movement matches more closely and remains steady, note the result. Don’t keep changing the value to chase small differences if the measurement itself may be inconsistent.
Keep a simple record of the original and updated E-steps values, commanded and measured lengths, firmware version, and test conditions. This makes it easier to compare results later, restore a previous setting if needed, and tell whether a change actually helped.
What if measured filament movement is still inconsistent?
Check the test before assuming there’s a firmware problem. Make sure the reference mark is clear, the ruler or measuring tool is aligned, and you’re comparing the same points each time. Confirm the filament is gripped securely, then inspect for a slipping drive gear, an obstruction, or excess resistance along the filament path.
If the result still varies, pause repeated adjustments. Consult the manufacturer’s guidance for your printer and firmware before investigating electrical or firmware faults. A change in symptoms doesn’t identify a failed component on its own.
When is professional repair the sensible next step?
Stop testing if filament movement remains erratic after you’ve checked the measurement method and visible feed issues, or if the printer behaves abnormally during extrusion. Record what you observed and the settings you changed. That information can help guide further assessment without guessing at the cause.
If careful checks suggest a persistent hardware problem, you can explore professional 3D printer repair services. A technician can assess the printer rather than relying on repeated value changes. Use the same disciplined approach in your e-steps extruder calibration step by step process: verify the measurement, document the result, and troubleshoot only what the evidence supports.
What to Do After E-Steps Extruder Calibration
Calibration isn’t the finish line. Use the result to establish a dependable baseline, then return to printing only after you’ve confirmed that filament movement is consistent. Keep firmware-specific changes aligned with your printer’s documentation, and avoid carrying over commands or settings from another model.
Follow a simple sequence: verify, document, test, then tune if needed. Repeat the controlled measurement and record the final E-steps value, firmware information, filament used, and test conditions. If movement is reliable but a print still needs refinement, review its material and slicer settings separately. This keeps machine calibration distinct from profile tuning.
Use a controlled test before changing print profiles
For a useful comparison, use the same filament and repeat the test under the same conditions you used before the adjustment. Check feeding consistency first, then assess print appearance separately. If you change a profile setting, adjust only one variable and record the result. That way, you can tell whether the change helped instead of guessing which adjustment made the difference.
After a consistent extrusion test, resume normal printing and watch for recurring symptoms. Don’t change flow just because the first print looks different; consider the material, profile, and print conditions before making a slicer adjustment.
Get help if the extruder still won’t feed consistently
If feeding remains erratic, or the printer behaves abnormally, stop making repeated E-steps changes. Revisit the printer documentation and consider having a technician assess the machine. Persistent symptoms can have more than one cause, so don’t assume a particular component has failed without an inspection.
3D Printing Canada offers professional 3D printer repair services for issues that persist after careful checks. You can also visit 3D Printing Canada’s homepage to explore its offerings. Keep your measurement notes and test conditions handy if you seek further help.
Put Your Calibration to Work
A dependable extrusion baseline starts with a measurement, not a guess. The e-steps extruder calibration step by step process helps you compare commanded and actual filament movement, then verify any firmware adjustment with the same controlled test. Keep E-steps and slicer flow separate, and change one setting at a time so you can understand what affects the result.
Once feeding is consistent, return to printing and tune material or profile settings only if the test shows they need attention. If the extruder still behaves erratically after careful checks, consult your printer’s documentation or seek professional help rather than continuing to change values blindly. 3D Printing Canada supplies 3D printers, scanners, accessories, and filament to customers across Canada, and offers professional repair services for hardware issues.
Explore 3D Printing Canada’s 3D printing products and repair support to find equipment, materials, or help with a persistent printer issue.
Frequently Asked Questions
What are E-steps on a 3D printer?
E-steps describe how much the firmware commands the extruder motor to move for a given filament distance. The value translates an extrusion command into motor movement, but it doesn’t correct every print-quality issue. Before changing it, check your printer’s firmware and manufacturer guidance. Some models use different calibration methods or don’t expose E-steps as an adjustable setting, so generic instructions may not apply.
How do I calculate the correct E-steps value?
Record the current E-steps value, command a known extrusion distance, then measure how far the filament actually moved. Calculate the new setting with this formula: new E-steps = current E-steps × commanded distance ÷ measured distance. Keep the distance units consistent and measure carefully. Follow your firmware documentation to enter and save the result, then repeat the same controlled test to verify it.
Should I calibrate E-steps with the nozzle hot?
Don’t command filament extrusion through a cold hot end. Heat the printer to a suitable temperature according to the manufacturer’s instructions before testing. The exact preparation can differ by printer and extruder design, so follow the model-specific procedure. If the filament doesn’t move smoothly, stop and inspect the loading and filament path first. Repeatedly changing E-steps won’t resolve a physical obstruction or inconsistent feed.
What is the difference between E-steps and flow rate?
E-steps calibration checks the relationship between an extrusion command and the extruder’s movement. Flow rate, sometimes called extrusion multiplier, adjusts material delivery in the slicer’s print profile. Confirm that the printer feeds filament consistently before tuning flow for a material or print. Change only one setting at a time and record the outcome, so you can identify which adjustment affected the result instead of masking a movement issue.
Do I need to calibrate E-steps on every 3D printer?
No. Many printers are calibrated by their manufacturer, and some printer designs or firmware don’t let users adjust E-steps in the same way. Check the printer documentation before starting. Calibration is most useful when a controlled measurement indicates that commanded filament movement is inaccurate and basic feed-path problems have been ruled out. Don’t change a setting simply because a print looks imperfect; other causes can produce similar symptoms.
Can I calibrate E-steps on a Bambu Lab printer?
Calibration options depend on the specific Bambu Lab model and its firmware. Don’t assume generic Marlin commands or procedures apply. Consult the manufacturer’s current documentation and supported maintenance instructions for your printer before attempting an adjustment. If extrusion remains inconsistent after those checks, avoid forcing an unsupported firmware change. Record what you observe and seek model-appropriate technical guidance rather than risking a setting change that the printer doesn’t support.
What should I check if E-steps calibration doesn’t fix under-extrusion?
First, recheck your measurement and confirm the filament feeds consistently. Look for a loading problem, a slipping extruder drive, an obstruction, or resistance along the filament path. Under-extrusion can have several causes, so E-steps calibration isn’t a universal fix. If the issue continues or the printer behaves abnormally, stop repeated adjustments and consult the manufacturer or a qualified technician. 3D Printing Canada offers professional 3D printer repair services for hardware issues.