
A stable, heavy table or bench paired with vibration-dampening feet can help reduce the motion behind 3D printer ghosting and ringing. For ghosting and ringing, vibration-dampening feet help limit how much printer motion reaches its support, but they won’t correct every cause of surface rippling. If repeated echoes appear around edges and details, start by steadying the printer, then examine its motion settings and mechanical setup.
Those ripples can be frustrating, especially when the rest of the model looks right. Slowing the printer may help, but the supporting surface matters too: a flexible or vibrating base can add movement. To reduce ghosting and ringing with vibration-dampening feet, start with a stable base that supports the printer during movement.
In this guide, you’ll learn how to recognize ghosting, distinguish it from layer shifting, and reduce vibration methodically. We’ll cover stable bases and dampening feet, along with printer checks and settings that can help identify the cause without changing everything at once.
Key Takeaways
- Look for repeated ripples beside sharp edges to spot ringing, and distinguish them from sudden layer shifts.
- Start troubleshooting with a stable printer frame, secure fasteners, and properly tensioned belts.
- Place the printer on a solid, heavy surface; rubber feet or vibration-dampening pads can help absorb motion.
- Adjust speed and motion settings gradually so you can identify which changes improve the print surface.
- If mechanical issues persist, 3D printer repair services can help address hardware problems affecting print quality.
What Is 3D Printer Ringing or Ghosting?
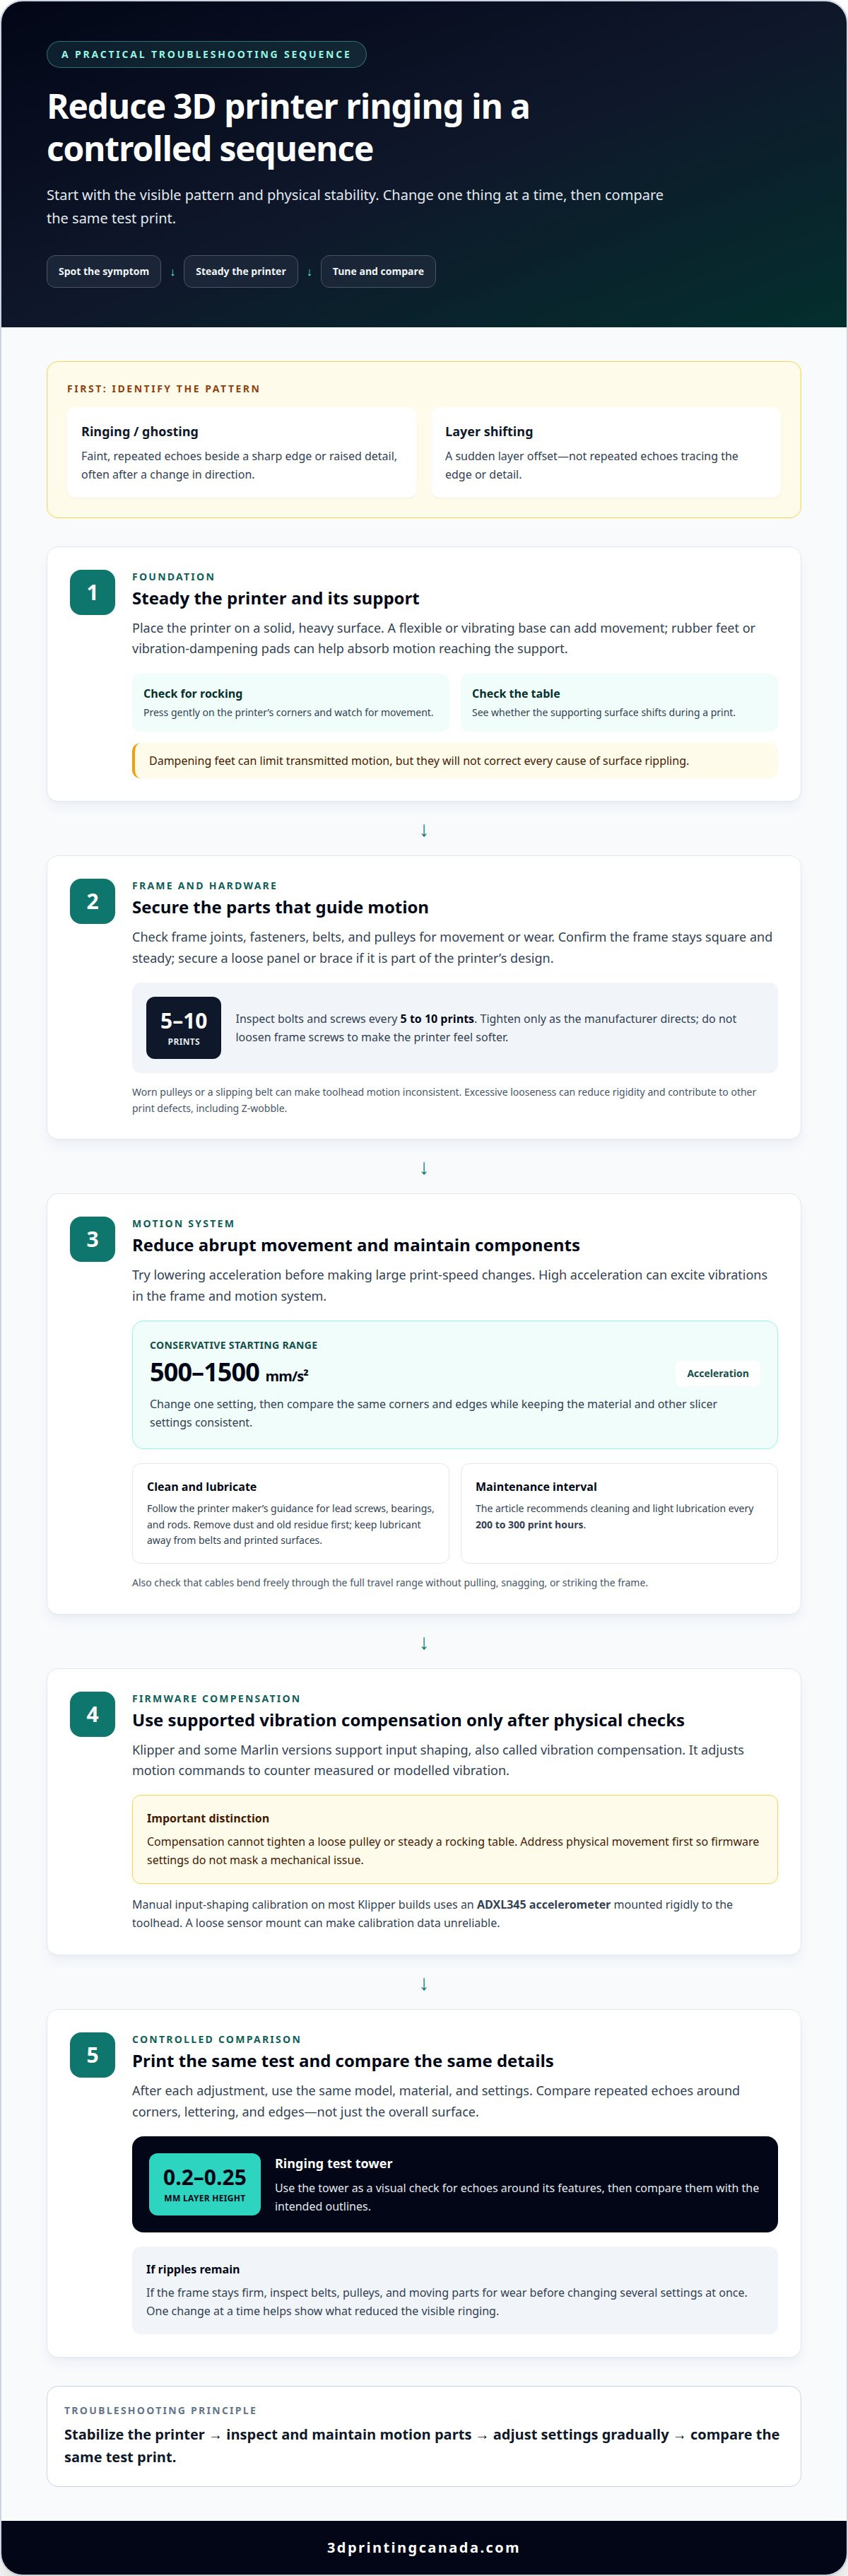
- Inspect the printer frame and its supporting surface before changing slicer settings. Ghosting appears as faint, repeated ripples beside an edge or raised feature, often after a sharp change in direction. A loose frame can flex as the toolhead moves, while a wobbly table can amplify that motion. Press gently on the printer’s corners and watch for rocking; check whether the table shifts during a print, too. A sudden layer offset is different: it suggests layer shifting, not surface ringing.
- Check the frame’s joints, fasteners, belts, and pulleys for movement or wear. Loose screws can let the frame vibrate, while worn pulleys or a slipping belt can make toolhead motion inconsistent. Inspect the printer’s bolts and screws every 5 to 10 prints, and tighten them only as the manufacturer directs. Don’t loosen frame screws to make the printer feel softer. Excessive looseness can reduce rigidity and contribute to other print defects, including Z-wobble.
- Check that the printer frame stays square and steady during movement. On a Cartesian printer, for example, a moving bed can rock if the frame or supporting surface is unstable. A stable frame gives the motion system a firm reference; a flexible frame can keep vibrating after the toolhead changes direction. If a panel or brace is loose, secure the existing component before considering an upgrade. Add bracing only if it suits the printer’s design and does not obstruct moving parts.
- Distinguish mechanical vibration from the electronic compensation supported by some firmware. Klipper and some Marlin versions support input shaping, also called vibration compensation. This feature adjusts motion commands to counter measured or modelled vibration, but it cannot tighten a loose pulley or steady a rocking table. Address physical movement first, then try the printer’s supported compensation tools if ringing remains. Changing firmware settings before checking the frame can mask a mechanical issue instead of resolving it.
- Use a controlled test print to check whether your changes improve the finish. Print the same model with the same material and settings after securing a loose joint or stabilizing the printer. Compare repeated echoes around corners and lettering, not just the overall surface. If the frame stays firm but ripples persist, inspect belts, pulleys, and moving parts for wear before changing several settings at once. Making one change at a time helps you identify what reduced the visible ringing.
Definition and appearance of 3D printer ringing or ghosting
Along with dampening feet, reduce abrupt toolhead movement, maintain motion components, secure cables, and calibrate vibration compensation if supported. These steps address different sources of motion, so adjust one at a time and compare the same test model to see what changes.
- Identify the surface pattern before changing settings. Ghosting, also called ringing, appears as faint, repeated echoes beside an edge or raised detail, such as ripples trailing a printed letter. The toolhead changes direction at that feature, and the printer’s moving parts continue vibrating briefly. These repeated marks differ from a sudden layer offset, which shifts part of the model rather than repeating its outline.
- Reduce abrupt motion by lowering acceleration before making large print-speed changes. Acceleration controls how quickly motors change speed, so high values can make the toolhead excite frame and motion-system vibrations. A conservative starting range of 500-1500 mm/s² may help reduce ringing. Print a test with one setting changed, then compare the same corners and edges. Keep the material and other slicer settings consistent during each comparison.
- Inspect moving components and follow the printer maker’s maintenance guidance. Clean and lightly lubricate lead screws, bearings, and rods every 200 to 300 print hours; regular lubrication helps avoid rough or inconsistent movement. Remove dust and old residue before applying lubricant, and keep it away from belts and printed surfaces. Binding or uneven motion can add unwanted movement, while clean travel lets the motors guide the toolhead more consistently.
- Reduce moving mass where the printer design allows, and secure cables that tug on the toolhead. A Bowden extruder can experience less ghosting than a direct extruder because it reduces carriage weight. Don’t convert the extruder setup solely to address ringing; the printer’s design and material requirements matter. Route the cable bundle so it bends freely through the full travel range without pulling, snagging, or striking the frame during a print.
- Calibrate vibration compensation using the method supported by your firmware. Manual input-shaping calibration on most Klipper builds uses an ADXL345 accelerometer mounted rigidly to the toolhead. Secure the sensor with a rigid screw mount or press-fit holder; a loose mount can make calibration data unreliable. After calibration, print the same ringing test again and compare the surface. Repeat maintenance and calibration as parts wear or motion changes.
One way to make the pattern easier to assess is to print a ringing test tower at a layer height of about 0.2-0.25 mm. Look for echoes around its printed features: ghosting describes details appearing outside their intended locations, and ringing is another name for the same effect. Treat the tower as a visual check for that misplaced echo rather than as a reason to change several settings at once. Compare the visible features with their intended outlines, then use the result to judge whether an adjustment reduced the effect. Keep the interpretation focused on repeated detail appearing beyond its intended position.
Stable tables, rubber feet, and vibration-damping pads
Choose a firm support first, then use feet or pads to help absorb motion. Compare how each setup performs during a print before changing slicer settings.
-
Compare Pads, Boards, and Rubber Feet
Place the printer on a solid, heavy table or bench, then add rubber feet or vibration-damping pads beneath its contact points. These materials can absorb some motion, while a stable support limits rocking across the whole machine. A board can provide a broader, more consistent base when the table surface is uneven. For example, an 8 mm aluminium tooling plate is one suggested stable base. Keep the printer level and ensure each foot rests fully on the surface.
Run the same short print before and after the change. Watch the table, printer frame, and model during quick direction changes. If the table still flexes, pads alone won’t make it rigid. Keep the printer away from fans, washing machines, and speakers, which can introduce extra vibration. Avoid placing it where a loose board or pad could slide during operation.
-
Compare DIY and Commercial Feet
Try a simple rubber or foam support only if it holds the printer securely and evenly. Small foam cubes can help disperse vibration, making them a straightforward way to test whether isolating the printer from its surface helps. Purpose-made anti-vibration feet are another option, but stability under your printer’s weight matters more than the label. Check that every foot stays in contact with the bench.
After either change, print the same model with settings unchanged and compare the surface. If a DIY support compresses unevenly or shifts, remove it rather than stacking more material underneath. Keep belt tension in mind, too: feet can reduce vibration reaching the table, but they won’t correct a loose or over-tight belt. Change one variable at a time so you can tell which adjustment affects the finish.
-
Assess Soft or Squishy Feet
Press each foot gently and check whether the printer rocks or tilts. Very soft supports can allow extra movement instead of controlling it, especially when the toolhead changes direction. That instability can worsen the print surface, even if the feet absorb some vibration. Look for consistent compression across all contact points, and avoid any setup that lets the nozzle move relative to the print bed.
Test one support change at a time, then inspect the same corners and edges on a comparison print. If ripples increase or the printer visibly sways, return to a firmer base. Keep slicer settings fixed during this test; changing acceleration while swapping feet makes it harder to identify what improved or harmed print quality. A stable setup helps reduce vibration without sacrificing controlled movement.
Ghosting and ringing causes
- Review acceleration and jerk settings first, since abrupt direction changes can excite mechanical resonance. Excessively high values are a main cause of ghosting, and speeds above 60-80 mm/s can create strong inertial forces on many printers. Reduce acceleration toward a conservative 500-1500 mm/s² range, then print a comparison model. Change one setting at a time so the repeated marks around corners show whether that adjustment helped.
- Check belt tension before changing other motion settings. A loose belt can let the toolhead lag, while an over-tight belt can reduce its ability to damp motion. Look for droop and aim for a belt that feels springy without stretching it. A plucked belt should sound like a low, taut bass note, not a slack thud or strained twang. Follow the printer maker’s adjustment method rather than forcing the belt tighter.
- Consider how the printer’s moving mass affects its response. A Cartesian machine moves its bed, which adds weight to the moving system; CoreXY and Delta designs are described as less prone to ghosting. Older belt-driven printers using 3 mm-pitch GT belts can also show more resonance artefacts than machines using 2 mm-pitch GT2 belts. These design differences affect susceptibility, but don’t rule out settings, belt condition, or support as causes.
- Compare the filament used for the affected print. Softer materials such as TPU can respond to vibration differently from rigid materials such as PLA, so the same motion settings may produce different surface results. Print the same geometry with each material only when both suit the model and printer. Record the material and settings, then compare repeated echoes near sharp features. A rubber foot may limit vibration reaching the table, but it won’t remove vibration created by the moving toolhead.
- Inspect the environment and mechanical assembly as a complete system. Fans, washing machines, and speakers can introduce extra vibration, while loose screws or belt components can add movement at the printer itself. Move the machine away from external vibration sources, then check its fasteners and pulleys according to the manufacturer’s guidance. If ripples remain, test a stable support and vibration-dampening feet separately from speed or acceleration changes. This makes each cause easier to isolate.
When comparing prints, keep the model and other settings consistent so the effect of motion adjustments is easier to see. In the example, the 3D print with more ghosting used an acceleration of 3,000 m/s² and a jerk setting of 30 mm/s. These settings illustrate how high acceleration and jerk can coincide with pronounced echoes; they are not a reason to change multiple controls together. Record the settings associated with each result, and use the visible marks near corners to judge whether a controlled adjustment improves the surface.
Treat belt tension as part of the diagnosis, but inspect it before changing motion settings. A loose or over-tight printer belt can contribute to ringing, and belts that are too tight can reduce dampening. If marks persist, reassess the tension rather than assuming motion values alone explain them. Make one adjustment at a time, then compare results under the same print conditions.
Solid bases and vibration-dampening feet
Vibration-dampening feet can reduce motion transmitted between a printer and its support, but they can’t correct every source of ringing. Pair them with a rigid base, then test the change with a consistent print. This is a practical starting point for reducing ghosting and ringing with vibration-dampening feet.
-
Select a Solid Base
Set the machine on a solid, heavy bench or table before adding feet. A rigid support limits flex, while dampening material helps absorb vibration passed into the surface. An 8 mm aluminium tooling plate is one suggested stable base. Check that the plate sits flat and doesn’t slide; a flexible or uneven board can let the printer rock instead of providing firm support.
-
Install and Level the Feet
Place one foot beneath each printer contact point, following the manufacturer’s installation directions. Set the printer down evenly, then check that every foot touches the base and the machine doesn’t rock when gently pressed at the corners. Keep the moving bed clear of the feet and surrounding objects throughout its travel. Recheck the bed level after installation, since changing the printer’s support can affect its position.
- Test the effect with a controlled print. Use the same model, filament, slicer profile, and firmware settings before and after installing the feet. A model with sharp corners makes repeated surface echoes easier to compare. Keep print speed and acceleration unchanged during the test; otherwise, you won’t know whether the feet or motion settings caused the difference. If ghosting and ringing remain, vibration-dampening feet are only one part of troubleshooting.
- Check stability before using the feet with a moving bed or high-speed motion. Dampening feet are suitable when they support the printer evenly and don’t interfere with bed travel, frame stability, or nearby cables. Watch the machine during a print, especially as the bed or toolhead changes direction. If the feet compress unevenly or allow rocking, they can undermine print quality. Choose a firmer support rather than compensating with slicer or firmware changes.
- Separate vibration isolation from motion compensation. Feet reduce some vibration reaching the supporting surface, while firmware features such as input shaping counter motion-related vibration electronically. Neither replaces the other: a rigid base and stable feet address support, while firmware and slicer settings address commanded movement. Compare prints after each adjustment, keeping the model and settings consistent so the cause of any change stays clear.
3D Printing Canada
3D Printing Canada can help when ghosting persists after you’ve checked the printer’s support, motion settings, and mechanical condition. If loose or worn hardware is affecting print quality, its 3D Printer Repair Services address printer hardware issues. For ongoing troubleshooting, share what the surface defect looks like and which changes you’ve already tested. That context can help narrow the problem to vibration, motion, or a mechanical fault, rather than treating every ripple with softer feet. The right next step depends on what’s causing the marks and how your printer behaves during a print. Contact 3D Printing Canada to discuss the print-quality issue and possible repair support.
Make Your Next Print a Useful Test
Use each print as feedback, not just a pass or fail. A consistent test model and a short record of adjustments can help you recognize whether a change improves your printer’s behaviour over time. That makes future troubleshooting more focused, especially when ghosting, ringing, and vibration-dampening feet are part of the same investigation. If the surface marks persist or point to a hardware issue, experienced support can help you decide what to address next. 3D Printing Canada offers 3D Printer Repair Services for printer hardware problems.
Bring the print-quality issue and the changes you’ve tried into the conversation. Contact 3D Printing Canada to discuss a practical next step. Keep testing one adjustment at a time, and you’ll build a clearer picture of what helps your printer produce the finish you want.
Frequently Asked Questions
Diagnose first: is this actually ringing?
Ringing usually appears as repeated echoes beside a sharp edge, while other surface defects have different patterns. Look closely at a corner or raised letter: evenly repeated outlines suggest vibration after a direction change. A sudden offset across later layers points to layer shifting instead. Print the same small model again without changing settings, then compare whether the marks repeat in the same places. This helps distinguish a motion-related pattern from an isolated flaw.
Can filament type affect ringing?
Yes. Softer filament such as TPU can respond to printer movement differently from rigid PLA, so an identical profile may leave different surface marks. To compare, print the same geometry with each material while keeping the printer and slicer settings unchanged. Also check whether the surface defect is a regular echo or an irregular texture. That distinction helps separate motion-related ringing from a material or extrusion issue.
What causes a ghosting image or ringing vibration in a 3D printer?
Ringing often starts when rapid toolhead movement excites vibration in the printer, especially around sharp turns. High acceleration or jerk can intensify the response; belt tension, moving mass, and external vibration can also contribute. For a practical check, print a model with sharp corners, then lower acceleration while keeping other settings fixed. If the repeated echoes change, motion settings likely contribute to the visible effect.