
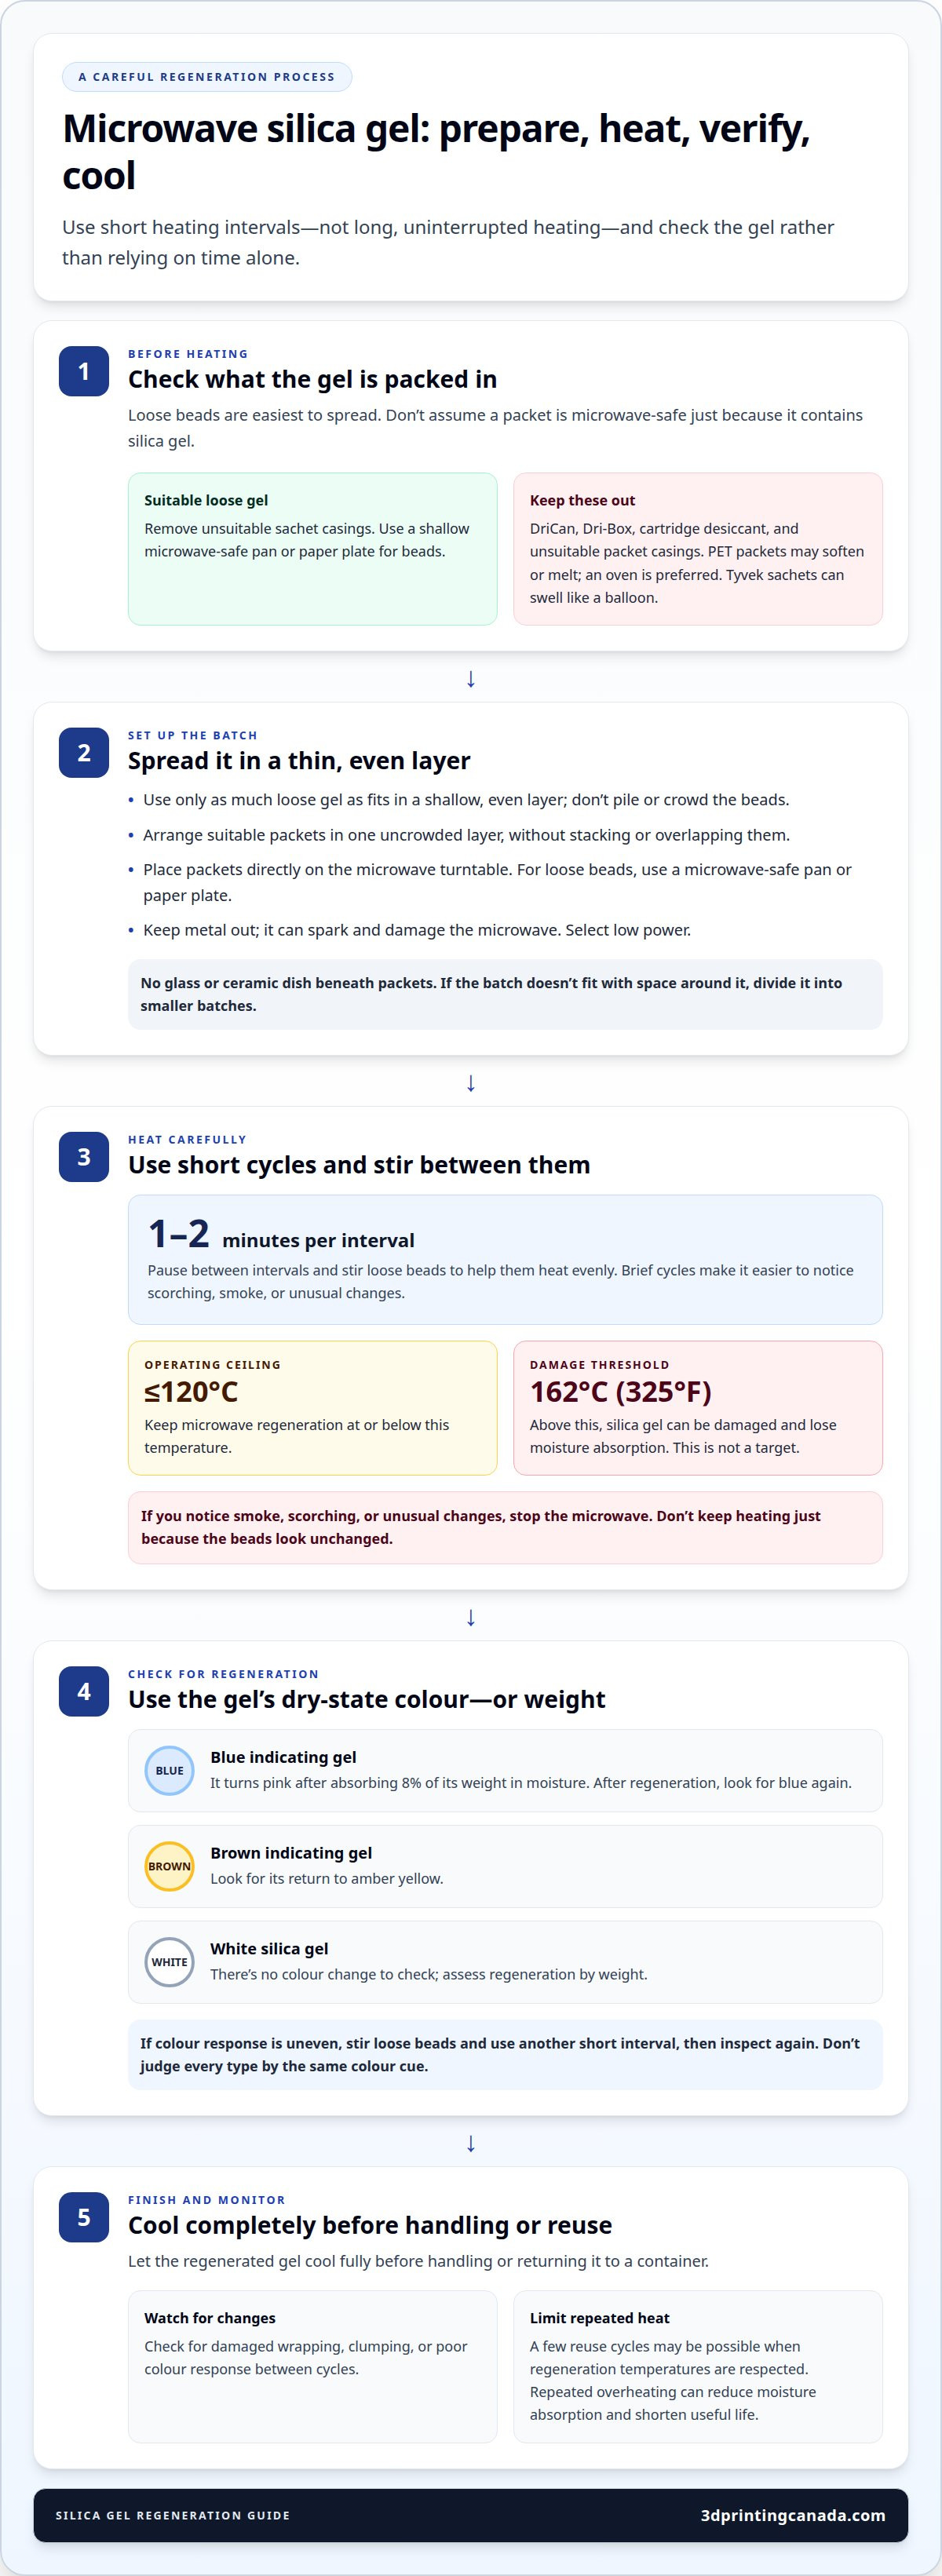
A microwave can regenerate silica gel, but long, uninterrupted heating is the wrong approach. Use short 1-2-minute intervals and stir between them to help the gel heat evenly. These microwave instructions for silica gel desiccant regeneration also show how to tell when the process is complete: indicating beads return to their dry-state colour, while white gel can be checked by weight.
If you’re unsure whether the gel is ready, don’t rely on heating time alone. Its form and condition matter, and some packaged desiccants shouldn’t go in a microwave. Loose beads are easier to spread in a shallow, microwave-safe container. Let regenerated gel cool completely before handling or reuse.
Follow these steps to prepare the gel, heat it carefully, check for signs of regeneration, and reduce the risk of overheating or deterioration over repeated cycles. You’ll also learn when a microwave isn’t suitable for a packet or casing.
Key Takeaways
- Use short heating intervals and stir loose beads between them to encourage more even drying.
- Choose a microwave-safe setup, and keep metal containers and unsuitable packet casings out of the microwave.
- Look for the gel’s dry-state colour or use weight to assess whether it has regenerated.
- Let the silica gel cool completely before handling or returning it to a container.
- Limit heat exposure to help reduce deterioration over repeated regeneration cycles.
Heat-related deterioration over repeated cycles
Overheating can damage silica gel, reduce its moisture absorption, or create fire and packaging hazards. Keep microwave regeneration at or below 120°C, and avoid heating silica gel above 162°C (325°F), which can damage it.
- Use the lower limit as your operating ceiling. Keep microwave regeneration at or below 120°C, rather than treating 162°C as a target. The higher figure marks a damage threshold, not a recommended setting. Microwave temperatures can exceed 90° during regeneration, so use low power and brief intervals. A cautious approach helps prevent concentrated hot spots from pushing the gel beyond the safer operating range.
- Stop before heat changes the material. Silica gel exposed above 162°C (325°F) can lose its ability to absorb moisture. That damage affects the desiccant itself, not just its colour or appearance. Don’t keep heating simply because beads look unchanged after an interval. Pause, let the batch cool, and assess it before deciding whether another short cycle is appropriate.
- Watch for fire and microwave damage. Silica gel can catch fire if the microwave power is too high or heating lasts too long. Metal containers can spark and damage the microwave, so keep them out. Short intervals make it easier to spot scorching, smoke, or unusual changes. If you notice any of these, stop the microwave rather than continuing.
- Consider the packet material before reheating. PET silica gel packets may soften or melt under excessive heat, so an oven is preferred for these packets. A Tyvek sachet can swell like a balloon in a microwave because its wrapping prevents water vapour from escaping. Don’t assume a packet is microwave-safe just because its silica gel beads can be regenerated.
- Limit repeated exposure and track changes. Silica gel or clay can be reused for a few cycles when regeneration temperatures are respected. Repeated overheating can reduce moisture absorption and shorten its useful life. Note any damaged wrapping, clumping, or poor colour response between cycles. If the material or packet shows heat damage, don’t continue microwaving it as though it were unchanged.
One forum participant microwaves silica gel pellets for 3 to 3:30 minutes per cycle, then lets them cool and release water before repeating if needed. Spreading beads over a large area can help avoid clumping during drying.
Silica gel works best at room temperature, 70 ‐90°F, and high relative humidity. In a closed container, it can reduce relative humidity to below 40% within its temperature range until saturated.
Microwave placement and container safety
Microwave only a batch that fits in a thin, even layer, or arrange packets in a single uncrowded layer. There’s no fixed amount that suits every microwave. The spread and spacing determine whether the batch fits safely.
-
Choose a Safe Placement and Container
Place a silica gel packet directly on the microwave turntable, not on a glass or ceramic plate, bowl, or container. For loose beads, use a shallow microwave-safe pan or paper plate, and spread the beads rather than piling them together. Keep metal containers out because they can spark and damage the microwave. Select a low-power setting before starting.
- Keep the batch manageable. Add only as much loose silica gel as you can spread in a thin, even layer across the microwave-safe surface. A mound or crowded pile makes it harder to heat the beads evenly. Arrange packets without stacking or overlapping them. If the full amount won’t fit with space around each packet, divide it into smaller batches rather than crowding the turntable.
-
Identify Packets Not to Microwave
Read the packet label and identify its casing before microwaving it. Packaged silica gel products such as DriCan, Dri-Box, and cartridge desiccant should not be microwaved. Some sachet casings may restrict water-vapour escape, so check whether a packet is suitable before microwaving. PET packets may soften or melt under excessive heat, so use an oven method for those instead.
- Remove unsuitable casings from the microwave plan. Regenerate bulk silica gel or clay without its sachet casing, rather than heating a packet whose material can trap vapour or soften. Don’t microwave a packaged product simply because it contains silica gel. A label naming a cartridge, DriCan, or Dri-Box identifies a product to keep out of the microwave.
- Check the final arrangement before switching on. Confirm that the beads are in a shallow layer, or that packets rest directly on the turntable without a glass or ceramic dish beneath them. Make sure there’s no metal tray or utensil inside. If the casing is Tyvek, PET, or part of a packaged desiccant product, remove it from the batch and use an appropriate alternative method.
Checking regeneration by colour or weight
- Identify the indicator type before heating. Check whether your silica gel is blue, brown, or white. Each type provides a different regeneration clue, so don’t judge every batch by the same colour. Blue indicating gel changes from pink toward blue as it dries. Brown indicating gel returns to amber yellow. White silica gel has no colour change to check, so assess it by weight instead.
- Compare blue beads with their dry-state colour. Blue indicating silica gel turns pink after absorbing 8% of its weight in moisture. After regeneration, look for the return to blue. If some beads remain pink, the batch may not have dried evenly. Stir loose beads and continue with a short heating interval, then inspect the colour again. Use the same lighting when comparing before and after.
- Check brown indicating gel for amber yellow. Brown gel’s regeneration cue is a return to amber yellow. Inspect beads throughout the batch rather than relying on one visible spot. If some remain a different colour, stir or redistribute the loose gel before another short interval. Colour is a practical indicator for indicating gel, but not for white silica gel or every packet’s outer wrapping.
- Use weight for white gel and individual sachets. White silica gel has no indicator colour, so weigh it to assess regeneration. You can also weigh individual sachets to determine whether they’re exhausted and need reactivation. For a useful comparison, record each sachet’s dry weight after regeneration, then compare it with the later weight before reactivating. A rising weight shows moisture uptake. Don’t assume every packet has the same starting weight.
- Combine the clue with a consistent record. For blue or brown beads, note the starting colour and the colour after each cycle. For white gel, record its weight when dry and compare it with later measurements. Weigh sachets separately: a batch total can hide one saturated packet among several drier ones. Use the same scale and method for each comparison.
- Decide whether to continue based on the material’s signal. If blue beads haven’t returned to blue, stir them and heat them for another 3 to 5 minutes. Check brown gel for amber yellow, and use weight rather than colour for white gel. Stop when the appropriate indicator shows the regenerated state. Don’t extend heating solely to reach an assumed weight or colour that doesn’t match the silica gel type.
Cooling silica gel after reactivation
- Switch off the microwave and leave the batch undisturbed. Let silica gel packets or loose beads cool completely before handling. Don’t reach into the microwave immediately after a heating interval. The container and desiccant may both be hot, even if the outer packet feels cooler. Give the material time to cool before moving it, and leave the microwave door open only if it’s safe to do so.
- Move the batch only when you can do so safely. If the beads are in a shallow microwave-safe container, take it out carefully. Avoid touching the container or beads directly while they’re hot. Set the container on a stable, heat-tolerant surface, away from edges where it could be knocked over. Keep packets in a single layer so heat can escape instead of getting trapped between them.
- Let loose beads cool in their spreading container. Keep the silica gel exposed in its shallow layer instead of transferring it straight into storage. A deep pile can hold heat in the centre, so let the whole batch reach room temperature before scooping or pouring. Don’t rely on touching a large quantity to judge its temperature. Use a suitable utensil to carefully check the centre and edges before handling.
- Cool packets without stacking them. Place reactivated sachets apart from one another on a stable surface. Stacking warm packets can slow cooling where their surfaces touch. Keep them in sight while they cool, especially if their casing softened or changed shape during heating. Don’t handle a hot or damaged sachet as though it’s ready to reuse.
- Wait until the entire batch has cooled before reuse. Let silica gel packets and beads cool completely after reactivation, not just lose their strongest surface heat. Warm desiccant can take in moisture again from the surrounding air. Once cool, transfer it promptly to the container or enclosure where it will be stored or used. Avoid leaving regenerated gel exposed while you prepare other supplies.
- Keep the cooling area clean and dry. Use a clean surface and dry utensil to prevent dust or moisture transferring onto the regenerated silica gel. If you’re cooling several batches, keep them separate until they’re ready for storage. Don’t pour warm beads into a sealed container. Let them cool first, then close the container to limit exposure to room air.
Microwave regeneration instructions
Use low power, short heating intervals, and checks between cycles. These steps explain how to regenerate silica gel desiccant in a microwave when the gel and packaging are suitable. Follow the product label first, since general guidance doesn’t replace specific safety directions.
An oven isn’t automatically safer or more effective. The suitable method depends on the packet material and its directions.
- Confirm the material and prepare loose gel. Microwave only silica gel suitable for this method, not a packaged product labelled against microwaving. For loose beads, spread a manageable amount in a thin, even layer in a shallow microwave-safe container. Leave enough room to stir the beads between intervals. Keep metal out of the microwave.
- Begin at low power. Heat for 1-2 minutes, then pause and inspect the batch. Short intervals help limit uneven heating, while a long cycle can create hot spots. Silica gel can catch fire if microwave power is too high or heating lasts too long. Stay nearby throughout the process.
- Stir loose beads before continuing. Move beads from the centre toward the edges, then spread them evenly again. This exposes different parts of the batch during the next interval. Pause and inspect after each cycle. Don’t leave the microwave running unattended, even if the batch seems small.
- Let the indicator guide further heating. If blue indicating gel hasn’t returned to blue, stir it and heat it for another 3 to 5 minutes. Don’t rely on one total time for every batch. Microwave models, batch size, and starting moisture affect the process. Use the colour or weight cue suited to the silica gel type.
- Keep temperature and method in view. Microwave regeneration of silica gel or activated clay should stay at or below 120°C. A power setting doesn’t show the gel’s temperature. PET packets may soften or melt with excessive heat, so an oven is preferred for them. Microwave instructions for regenerating silica gel desiccant don’t override packaging directions or make unsuitable casings microwave-safe.
- Stop when the appropriate indicator shows regeneration. Check the colour of indicating gel, or use weight for white silica gel. If the indicator hasn’t returned to its dry-state signal, pause and reassess before another interval. Let the material cool completely before handling or reuse. Avoid prolonged heating to reach an assumed time or appearance.
3D Printing Canada
3D Printing Canada helps keep your 3D printing projects moving with equipment and technical support. The microwave steps above can help you reactivate suitable silica gel, but they won’t address a printer fault or other hardware problem. If your printer is malfunctioning, 3D Printing Canada’s 3D Printer Repair Services address hardware issues. For desiccant questions, use the packet’s instructions and the safe steps in this guide to decide whether microwave regeneration is appropriate.
If a printer issue is getting in the way of your work, contact 3D Printing Canada to discuss the repair support you need.
Make moisture control part of your next print
Turn silica gel care into a small part of your regular 3D printing workflow. Keep track of which storage container each batch protects, and note when the desiccant needs attention. That simple habit can help you make a consistent decision instead of reacting only when stored materials or equipment show signs of moisture exposure. Use these desiccant regeneration instructions for silica gel in a microwave only when the packet or material is suitable for that method.
For other 3D printing needs, 3D Printing Canada also offers Bambu Lab Accessories and 3D Printeda. Choose the support or equipment that fits your project, and keep your setup organized as your work evolves.
Contact 3D Printing Canada to discuss your 3D printing needs. Keep learning, keep experimenting, and enjoy what you make.
Frequently Asked Questions
How can I verify that the regeneration has been completed?
Use the indicator or weight method that suits your silica gel, then assess the batch as a whole. For example, inspect beads from the centre and edges rather than judging only the top layer. If you’re tracking sachets, record their dry weights for comparison after use. An even indicator change or a return toward the recorded dry weight provides a practical completion check.
How do you reactivate or recharge silica gel packets and beads?
Start by identifying the gel and its casing, since not every packet is microwave-suitable. For suitable loose beads, spread a manageable amount in a shallow microwave-safe container. Heat at low power in short intervals, stirring between them. Handle packets according to their material and product directions. After reactivation, let the material cool completely before returning it to the container it protects.
Is it possible to regenerate the silica gel?
Yes. Silica gel can be reactivated by removing absorbed moisture, then reused for a few cycles when regeneration temperatures are respected. Overheating or physical damage can reduce its useful performance. Watch for changes such as beads that no longer respond as expected or packets with softened, torn, or swollen casings. Replace damaged material rather than relying on repeated heating to restore it.
Can silica gel desiccant be safely regenerated in a microwave?
It can be microwaved if the silica gel and its container are suitable for the method and heating is controlled. Use low power, stay nearby, and stop if you see smoke, scorching, sparks, or packet deformation. Don’t microwave metal containers or packaged products such as DriCan, Dri-Box, or cartridge desiccant. Tyvek sachets can swell, while PET packets may soften or melt.
What microwave power and heating time are recommended for regenerating silica gel?
Use a low-power setting and heat in short intervals of 1-2 minutes, checking between intervals rather than relying on one long run. The batch size, moisture level, and microwave affect how much heating is needed. Stir loose beads between intervals to expose different parts of the batch. Stop when the appropriate colour or weight indicator shows regeneration, and avoid high power or unattended heating.
Should silica gel beads be spread in a shallow, microwave-safe container?
Yes. A shallow layer makes it easier to stir and inspect loose beads between heating intervals. Choose a microwave-safe container, such as a shallow pan, and avoid metal. Don’t put a glass or ceramic plate under a packet. Packets should sit directly on the microwave turntable. If the beads form a deep pile or crowd the container, divide the batch before heating.
How can you tell when silica gel is fully regenerated?
Look for the dry-state signal for that gel type: blue indicating gel returns to blue, while brown indicating gel returns to amber yellow. White silica gel has no colour indicator, so compare its weight with a recorded dry baseline. Don’t apply one colour rule to every type. If the batch shows mixed signals, assess the beads or sachets individually before deciding they’re ready.
How should silica gel be cooled and stored after microwave regeneration?
Let beads or packets cool completely before handling or storage. Once cool, move them promptly to the dry container or enclosure where they’ll be used, limiting the time they’re exposed to room air. Keep different batches separate if you’re tracking their condition. Before storing a packet, check that its casing is intact and hasn’t swollen, softened, or torn during heating.