
Calibration prints aren’t the only way to prevent wasted filament. To reduce the print failure rate in production runs, start with a clean, level bed and a small first-layer test. Then check calibration, printer condition, and filament before committing to a full batch. These checks can reveal adhesion and extrusion problems early, while there’s still time to adjust.
Losing material and machine time to a failed print is frustrating, especially when the same issue could affect every part in a run. Bed levelling, calibration, preventive maintenance, dry filament storage, and thoughtful post-processing all help limit failures and waste. Print orientation, supports, and a quick test of a new or complex design can also reveal problems early, helping you build a more reliable workflow for the next production run.
Key Takeaways
- Set up a consistent bed-levelling routine and confirm the first layer before committing to a full production run.
- Use calibration and preventive maintenance to catch printer issues before they disrupt a batch.
- Spot common failure risks, including crowded build plates, warping, and print settings that don’t suit the part.
- Store filament with moisture in mind, and dry affected material before printing.
- Use test prints, simulation, and support-aware design choices to find problems early and simplify post-processing.
1. Print bed levelling and material availability
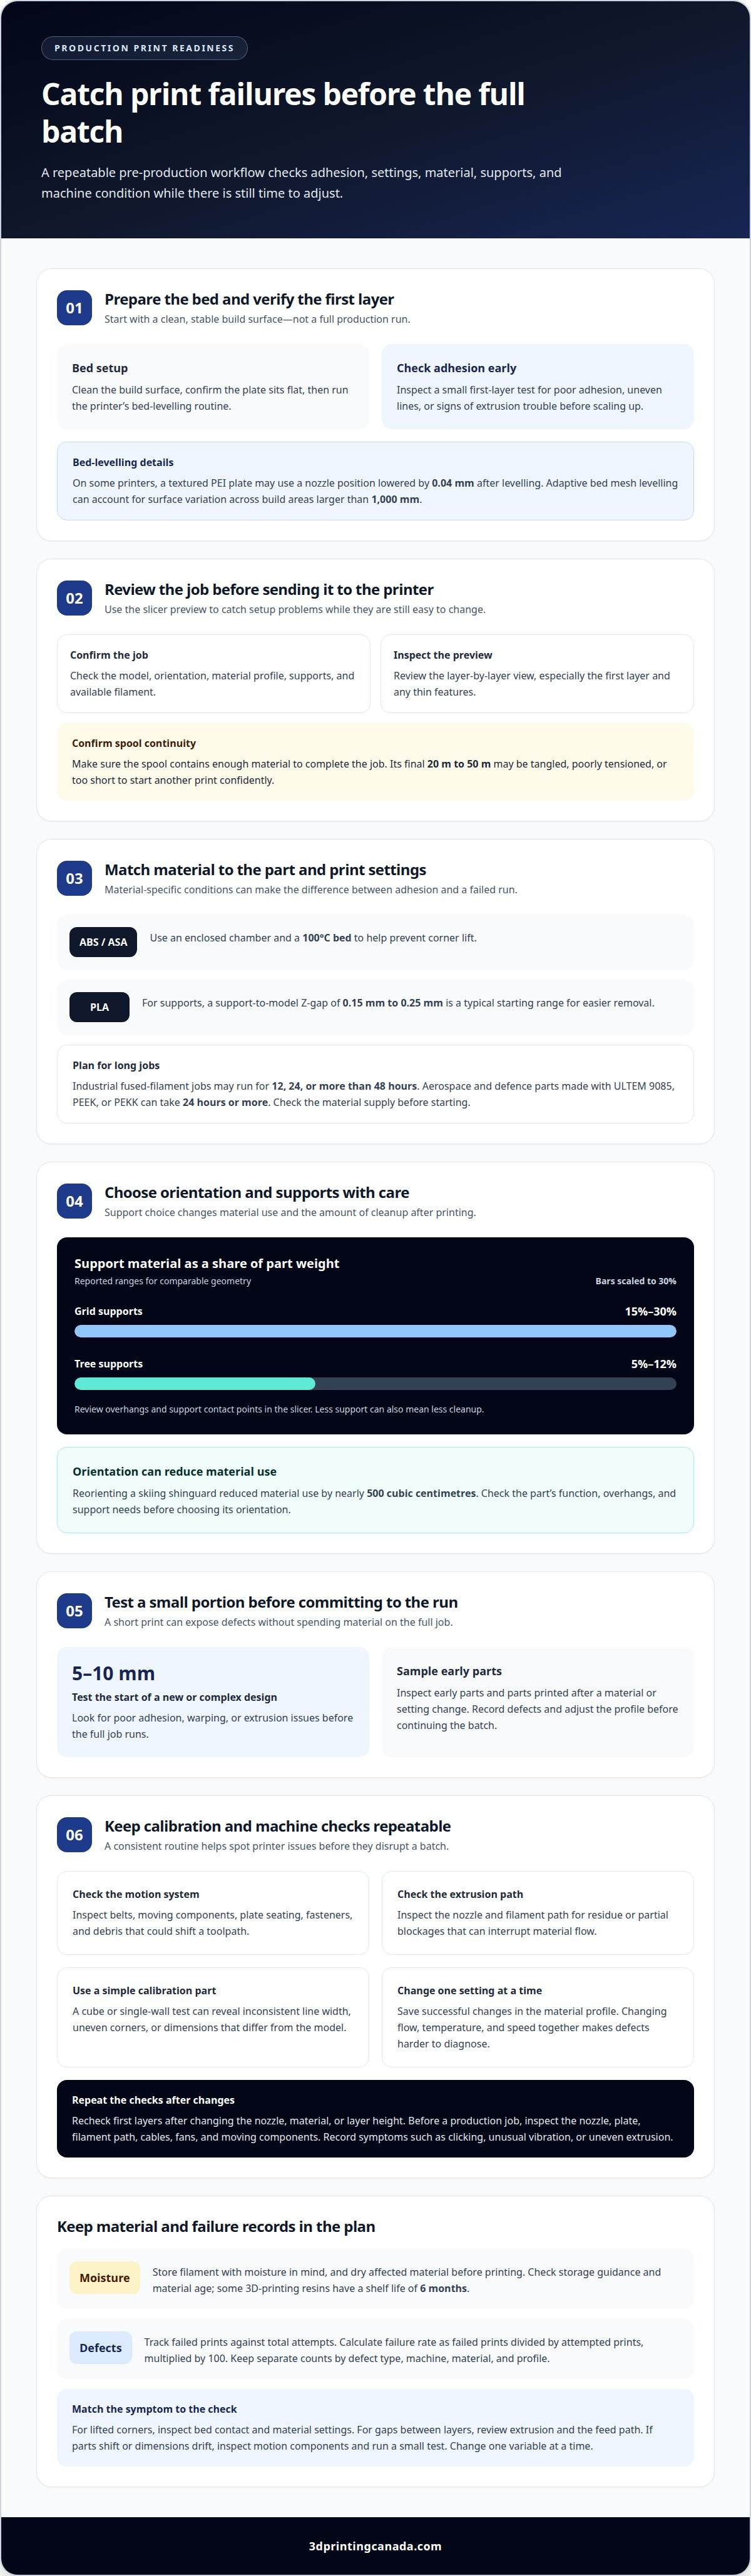
A reliable production run starts with a level bed, suitable material, and a complete prepress review. Clean the build surface, confirm the plate sits flat, then run the printer’s bed-levelling routine. On a textured PEI plate, some printers lower the nozzle by 0.04 mm after levelling to support first-layer adhesion. Adaptive bed mesh levelling can account for surface variation across build areas larger than 1,000 mm.
Prepress checks help prevent production errors by confirming the model, orientation, material profile, supports, and available filament in the slicer. Review the layer-by-layer preview, paying close attention to the first layer and any thin features. Confirm that the spool contains enough material to complete the job, especially before starting a long production run.
Bed adhesion also depends on material-specific settings. ABS and ASA require an enclosed chamber and a 100°C bed temperature to help prevent corner lift. For PLA supports, a support-to-model Z-gap of 0.15 mm to 0.25 mm is a typical starting range for easier removal. Use the profile suited to the material, then assess the first layer before scaling up.
Long runs need a material plan as well as a printer plan. Industrial fused-filament jobs may run for 12, 24, or more than 48 hours, while aerospace and defence parts made with ULTEM 9085, PEEK, or PEKK can take 24 hours or more. Check spool continuity and remaining material before a job begins. A roll’s final 20 m to 50 m may be tangled, poorly tensioned, or too short to start another print confidently.
Orientation affects both function and support material. Grid supports can add 15% to 30% of a part’s weight; tree supports may use 5% to 12% for comparable geometry. Reorienting a skiing shinguard reduced material use by nearly 500 cubic centimetres. Review contact points and overhangs in the slicer before choosing supports, since less support can also mean less cleanup.
Use a test print to catch defects early. Printing the first 5 mm to 10 mm of a new or complex design can reveal poor adhesion, warping, or extrusion issues before the full job runs. Quality-control sampling can then inspect early parts and parts printed after a material or setting change. Record any defect and adjust the profile before continuing the batch.
Material shelf life matters, too. Some 3D-printing resins have a shelf life of 6 months, so check the product’s storage guidance and age before planning a run. Matching the material to the part’s function, print settings, and production schedule helps avoid preventable failures.
2. Calibration and preventive maintenance
Calibration should reflect the printer, nozzle, material, and slicer profile used for a job. Automatic routines can save setup time, but they don’t replace checking whether the machine produces consistent results. The Bambu Lab A1, A1 Mini, and P2S perform full automatic calibration before every print. For other workflows, keep a repeatable calibration routine and record the profile changes that affect part quality.
Start with the motion system. Check that belts are secure, moving components travel smoothly, and the build plate sits firmly on its supports. Loose fasteners or debris on a moving surface can shift a toolpath and cause dimensional errors. Inspect the nozzle and extruder path, too. Residue or a partial blockage can interrupt material flow, leaving gaps between lines or weak layers.
Next, check extrusion and geometry with a simple calibration part. A cube or single-wall test can reveal inconsistent line width, uneven corners, or dimensions that differ from the model. Change one setting at a time, then save the result in the material profile. Avoid changing flow, temperature, and speed together, as it makes defects harder to diagnose.
Layer height and orientation also affect calibration results. A profile tuned for a fine layer height may behave differently with a thicker setting because each layer deposits a different volume of material. Recheck the first layers after changing the nozzle, material, or layer height. If the part’s orientation changes, review support placement and cooling in the slicer before relying on the previous settings.
Preventive maintenance works best as a documented routine, not as a response to visible failure. Before a production job, inspect the nozzle, plate, filament path, cables, fans, and moving components. Clean contact surfaces and remove loose material that could interfere with movement or adhesion. After a run, record symptoms such as clicking, unusual vibration, or uneven extrusion, and note the printer and profile involved.
Use print results to identify what needs recalibration. If the first layer looks uneven, revisit bed compensation and plate seating. If dimensions vary between parts, inspect the motion components and repeat a geometry test. If extrusion becomes inconsistent, examine the nozzle and feed path before adjusting software settings. A consistent checklist makes these checks easier to repeat across shifts.
Persistent mechanical faults can undermine even a well-tuned profile. For recurring issues such as uneven extrusion or unstable motion, 3D printer repair services can help address the hardware problem before another production run.
3. Common causes of failed prints
Categorize defects by what failed: adhesion, warping, extrusion, layer bonding, dimensional accuracy, or surface quality. Track each failed print against total attempts, then calculate the failure rate as failed prints divided by attempted prints, multiplied by 100. Keep separate counts by defect type, machine, material, and profile so the workflow points to recurring causes instead of hiding them in one overall figure.
Troubleshoot by matching each symptom to a likely cause, then change one variable at a time. For lifted corners, inspect bed contact and material settings. For gaps between layers, review extrusion and the feed path. If parts shift or dimensions drift, inspect the machine’s motion components and run a small test before restarting the batch.
Warping often appears on large parts with high infill. A 60% infill density can increase shrinkage forces compared with a 15% default, especially when the part cools unevenly. Review the part’s size, geometry, and infill before printing. If the function allows, reduce unnecessary infill or divide the job into smaller parts. Keep structural requirements in view before changing a setting.
Packing parts onto the build plate introduces another risk. Crowding can constrain toolpaths and make mid-job failures more likely. Check the slicer preview for overlapping models, tight spacing, and intersecting supports. Leave enough room for the machine to complete each path cleanly, rather than filling the build volume just to maximize output.
Some defects point to the motion system rather than the plastic profile. Repeating grain or belt patterns can match the printer belt’s 2 mm tooth spacing. Inspect belt condition and tension, then check whether the pattern repeats in the same direction across parts. Avoid compensating with slicer changes until mechanical causes have been assessed.
Extrusion faults can appear as thin sections, missing lines, or inconsistent surface texture. Check whether the spool feeds freely, the nozzle is clear, and the extruder moves material consistently. A partial clog can interrupt flow even if the job starts well. Before resuming the full workflow, compare a short test print with one made using a known-good profile.
Resin and powder processes have distinct failure modes. In stereolithography, a fully enclosed part without self-supporting features can trap wet, uncured resin inside. In selective laser sintering, similar geometry can trap unfused powder that cannot be reclaimed. Add openings for drainage or powder removal, then inspect the sliced model before printing.
Log the defect and corrective action for every failed attempt. If several jobs show the same extrusion, motion, or hardware problem, the pattern may call for 3D printer repair services, rather than repeated changes to the print profile.
4. Filament storage and moisture control
Filament can absorb moisture from the air, affecting how it feeds and extrudes. Damp material may bubble, produce a rough finish, or create inconsistent layers. These defects can weaken a part or make its dimensions unreliable, even when the printer settings haven’t changed. Track storage conditions by material type, particularly between production runs.
Use relative humidity as a practical storage target. Store PLA and PETG below 15% relative humidity; nylon and PVA need levels below 10%. Keep spools in a sealed, dry environment when they aren’t loaded. Label each spool with its material and opening date, then return it to storage after a job instead of leaving it exposed near the machine.
Before printing, inspect the filament path and listen for popping or crackling during extrusion. Look for rough strands, uneven surfaces, or a finish that differs from the material’s usual appearance. These signs may indicate moisture, but check the spool feed and nozzle path as well. Change one factor at a time so a test print can show whether drying improved the result.
Dry moisture-affected filament at 45°C to 55°C for four to eight hours before use. Follow the material manufacturer’s manual for handling and drying guidance, since different polymers respond differently to heat. After drying, keep the spool protected until it enters the printer. Exposing it to humid air again can undo the preparation before a long job finishes.
Moisture control supports more than a clean surface. Inconsistent extrusion can affect layer bonding, part strength, and dimensional fit. For example, a bracket that must fit around another component may fail quality checks if its layers separate or its edges distort. Warping can also have causes other than wet filament, so consider the build plate, part geometry, and cooling when diagnosing lifted edges.
Keep storage checks separate from slicer adjustments. If a dry spool still prints poorly, review the profile and part orientation. Overhangs may need support, while a change in orientation can alter how layers carry a load. Don’t try to compensate for wet material by repeatedly changing temperature or flow settings. This can conceal the underlying issue and make the next spool harder to troubleshoot.
Print a short test part after drying, especially before a large batch. Compare its extrusion consistency, layer bonding, and finish with a successful print made from the same filament. Record the spool condition and drying duration alongside the result. This simple record can help identify whether storage, material handling, or another part of the process needs attention.
5. Reducing print failures and post-processing
Preventing print failures is only part of the job. A successful additive manufacturing workflow also limits support structures, unnecessary material, and hands-on finishing. Before printing, check the slicer preview for signs of warping, support failure, or distortion. Simulation can flag these risks early, giving you time to adjust the design or settings rather than discover defects after a long run.
Review infill against the part’s function. Infill above 50% can increase shrinkage tendency in structural parts, so don’t raise density by default. Check load requirements, wall design, and material before changing the setting. If supports are turned off for nylon, keep unsupported overhangs to 45 degrees. Orient the part to reduce support needs where its function allows.
Support choices affect both waste and cleanup. Removing supports takes time and can mark a surface, while support-heavy designs use more material. Adjust orientation and support placement in the slicer, then inspect contact points and overhangs. Aim for a stable print with supports only where the geometry needs them, rather than applying automatic supports to every design.
Retraction can also influence defects and finishing. For nozzle sticking, the recommended retraction speed is 40 to 60 mm/s; keeping retraction length at or below 2 mm can reduce clogging risk. Treat these as settings to assess against the printer and material, rather than changing both at once. A clean extrusion path means fewer strings and less cleanup after printing.
Costs and return on investment depend on material use, machine time, labour, and finishing for each part. Compare those costs before and after process changes; reducing failed prints can lower material waste, though the savings will vary by workflow.
Keep a simple production record of attempts, failed parts, material used, machine hours, and post-processing time. After changing a profile or design, compare the same measures across runs. This makes the impact of fewer failures visible without assuming that every adjustment will deliver the same results for different parts.
Plan for the final step, too. A person still needs to remove parts from the build plate after printing. Account for that handling time in production planning, and use designs that reduce support removal where possible. If repeated machine faults are driving failures, get help with printer repair.
3D Printing Canada: 3D Printer Repair Services
3D Printing Canada provides 3D Printer Repair Services for hardware issues that interrupt reliable printing. If recurring extrusion problems, unstable movement, or inconsistent results continue after calibration and maintenance, a repair may address an underlying machine fault rather than another slicer adjustment.
Repair can be the practical next step when the same defect returns across different designs or material profiles. A printer that cannot maintain consistent operation can disrupt production schedules and lead to repeated failed parts. Share the symptoms and how they affect your workflow when you reach out. Contact 3D Printing Canada to discuss printer repair.
Make the next production run more predictable
Use each completed batch to improve the next. Record which settings changed, what defects appeared, and whether the adjustment improved the finished parts. This production history helps distinguish a one-off issue from a recurring pattern and gives your team a clearer starting point for future jobs. To reduce the print failure rate in production runs, turn these observations into a consistent process instead of relying on memory or repeated trial and error.
When a problem keeps returning across profiles or designs, consider whether the printer itself needs attention. 3D Printing Canada offers repair services for printer hardware issues, helping you address machine problems that can disrupt otherwise well-planned work. The right next step is the one that fits the cause: refine the workflow when settings are responsible, or seek repair support when hardware symptoms persist.
Discuss a recurring printer issue with 3D Printing Canada, and keep building a more dependable process for every run.
Frequently Asked Questions
How do I stop wasting filament on calibration prints?
Make each calibration test answer a specific question instead of printing a large, generic model. If dimensions are off, use a small geometry test that isolates fit. If extrusion looks uneven, test a single-wall section. Change one setting at a time and save the result in the matching material profile. Before a production run, test critical features of the actual design, such as holes, snap fits, or thin walls.
How does filament storage reduce waste?
Good storage helps preserve a spool for future jobs instead of letting moisture affect its performance. Keep opened filament sealed between uses, label the material, and organize different polymers so each spool returns to the right profile. For example, nylon and PLA have different humidity requirements, so storage practices should account for the material. These habits also make it easier to trace a poor print back to its spool.
How does unattended 3D printing affect part quality compared to supervised runs?
Unattended printing doesn’t automatically change a machine’s output, but it delays detection when a defect starts. An operator can spot a shifting part, unusual extrusion, or failed first layer and stop the job before more material is used. For unattended jobs, use a validated profile and review the slicer preview beforehand. Schedule human checks at meaningful points, particularly after changing material, design, or settings.
What happens if a print fails mid-job during unattended printing?
A failed print can leave an incomplete part, wasted material, and a build plate that needs attention before the next job. The printer may continue depositing plastic around a detached part, making the result unusable. Once the machine is safe to handle, remove the failed material and inspect the nozzle, plate, and surrounding area. Record where the failure began before restarting.
What happens to filament that has absorbed moisture?
Moisture can make filament extrude inconsistently, affecting surface finish and layer bonding. You may notice popping, bubbles, rough strands, or a print that differs from earlier parts made with the same profile. Drying may restore usable material, but follow the filament maker’s manual for the recommended method. Record the spool and drying process, then assess a small sample before using the material for a critical part.
What are the most common causes of print failures in production runs?
Common causes include poor first-layer adhesion, warping, inconsistent extrusion, motion problems, and settings that don’t suit the material or design. A crowded build plate can also interfere with a job, while supports or part orientation may create weak or difficult-to-finish areas. Classify each defect and record the affected machine and profile. If a failure keeps recurring, that record helps narrow down the next troubleshooting step.
How do calibration and preventive maintenance reduce printer failures?
Calibration helps keep motion, extrusion, and dimensions consistent, while maintenance can catch wear or obstruction before it disrupts a job. Link symptoms to specific checks: uneven walls call for an extrusion review, while repeated position errors call for a motion-system inspection. Recalibrate after changing a key component or workflow, then associate the adjusted profile with the relevant machine and material combination.
What production print settings optimize quality, speed, and reliability?
Choose settings according to the part’s function, not a single default for every design. For non-structural decorative parts, 8% to 12% infill can be sufficient; parts that bear loads, absorb impacts, or use threads may need 20% to 40%. For flat or low-curvature surfaces, 0.2 mm or 0.3 mm layers can reduce print time compared with 0.1 mm. Confirm fit and finish on a representative part before batching.