
Swapping to a larger nozzle won't automatically cut your print times in half; on modern high-speed machines, it might not save you any time at all. If you are running a real-world 0.4mm nozzle vs 0.6mm nozzle print time comparison, you quickly discover that hotend melt capacity dictates your actual throughput far more than orifice size. We have all stared at a multi-part functional build eating up dozens of hours, desperately wanting a wider extrusion bead to slash that backlog without sacrificing crisp overhangs or dimensional accuracy.
You don't have to guess whether your toolhead can handle the extra plastic. In this guide, you will discover the quantifiable percentage time savings you can achieve on functional prints, understand the volumetric flow limitations throttling your hotend, and learn how wall-count adjustments unlock genuine speed. Here is a clear, practical framework to help you choose the ideal nozzle diameter for every spool on your shelf.
Key Takeaways
- A practical 0.4mm nozzle vs 0.6mm nozzle print time comparison reveals that genuine speed gains come from dropping perimeter counts and boosting layer heights, yielding up to 40% time savings on bulkier models.
- Hotend volumetric flow rate serves as the true physical speed limit; without high-flow melting capacity, pushing more plastic through a wider bore simply forces modern high-speed toolheads to slow down.
- Large functional enclosures and structural brackets gain massive efficiency from a 0.6mm setup, whereas miniatures, fine embossed lettering, and delicate overhangs still require the precision of a 0.4mm orifice.
- Modern perimeter generators like the Arachne engine effectively close the cosmetic gap between bore sizes while wider extruded beads naturally increase inter-layer adhesion and mechanical impact strength.
- Upgrading to wear-resistant hardened toolhead components allows you to print abrasive composite filaments reliably without inducing micro-clogs or sacrificing flow consistency.
0.4Mm vs 0.6mm Nozzles: The Core Print Time Differences
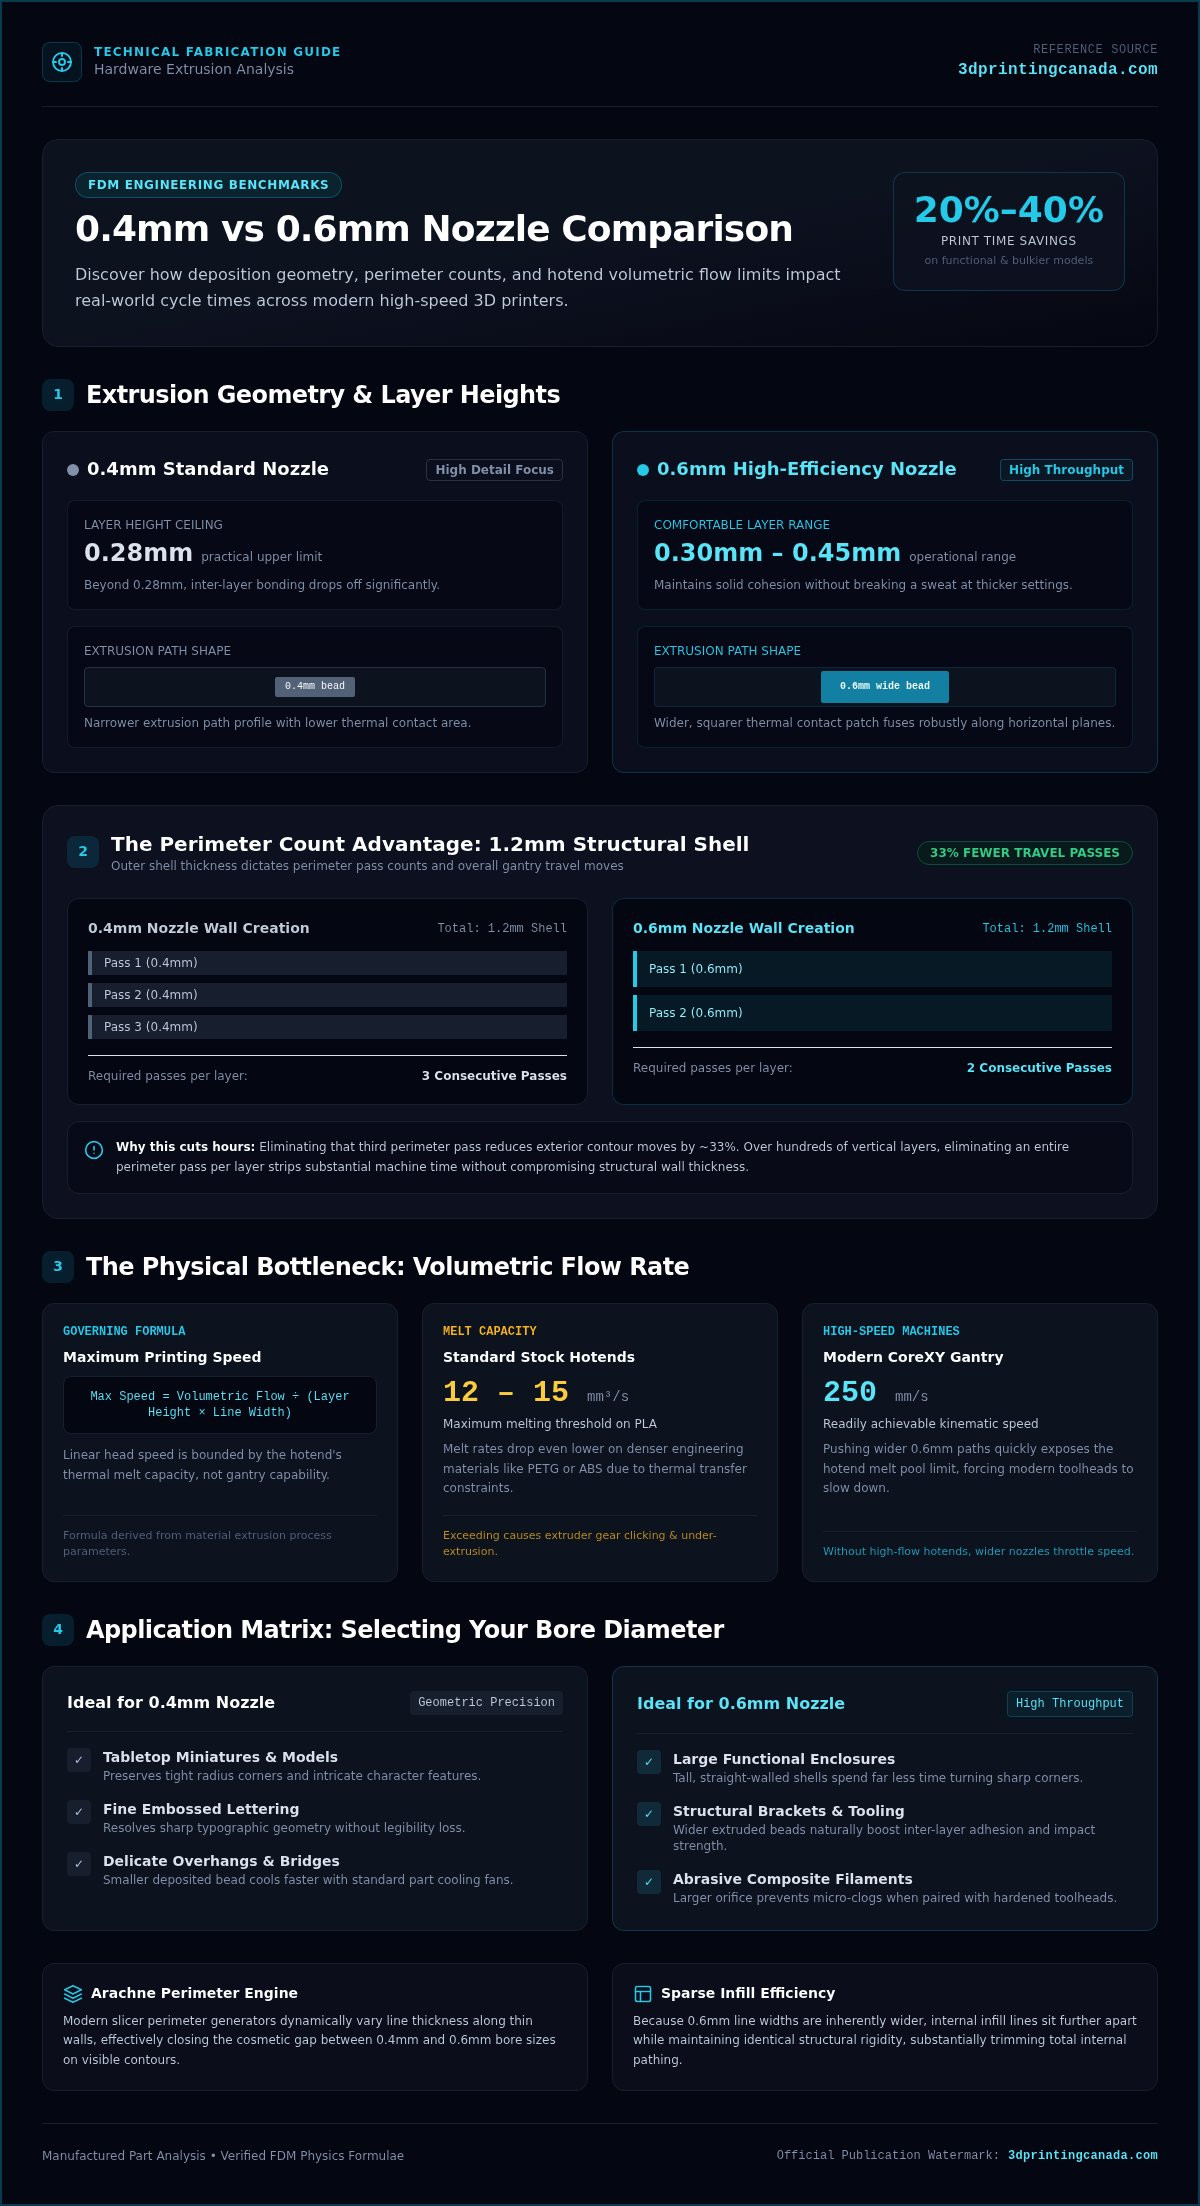
Every direct fused filament fabrication test reveals a basic physical truth: nozzle bore diameter controls deposition geometry, which dictates how quickly your gantry empties a spool. When you run an honest 0.4mm nozzle vs 0.6mm nozzle print time comparison on medium-to-large functional components, you will generally see print duration fall by 20% to 40%. You aren't necessarily driving the toolhead across the bed at breakneck speeds. Instead, you are laying down significantly more molten plastic across every single millimetre of travel.
A larger orifice directly alters the cross-sectional shape of your extrusion lines. That thicker bead impacts your print jobs in three distinct ways:
- Volumetric volume scaling: Total deposited volume multiplies rapidly because both bead width and maximum functional layer height expand at the same time.
- Sparse infill efficiency: Thicker line widths mean infill lines sit wider apart while maintaining identical internal structural resistance, drastically cutting internal pathing.
- Macro-geometry acceleration: Tall, straight-walled enclosures and heavy brackets spend far less time accelerating, decelerating, and turning around sharp corners.
Extrusion Width and Layer Height Geometry
A standard 0.4mm nozzle hits its practical vertical limit at roughly 0.28mm layer heights before inter-layer bonding drops off. In contrast, a 0.6mm nozzle comfortably lays down layers between 0.30mm and 0.45mm without breaking a sweat. The resulting extrusion path is wider and flatter. This squarer profile creates a broad thermal contact patch that fuses exceptionally well along horizontal planes, giving you robust mechanical characteristics alongside noticeable cycle-time reductions.
Perimeter Reduction: The Secret to Shaving Hours
Perimeter counts hold the real key to speed. To achieve a typical 1.2mm structural outer shell, your slicer must program three consecutive passes with a 0.4mm nozzle. Step up to a 0.6mm nozzle, and you get that identical 1.2mm wall thickness in just two passes. Eliminating that third perimeter run slashes overall travel moves by roughly 33% on exterior contours. Across tall models spanning hundreds of layers, cutting an entire perimeter loop per layer strips hours off the print clock, making this 0.4mm nozzle vs 0.6mm nozzle print time comparison a massive win for functional fabrication.
Volumetric Flow Rate: The True Bottleneck to Faster Printing
Linear print speed looks impressive on a spec sheet, but molten volume dictates true execution time. Volumetric flow rate measures the exact cubic millimetres of filament your heater block can reliably melt and push per second (mm³/s). When running a realistic 0.4mm nozzle vs 0.6mm nozzle print time comparison, your hotend's thermal ceiling acts as the ultimate gatekeeper. Standard stock hotends typically top out around 12 to 15 mm³/s on PLA, dropping even lower on denser engineering materials like PETG or ABS.
You can calculate your target feedrate with a straightforward formula: Maximum Speed = Volumetric Flow ÷ (Layer Height × Line Width). If you try pushing beyond that mathematical threshold without matching your hardware, you invite severe under-extrusion. Understanding these material extrusion process parameters keeps your prints dimensionally accurate and structurally sound. To see how machine architectures handle these demands, check out our guide on fast 3D printer trends across modern systems.
Calculating Your Hotend's Maximum Flow Threshold
Every hotend has a physical melt pool limit shaped by heater wattage, nozzle thermal conductivity, and melt-zone length. Hotend volumetric flow rate limits represent the maximum volume of plastic a heater assembly can liquefy per second before internal melt pressure causes the drive gears to slip. When you exceed this capacity, your extruder starts clicking loudly as drive gears grind into filament notches. Multiplying speed by layer height and extrusion width lets you verify flow headroom before sending code to the machine.
Why Fast Printers Hit the Wall with 0.6mm Nozzles
Modern CoreXY machines easily reach 250 mm/s, but pushing wider paths quickly exposes hardware limits:
- Slicer throttling: Slicing a 0.6mm line at 0.3mm layer height and 250 mm/s requires 48.75 mm³/s, forcing your slicer's Max Volumetric Speed clamp to downscale linear travel to roughly 100 mm/s.
- Flow starvation: Standard 15 mm³/s blocks cannot keep up with wide tracks, turning expected time gains into sluggish print runs.
- High-flow salvation: Upgraded ceramic heating blocks, extended melt zones, and internal split-channel nozzles elevate flow capacity to 30 mm³/s or more, restoring blistering linear feedrates.
If you want to unchain your hardware and maximize throughput across your workshop, explore 3D Printing Canada for high-flow toolhead upgrades and compatible components tailored to demanding print farms.
Real-World Print Time Benchmarks: Functional Parts vs Miniatures
Geometry dictating print efficiency is an inescapable reality in extrusion-based additive manufacturing. When you run an actual 0.4mm nozzle vs 0.6mm nozzle print time comparison across different model types, the clock tells vastly different stories. Volumetric deposition advantages shine brightest on wide planes and dense internal grids, while compact models with intricate features level the playing field.
Consider how different geometries respond when jumping from a 0.4mm to a 0.6mm tip:
- Standard 3D Benchy (60mm length): Slices at 48 minutes with a 0.4mm nozzle (0.20mm layers), dropping to roughly 36 minutes on a 0.6mm nozzle (0.30mm layers), securing a tidy 25% time reduction.
- Industrial storage drawer (250mm bin): Takes 14 hours, 10 minutes on a 0.4mm setup, plummeting to 8 hours, 30 minutes on a 0.6mm setup, yielding a massive 40% time savings.
- Tabletop warrior miniature (32mm scale): Requires 1 hour, 15 minutes on a 0.4mm nozzle, and still takes 1 hour, 10 minutes on a 0.6mm nozzle, netting under 7% savings while smudging critical details.
The 3D Benchy and Calibration Cube Comparison
A benchmark Benchy sees moderate speed improvements because minimum layer cooling times step in. Slicers intentionally throttle print speeds around the wheelhouse and chimney to let each plastic bead solidify before the nozzle circles back. Hull curves and cabin overhangs retain solid fidelity, but the 0.6mm nozzle cannot fully flex its muscles on such small surface areas.
Large Functional Enclosures and Heavy Brackets
Big, chunky utility prints tell a whole different story. A 250mm organizational bin unlocks 35% to 48% total time savings because the toolhead spends long stretches moving in uninterrupted lines. Laying down 0.65mm infill tracks cuts internal cross-hatching passes in half. Solid bottom floors and top shells seal shut in fewer strokes, turning overnight multi-day marathons into easy daytime prints.
Detailed Figurines and Tabletop Gaming Terrain
Tiny display models yield almost no practical benefits from a wider orifice. Intricate character facial features, thin weapons, and tight recesses simply blur together, or drop out of the sliced toolpath entirely when features fall below 0.6mm. In contrast, bulkier scatter terrain like stone ruins, hills, and massive dungeon walls prints twice as fast with a 0.6mm nozzle, proving that model scale always dictates your hardware strategy.
Quality Trade-offs: Visual Detail, Strength, and the Arachne Engine
Speed never exists in a vacuum. Any rigorous 0.4mm nozzle vs 0.6mm nozzle print time comparison must weigh raw hourly savings against visual fidelity and component toughness. Upgrading to a wider bore changes the mechanical behaviour of molten polymer on the bed. You gain tremendous inter-layer contact area, but you also alter how your slicer resolves acute exterior corners and delicate horizontal features.
Balancing these mechanical realities comes down to three operational factors:
- Layer visibility versus weld integrity: Taller 0.32mm layers produce pronounced stair-stepping on shallow curves, yet their mass traps thermal energy that fuses layers into near-isotropic solids.
- Dynamic perimeter pathing: Slicers no longer lock you into rigid track widths, allowing intelligent software to narrow paths in tight corners.
- Bridging mechanics: Wider extruded beads carry more gravitational mass, demanding tuned cooling airflow on steep unsupported geometries.
Visual Resolution vs Mechanical Layer Adhesion
Fine 0.16mm layers deposited through a 0.4mm nozzle excel at hiding the layer lines on decorative domes and visual display pieces. Step up to a 0.6mm nozzle at 0.32mm layers, and those layer ridges become immediately obvious to the naked eye. In exchange, you get formidable durability. Standard Charpy impact tests show structural components printed with a 0.6mm nozzle absorb up to 25.6% more impact energy because wider tracks form broader horizontal weld interfaces that resist splitting under severe shear loads.
How the Arachne Slicer Engine Changed the Game
Older slicing engines relied on classic perimeter algorithms that forced a fixed line width across every wall, leaving awkward gaps or failing to print thin sections. The modern Arachne engine dynamically adjusts extrusion width down to roughly 80% and up to 175% of your nozzle diameter. This variable bead width allows a 0.6mm nozzle to taper down and print walls as thin as 0.48mm without skipping geometry, dramatically narrowing the detail gap between nozzle sizes.
Bridging and Overhang Limitations to Monitor
Heavier extrusion tracks present clear physical limits on unsupported bridges. When laying down a wide molten bead across open air, gravity acts swiftly on that extra thermal mass before auxiliary cooling fans can solidify the span. Dropping your nozzle temperature by 5°C to 10°C and capping unsupported bridging speeds preserves clean perimeters on 0.6mm profiles.
Dialling in wide-bead extrusion profiles requires dependable hardware. Explore 3D Printing Canada for precision nozzles, high-performance toolheads, and professional technical support to tune your setup perfectly.
How to Choose and Optimise Your Nozzle Setup
Deciding between toolhead configurations comes down to aligning part geometry with your extrusion hardware. A thorough 0.4mm nozzle vs 0.6mm nozzle print time comparison proves that neither diameter holds a universal advantage; each serves dedicated production goals. You can match the ideal bore size to your workshop workflow by working through a clear five-step checklist:
- Define mechanical requirements: Prioritise a 0.6mm bore whenever high shear resistance and fast turnaround outrank smooth top-surface stepping.
- Audit model feature size: Check your CAD files for thin wall features under 0.50mm or delicate vertical text that require a 0.4mm tip.
- Assess filament abrasiveness: Switch immediately to hardened steel or ruby nozzles when running carbon-fibre, glass-filled, or glow-in-the-dark blends to stop standard brass orifices from eroding within hours.
- Verify hotend thermal overhead: Ensure your heater block can maintain steady melt temperatures across wider extrusion tracks.
- Streamline physical swaps: Keep complete spare hotend assemblies on hand to swap nozzle diameters without risking stripped heater block threads.
Modern ecosystem upgrades make testing different setups remarkably painless. Explore our inventory of Bambu Lab accessories to source complete drop-in hotend assemblies, wear-resistant nozzles, and high-speed maintenance parts across Canada.
A Practical Decision Matrix: When to Pick Which Nozzle
Keep a 0.4mm nozzle locked in your toolhead for tabletop miniatures, detailed cosmetic prototypes, tight M3 to M5 machine threads, and delicate horizontal text. Turn to a 0.6mm nozzle for utility bins, mounting brackets, large structural assemblies, and composite printing. The wider 0.6mm bore dramatically reduces the micro-clogs that plague 0.4mm tips when extruding chopped fibres, keeping abrasive jobs running reliably without unexpected mid-print failures.
Slicer Tuning Tips for 0.6mm Nozzles
Swapping hardware requires matching software adjustments to prevent messy travel moves:
- Increase hotend temperature: Raise nozzle temperatures by 5°C to 10°C to lower melt viscosity when pushing high volumetric volumes.
- Dial in retraction: Retune retraction distances and speeds carefully, as a wider orifice holds a larger molten reservoir that bleeds oozing artifacts across open air gaps.
- Recalibrate pressure advance: Rerun pressure advance calibration lines to stop bulging corners caused by higher extrusion pressures during rapid acceleration phases.
If you run into persistent jamming, stripped extruder gears, or uneven extrusion while dialling in wider nozzles, reach out to our team for expert 3D printer repair services to get your machine running smoothly again.
Unlock Faster Build Cycles on Your Print Bed
Selecting the ideal diameter isn't about picking a permanent winner; it's about matching your hardware to your project goals. As any thorough 0.4mm nozzle vs 0.6mm nozzle print time comparison demonstrates, volumetric melt limits and model geometry ultimately dictate your true production speed. Keep your 0.4mm setup ready for high-detail cosmetic prints and fine mechanical threads, but lean on 0.6mm when you need rugged enclosures, functional brackets, or dependable composite extrusion.
Ready to eliminate printing backlogs and maximize workshop output? Upgrade your toolhead with premium nozzles and accessories from our extensive Canadian inventory of brass, hardened steel, and high-flow components. Backed by fast nationwide shipping on performance filaments and knowledgeable Canadian technicians ready to support your setup, you can dial in your machine with total confidence and keep your printers running at peak efficiency.
Frequently Asked Questions
How much print time do you actually save with a 0.6mm nozzle?
You typically save between 20% and 40% on total print time for medium to large functional parts. In a direct 0.4mm nozzle vs 0.6mm nozzle print time comparison, these savings depend heavily on model geometry and slicer settings. Big utility bins and brackets see major reductions by dropping perimeter passes from three to two. However, small or highly detailed models with strict cooling limits will see modest gains, often under 10%.
Can my 3D printer use a 0.6mm nozzle without hardware upgrades?
Yes, almost every standard desktop 3D printer accepts a 0.6mm nozzle without requiring physical toolhead modifications. You simply install the compatible nozzle thread or swap the complete hotend assembly, then select a corresponding 0.6mm preset inside your slicer software. Keep in mind that while your stock hotend handles the wider bore easily, your maximum print speeds will remain limited by the stock heater block's existing volumetric flow rate.
Does a 0.6mm nozzle make 3D prints stronger than a 0.4mm nozzle?
Yes, parts printed with a 0.6mm nozzle exhibit significantly higher mechanical strength and layer bonding. The broader extrusion tracks create a wider horizontal contact area between successive layers, which retains thermal energy longer during deposition. This extra heat improves plastic fusion along the Z-axis, reducing the risk of structural delamination when your functional brackets, tools, or outdoor enclosures undergo heavy mechanical stress or direct impacts.
Will a 0.6mm nozzle clog less frequently than a 0.4mm nozzle?
Yes, a 0.6mm orifice experiences substantially fewer clogs, particularly with particle-filled filaments. Abrasive materials containing carbon fibre, glass fibre, wood particles, or glow-in-the-dark powders often cluster and bridge across the narrower 0.4mm exit hole. The extra clearance inside a 0.6mm bore allows suspended fibres to pass through smoothly, preventing sudden mid-print blockages while maintaining steady, uniform material deposition.
Do I need to adjust print temperatures when switching to a 0.6mm nozzle?
Yes, raising your hotend temperature by 5°C to 10°C is generally recommended when stepping up to a 0.6mm tip. Because you are pushing a larger volume of plastic through the melt chamber per second, the material spends less dwell time inside the heating zone. Increasing nozzle temperature compensates for this reduced contact time, lowering polymer viscosity so your extruder can push wider tracks without under-extruding.
Can you print fine 0.2mm layer heights with a 0.6mm nozzle?
Yes, a 0.6mm nozzle handles a 0.2mm layer height with outstanding consistency. Standard FDM guidelines state that safe layer heights range between 25% and 75% of your nozzle diameter, making 0.2mm well within the optimal operating window for a 0.6mm bore. This combination delivers clean, smooth vertical walls while still giving you the structural and speed advantages of wider internal infill and perimeter beads.
What happens if my hotend volumetric flow rate is too low?
When your hotend cannot melt plastic fast enough to meet your programmed feedrate, the extruder skips steps and causes under-extrusion. You will likely hear clicking sounds from the toolhead drive gears slipping against the filament. In any 0.4mm nozzle vs 0.6mm nozzle print time comparison, an underpowered heater block creates weak layer bonding, noticeable surface gaps, or complete mid-print jams unless you cap speeds.