
Une buse bouchée n’est pas le signe d’une imprimante cassée ; c’est le signal que votre machine a besoin d’un peu d’attention d’un expert. Nous sommes tous passés par là : à fixer un amas de filament gâché en se demandant si la tête d’impression de votre coûteuse Bambu Lab est définitivement fichue. C’est frustrant de voir des heures de progression s’évaporer à cause d’un minuscule débris ou d’un problème de remontée de chaleur. Si votre imprimante est actuellement bloquée, ne vous précipitez pas encore sur les pièces de rechange. Maîtriser la réparation d’une buse bouchée d’imprimante 3D est une compétence essentielle qui vous fait économiser de l’argent et permet à votre flux de création de continuer.
Ce guide propose une hiérarchie claire des interventions pour remettre votre filament en circulation sans risquer d’endommager votre matériel. Vous apprendrez les méthodes les plus sûres pour débloquer un bourrage, de la simple technique du cold pull au nettoyage mécanique plus avancé. Nous vous aiderons aussi à comprendre quand une buse est réellement irrécupérable et nous vous montrerons comment organiser votre routine d’entretien pour éviter de futurs bouchons. Que vous travailliez sur une installation de loisir ou sur une machine professionnelle, nous vous aiderons à remettre vos projets sur les rails et à les faire fonctionner en douceur.
Points clés
- Repérez les premiers signes d’un bourrage, comme des engrenages qui cliquettent ou des couches irrégulières, pour éviter les impressions ratées et le gaspillage de filament.
- Utilisez la méthode non invasive du Cold Pull pour extraire en toute sécurité les débris de votre hotend, sans risquer d’endommager les composants délicats.
- Suivez nos étapes éprouvées de réparation d’une buse bouchée d’imprimante 3D pour traiter les obstructions tenaces et les problèmes de heat creep que les aiguilles seules ne peuvent pas résoudre.
- Apprenez à organiser le stockage de votre filament pour empêcher l’humidité canadienne de compromettre vos matériaux et de provoquer de futurs bouchons.
- Comprenez les signes évidents d’usure de la buse afin de savoir exactement quand il est plus rentable de la remplacer par une neuve.
Identifier le bouchon : symptômes et outils essentiels
Avant de vous lancer dans la réparation d’une buse bouchée d’imprimante 3D, vous devez jouer les détectives. Tous les bouchons ne se ressemblent pas, et identifier le type précis d’obstruction vous évitera de perdre des heures à appliquer la mauvaise solution. Une obstruction complète est évidente : le moteur de l’extrudeur tourne, mais aucun plastique ne sort de la pointe. Un bouchon partiel est plus insidieux. C’est le tueur d’impression « silencieux » qui provoque une sous-extrusion, donnant à vos modèles l’apparence d’être faits de dentelle fragile plutôt que de plastique solide. Si vous voyez votre imprimante « imprimer dans le vide » pendant que la tête se déplace, vous avez un bourrage total entre les mains.
La sécurité est votre priorité absolue. N’essayez jamais de nettoyer ou de retirer une buse lorsqu’elle est froide. Le plastique durci agit comme un adhésif industriel. Forcer un outil dans un hotend froid peut casser votre heat break ou endommager les filets du bloc de chauffe, transformant un simple nettoyage en réparation coûteuse. Préchauffez toujours votre machine à la température d’impression du dernier filament utilisé. Si vous imprimiez avec du PETG, chauffez à la température du PETG afin que tout résidu soit suffisamment mou pour être déplacé. Prenez vos gants résistants à la chaleur et examinons les signes d’alerte spécifiques.
Symptômes courants d’une buse bouchée
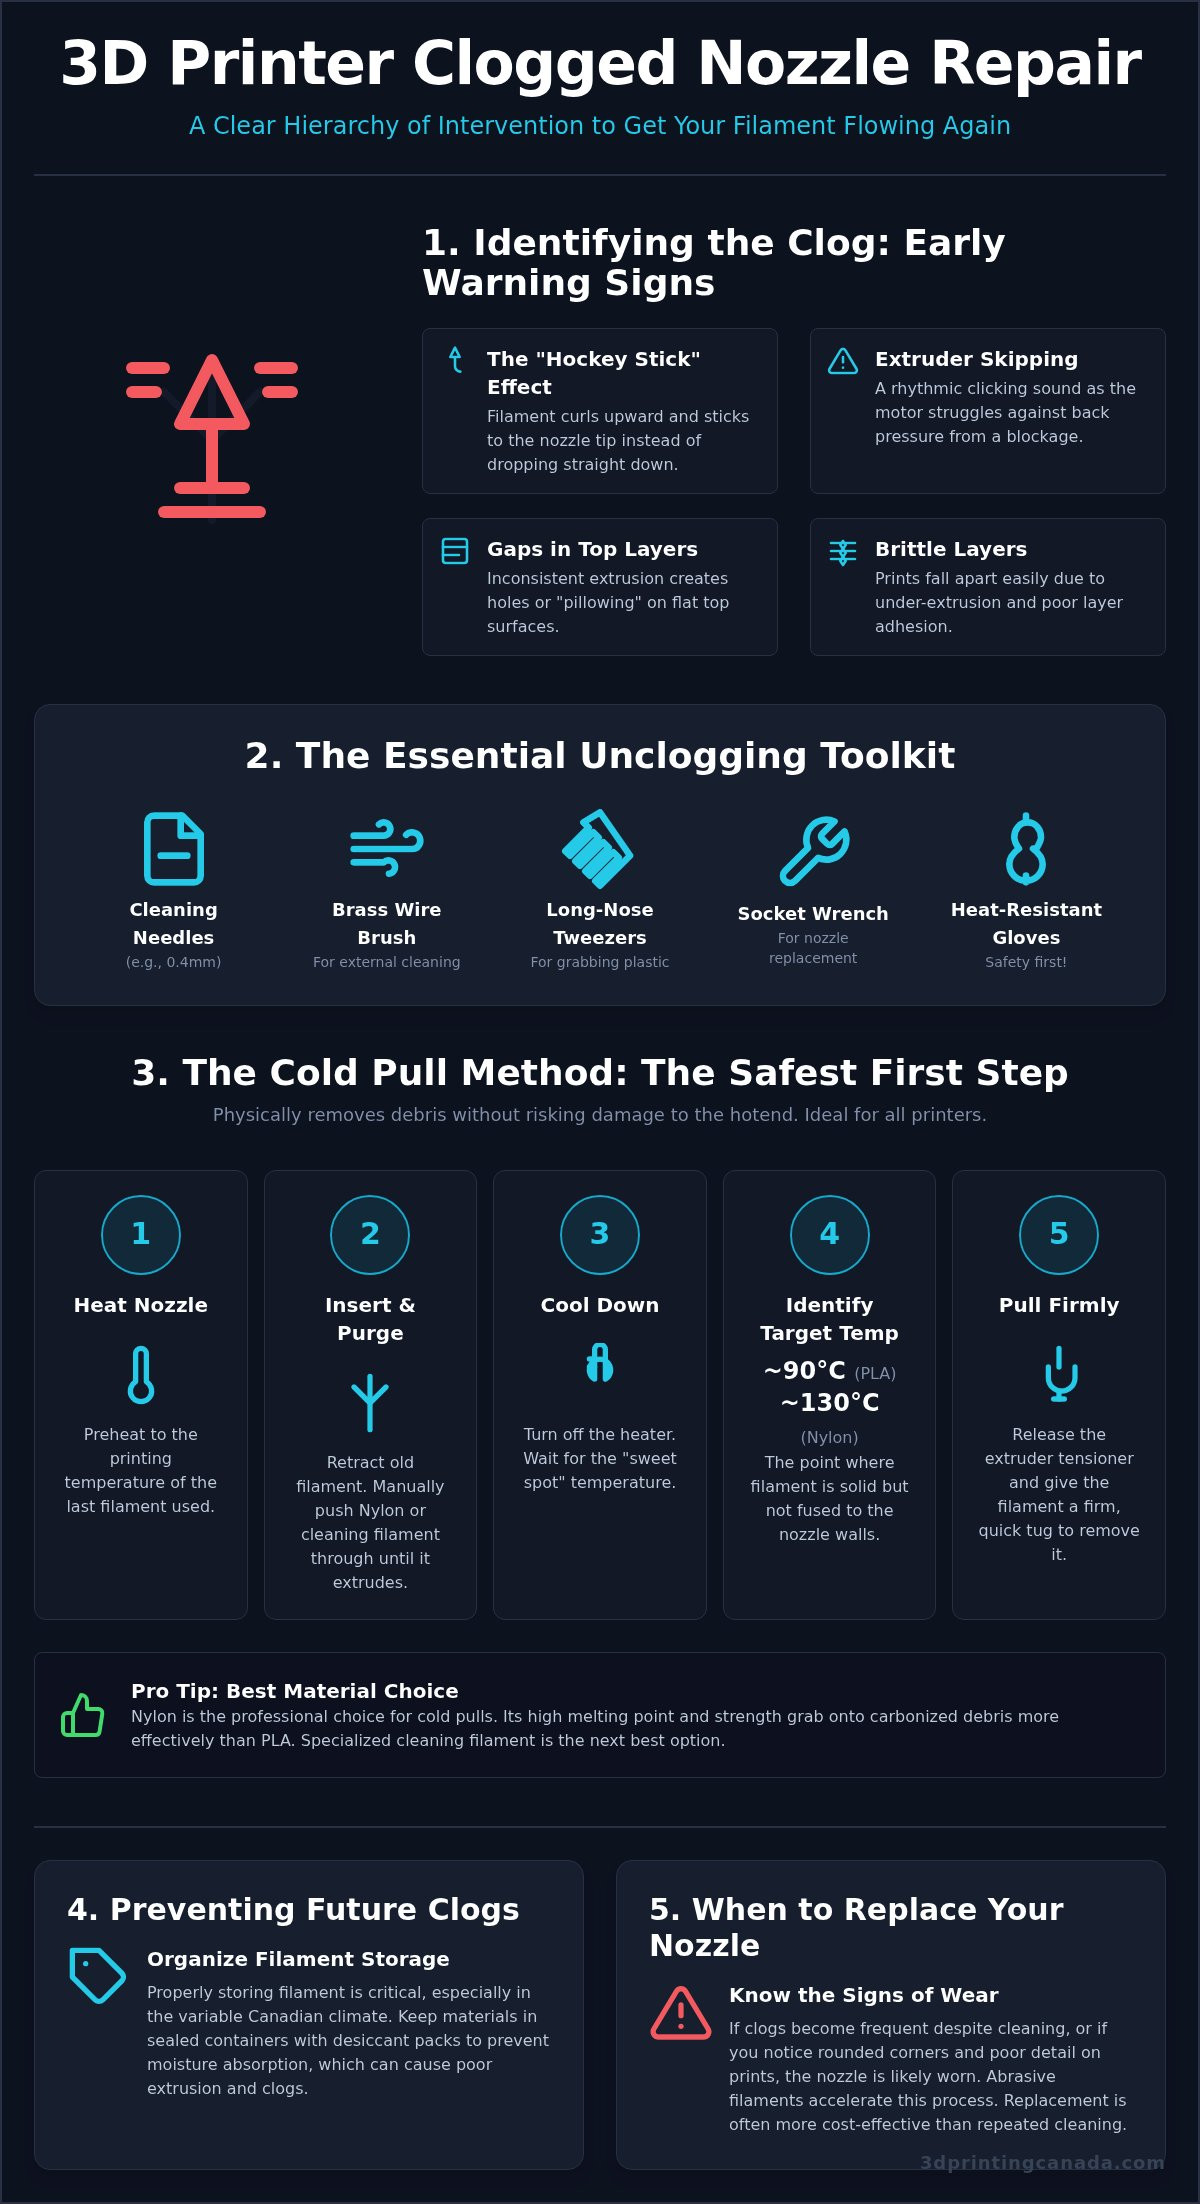
- L’effet « club de hockey » : Observez le filament lorsqu’il sort de la buse pendant une purge. S’il se recourbe vers le haut et adhère immédiatement à la pointe de la buse au lieu de tomber bien droit, vous avez probablement une obstruction interne partielle ou une bavure sur le bord de la buse.
- Sauts de l’extrudeur : Écoutez un bruit de clic rythmique provenant de votre tête d’outil. Cela se produit lorsque le couple du moteur ne parvient pas à surmonter la contre-pression causée par une obstruction.
- Trous dans les couches supérieures : Si vos surfaces supérieures semblent présenter des lignes manquantes ou des trous de type « pillow », votre buse a du mal à maintenir un débit constant.
- Couches fragiles : Lorsque les couches se séparent avec presque aucune résistance, c’est le signe que la buse ne délivre qu’une partie du matériau nécessaire à une liaison solide.
La trousse de débouchage essentielle
Vous n’avez pas besoin d’un atelier immense pour effectuer une réparation d’une buse bouchée d’imprimante 3D, mais avoir les bons outils rend le processus beaucoup plus fluide. Préparez une petite trousse dédiée afin de ne pas courir après des pièces pendant que votre hotend est à l’arrêt à 230 °C. Commencez par un jeu d’aiguilles de nettoyage en acier inoxydable, notamment de 0,4 mm pour les buses standard. Prévoyez aussi une brosse métallique en laiton pour nettoyer l’extérieur du bloc de chauffe et une paire de pinces fines de haute qualité à long bec pour saisir les petits morceaux de plastique fondu. Enfin, gardez une petite clé à douille à proximité. Si le bouchon est irrécupérable, vous en aurez besoin pour remplacer la buse en toute sécurité sans vous brûler les doigts ni endommager le câblage délicat de votre Bambu Lab ou d’un hotend haut de gamme.
La méthode du Cold Pull : la façon la plus sûre d’éliminer les débris
Le cold pull, souvent appelé méthode atomique, est la référence absolue pour la réparation d’une buse bouchée d’imprimante 3D. C’est une technique non invasive qui utilise le filament lui-même pour accrocher les débris internes et les extraire par le haut du hotend. Contrairement à une aiguille, qui peut simplement déplacer l’obstruction, un cold pull réussi retire physiquement le contaminant. Cette méthode est particulièrement importante pour les machines rapides comme celles de Bambu Lab. Comme ces imprimantes utilisent souvent des ensembles buse-chauffe intégrés, il faut éviter toute force mécanique qui pourrait plier le heat break délicat. Un cold pull est doux pour le matériel, mais impitoyable pour les saletés à l’intérieur.
Choisir le bon matériau pour cette tâche change tout. Même si vous pouvez utiliser du PLA en dépannage, le Nylon est le choix des professionnels. Il a un point de fusion élevé, une résistance exceptionnelle et ne casse pas quand on le met en tension. La structure semi-cristalline du Nylon lui permet d’épouser parfaitement l’intérieur de votre buse et de saisir chaque particule de plastique carbonisé ou de poussière. Si vous n’avez pas de Nylon sous la main, un filament de nettoyage spécialisé est votre meilleure option suivante. Il est conçu pour fonctionner sur une large plage de températures, ce qui le rend parfait pour purger l’ancien matériau. Vous pouvez trouver des filaments de haute qualité et des fournitures de nettoyage qui rendent cette tâche d’entretien beaucoup plus efficace.
Étape par étape : réaliser le tirage atomique
Commencez par chauffer votre buse à la température d’impression du matériau actuellement chargé. Une fois chaude, retirez le filament en place et insérez votre matériau de nettoyage ou du Nylon. Poussez-le manuellement jusqu’à ce qu’il commence à s’écouler par la pointe. Ensuite, coupez le chauffage et laissez la buse refroidir. Vous recherchez le « point idéal » où le plastique est suffisamment solide pour rester d’un seul tenant, mais assez souple pour se détacher des parois métalliques. Pour le PLA, c’est généralement autour de 90 °C. Pour le Nylon, visez environ 130 °C. Lorsque la température atteint la cible, relâchez le tendeur de l’extrudeur et donnez au filament une traction ferme et rapide vers le haut. Vous devriez entendre un « pop » satisfaisant lorsque le bouchon se déloge.
Interpréter les résultats de votre cold pull
Examinez l’extrémité du filament que vous venez d’extraire. Elle devrait être un moulage inversé parfait de l’intérieur de votre buse. Si l’extrémité est couverte de petites particules noires, vous avez du filament carbonisé, probablement à cause d’une impression trop chaude ou d’une buse restée trop longtemps à l’arrêt en chauffe. Des paillettes métalliques sont un signe plus grave, indiquant souvent que les engrenages de votre extrudeur abrasent le filament ou que la buse elle-même s’use. Si le bouchon sort sombre ou trouble, recommencez le processus. Continuez les cold pulls jusqu’à ce que l’extrémité du filament ressorte aussi propre et nette qu’elle l’était sur la bobine. Cela garantit que la réparation de la buse bouchée de votre imprimante 3D est terminée et que votre débit est entièrement rétabli.
Déblocage avancé : utilisation d’aiguilles de nettoyage et de la chaleur
Si le cold pull n’a pas entièrement rétabli le débit, ne perdez pas espoir. Certains bouchons sont constitués d’une « croûte » carbonisée qui adhère aux parois internes de la buse et nécessite un peu d’agitation mécanique pour se détacher. C’est un obstacle courant dans toute réparation d’une buse bouchée d’imprimante 3D. Le cold pull est excellent pour attraper les débris libres, mais les techniques avancées, comme l’utilisation d’aiguilles de nettoyage ou d’un décapeur thermique, traitent les bourrages plus tenaces et cuits en profondeur. Si vous vous retrouvez face à un bourrage qui ne bouge pas malgré plusieurs tentatives, notre service de dépannage d’imprimante 3D est toujours disponible pour prendre le relais à votre place.
La technique de l’aiguille
Une aiguille de nettoyage est votre outil le plus précis, mais elle demande de la délicatesse. Commencez par chauffer votre buse à 220 °C, ou légèrement au-dessus de votre température d’impression habituelle, afin que le plastique soit aussi fluide que possible. Insérez l’aiguille par le bas, en la poussant droit vers le haut dans l’orifice. Ne forcez jamais ; si vous sentez une forte résistance, arrêtez-vous. Faites bouger l’aiguille en petits mouvements circulaires pour fragmenter les particules carbonisées. Contrairement à ce que certains concurrents suggèrent, vous ne devez jamais faire passer l’aiguille par le haut de l’extrudeur, car vous risquez de casser le fin fil métallique à l’intérieur de la buse. Une fois les débris décollés, lancez immédiatement une purge de filament neuf pour évacuer les particules avant qu’elles ne se redéposent.
Gérer le heat creep et les bourrages de PTFE
Parfois, le bouchon ne se trouve pas réellement dans la pointe de la buse, mais plus haut, dans la « zone froide ». C’est ce qu’on appelle le heat creep. Cela se produit lorsque le ventilateur de refroidissement tombe en panne ou n’est pas assez efficace, ce qui amène le filament à ramollir et gonfler avant d’atteindre le bloc de chauffe. Cela crée un bourrage dans le tube PTFE qu’aucune aiguille ne pourra résoudre. Vérifiez le ventilateur du hotend pour vous assurer qu’il tourne à pleine vitesse et qu’il n’est pas encrassé par la poussière. Si le filament s’est déformé à l’intérieur du tube PTFE, il peut être nécessaire de retirer le tube et de couper l’extrémité brûlée ou gonflée à l’aide d’une lame bien aiguisée. Lors du remontage, assurez-vous que le tube est parfaitement affleurant et bien d’équerre contre l’arrière de la buse. Le moindre espace finira par se remplir de plastique fondu et provoquera une nouvelle panne.
Pour les salissures externes, comme la redoutée « blob of death » où le plastique a enveloppé votre bloc de chauffe, utilisez un décapeur thermique. Réglez-le sur une chaleur moyenne et dirigez-le vers le plastique durci jusqu’à ce qu’il devienne caoutchouteux. Utilisez votre brosse en laiton ou vos pinces pour retirer le matériau en gros morceaux. Faites attention à ne pas accrocher les fils délicats du thermistor ou de la cartouche chauffante pendant l’opération. Prendre le temps de nettoyer l’extérieur de votre hotend évite que l’ancien plastique ne coule dans vos nouvelles impressions et ne provoque de futures obstructions.
Prévenir les futurs bouchons : entretien du filament dans le climat canadien
La réparation la plus efficace d’une buse bouchée d’imprimante 3D est celle que vous n’avez jamais à effectuer. La prévention commence par la compréhension de votre environnement. Le climat canadien présente un ensemble unique de défis pour les créateurs. Alors que nos hivers sont notoirement secs, les mois d’été humides dans des régions comme le sud de l’Ontario ou les Maritimes peuvent rapidement transformer une bobine fraîche de PETG en un amas de bulles. L’humidité contribue silencieusement aux bourrages de buse. Lorsque le filament absorbe de l’eau, cette humidité se transforme en vapeur à l’intérieur du hotend. Cela crée des pics de pression internes et un débit irrégulier qui finissent par entraîner une obstruction tenace.
La poussière est une autre cause fréquente que beaucoup de bricoleurs négligent. L’électricité statique à la surface du filament agit comme un aimant pour les particules en suspension et les poils d’animaux. Lorsque le filament entre dans votre extrudeur, il entraîne ces débris directement dans le minuscule orifice de 0,4 mm de votre buse. Une solution simple et peu technologique consiste à utiliser un « nettoyeur de filament » en éponge, fixé sur la ligne avant l’entrée dans l’alimentation. Ce petit ajout essuie les contaminants avant qu’ils ne causent des problèmes. Si vous constatez que les buses standard en laiton se bouchent trop souvent avec des matériaux phosphorescents ou en fibre de carbone, envisagez de mettre votre matériel à niveau. Vous pouvez consulter notre guide sur les accessoires Bambu Lab Canada pour des mises à niveau en buse en acier trempé qui gèrent les matériaux abrasifs sans effort.
Solutions de stockage du filament
Pour garantir la régularité de vos impressions, vous devez organiser un système de stockage adapté. Les matériaux hautes performances comme le Nylon sont extrêmement hygroscopiques, ce qui signifie qu’ils peuvent devenir « humides » en seulement quelques heures d’exposition à l’air humide. Vous saurez que votre filament est compromis si vous entendez de faibles craquements ou crépitements provenant du hotend pendant une impression. Utilisez des boîtes de séchage dédiées ou des sacs sous vide avec des sachets de dessiccant neufs pour toute bobine qui n’est pas utilisée. Investir dans des matériaux de haute qualité, d’origine canadienne, est aussi utile, car ils sont souvent emballés dès le départ avec de meilleures barrières contre l’humidité.
Réglages logiciels pour réduire les bouchons
Optimiser les réglages de votre slicer est tout aussi important que l’entretien physique. Des distances de rétraction excessives peuvent ramener le plastique fondu trop loin dans la zone froide, ce qui entraîne les problèmes de heat creep évoqués plus haut. Gardez vos réglages de rétraction aussi faibles que possible tout en évitant les fils. De plus, définissez une « température de veille » dans votre slicer si votre imprimante le permet. Cela garantit que si une impression est interrompue, le filament ne « cuit » pas à pleine chaleur pendant une heure, ce qui entraîne carbonisation et formation de croûtes internes. Nettoyer régulièrement les engrenages de l’extrudeur avec une petite brosse empêchera aussi les copeaux de plastique de tomber dans le chemin du filament. Pour tous vos besoins d’entretien et pour garder votre installation parfaitement opérationnelle, achetez aujourd’hui notre gamme complète de fournitures d’impression 3D.
Quand remplacer votre buse ou faire appel à une réparation professionnelle
Toute réparation d’une buse bouchée d’imprimante 3D atteint un point où les lois de la physique et de l’économie prennent le dessus. Même si nous sommes fiers de pouvoir remettre à neuf presque n’importe quel hotend, vous devez reconnaître quand un composant a atteint la fin de sa durée de vie fonctionnelle. Une buse est un instrument de précision. Si la géométrie interne est marquée ou si la pointe externe est déformée, aucun nettoyage ne pourra restaurer la finition de niveau usine que vos projets méritent. Savoir quand arrêter de frotter et commencer à remplacer est ce qui distingue un bricoleur frustré d’un créateur productif.
L’analyse coût-bénéfice est généralement assez simple pour les composants en laiton standard. Si vous passez plus de 15 ou 20 minutes à essayer de débloquer une buse basique, vous perdez probablement de l’argent en temps perdu et en gaspillage potentiel de filament. Cependant, les enjeux changent avec les machines rapides comme la série Bambu Lab. Celles-ci utilisent souvent des ensembles intégrés où la buse, le chauffage et le thermistor sont étroitement liés. Dans ces cas, une réparation bâclée d’une buse bouchée d’imprimante 3D peut endommager le câblage ou plier le heat break. Si vous sentez que la tâche vous dépasse, il vaut toujours mieux consulter un expert avant qu’un petit bouchon ne se transforme en révision complète du hotend.
Signes indiquant que votre buse est endommagée de façon permanente
- Usure visible de la pointe : Inspectez l’extrémité de votre buse. Si elle paraît aplatie, arrondie ou asymétrique, l’orifice s’est élargi. C’est courant après l’impression de matériaux abrasifs comme la fibre de carbone ou les chargés bois avec une buse en laiton.
- Bouchons « fantômes » persistants : Si vous effectuez trois ou quatre cold pulls réussis, mais que la buse se rebouche dans la première heure d’impression, les parois internes sont probablement rayées. Ces micro-rayures retiennent le plastique et servent d’ancrage à de nouveaux bouchons.
- Largeur d’extrusion irrégulière : Lorsque votre buse de 0,4 mm commence à produire des lignes d’épaisseur variable ou dont les bords paraissent « flous », l’alésage interne n’est plus un cercle parfait.
Le cadre de décision : réparer ou remplacer
Organisez votre stratégie d’entretien selon le matériau de votre matériel. Pour les buses standard en laiton, nous recommandons généralement le remplacement plutôt qu’un nettoyage intensif. Elles sont peu coûteuses, et une pointe neuve résout souvent instantanément les problèmes mystérieux de qualité d’impression. Si vous utilisez des buses en acier trempé ou des buses spéciales, elles sont conçues pour durer et valent vraiment un nettoyage en profondeur avec les techniques évoquées plus haut. Ces matériaux sont bien plus difficiles à endommager avec des aiguilles de nettoyage ou des brosses en laiton.
Pour les problèmes complexes impliquant des hotends intégrés ou des composants électroniques internes, nos services professionnels de réparation d’imprimantes 3D constituent la solution la plus sûre. Si vous avez débouché la buse mais que l’imprimante n’extrude toujours pas, le problème peut se trouver sur la carte mère ou dans l’ensemble de l’extrudeur lui-même. Nos techniciens peuvent diagnostiquer ces pannes matérielles plus profondes et remettre votre machine sur les rails sans risquer de l’endommager davantage. Que vous ayez besoin d’une simple pièce de rechange ou d’un calibrage complet du système, nous sommes là pour soutenir votre réussite créative partout au Canada.
Remettez votre imprimante sur les rails
Maîtriser la réparation d’une buse bouchée d’imprimante 3D est bien plus qu’une simple tâche d’entretien ; c’est un moyen de garantir que votre élan créatif ne s’arrête jamais net. En commençant par des techniques non invasives comme le cold pull et en passant aux nettoyages avancés seulement lorsque c’est nécessaire, vous protégez la santé de votre machine sur le long terme. N’oubliez pas que la prévention est votre meilleur outil. Garder votre filament au sec dans le climat canadien variable et utiliser de simples filtres à poussière empêchera la plupart des bourrages avant même qu’ils ne commencent.
Si vous avez essayé les étapes de ce guide et que votre hotend ne fonctionne toujours pas correctement, ne laissez pas cela bloquer votre flux de travail. Que vous ayez besoin d’une nouvelle buse en acier trempé ou d’une assistance technique experte pour une révision matérielle complexe, nous sommes là pour vous aider. En tant que détaillant d’accessoires Bambu Lab autorisé, nous offrons une expédition nationale rapide partout au Canada pour vous permettre de reprendre l’impression rapidement. Nos techniciens experts prennent en charge toutes les grandes marques d’imprimantes, afin de vous fournir l’assistance fiable nécessaire pour résoudre même les bourrages les plus tenaces.
Parcourez notre gamme complète de buses de remplacement et de pièces de hotend pour que votre atelier fonctionne sans accroc. Vous avez les compétences pour régler ce problème, et nous avons les pièces pour vous soutenir. Bonne impression !
Foire aux questions
Comment savoir si la buse de mon imprimante 3D est bouchée ?
Vous réaliserez qu’il y a un problème lorsque votre imprimante commencera à « imprimer dans le vide » ou que le moteur de l’extrudeur émettra un clic rythmé. Ces signes, ainsi que des couches fines et fragiles qui se séparent facilement, indiquent que le débit est limité. Si votre filament se courbe immédiatement en sortant de la buse pendant une purge, vous avez probablement une obstruction partielle qui doit être traitée avant qu’elle ne devienne un bourrage complet.
Puis-je nettoyer une buse d’imprimante 3D avec une aiguille ?
Vous pouvez utiliser une aiguille de nettoyage dédiée pour casser les obstructions internes, mais vous devez le faire lorsque le hotend est à pleine température d’impression. Insérez délicatement l’aiguille par le bas pour détacher le plastique carbonisé. Faites attention à ne pas appliquer de pression latérale. Ces fines aiguilles peuvent facilement casser à l’intérieur de l’orifice, ce qui fait souvent du remplacement complet de la buse votre seule option restante.
Qu’est-ce que le « Cold Pull » ou la « méthode atomique » pour les imprimantes 3D ?
Le Cold Pull est une technique qui consiste à laisser le filament se semi-solidifier à l’intérieur de la buse avant de le retirer pour extraire les débris. Elle est largement considérée comme la méthode la plus efficace pour effectuer une réparation d’une buse bouchée d’imprimante 3D sans démonter la machine. L’utilisation de Nylon ou d’un filament de nettoyage spécialisé fonctionne le mieux en raison de leur résistance et de leur capacité à accrocher les contaminants internes.
Vaut-il mieux nettoyer ou remplacer une buse d’imprimante 3D ?
Le choix entre nettoyage et remplacement dépend du matériau de la buse et de la gravité du bourrage. Les buses standard en laiton sont peu coûteuses, donc les remplacer est souvent plus efficace que de passer des heures sur un bouchon récalcitrant. Cependant, il faut toujours tenter de nettoyer les buses coûteuses en acier trempé ou les buses spéciales avant d’envisager un remplacement, car elles sont conçues pour supporter plusieurs cycles de nettoyage.
Un filament humide peut-il provoquer des bouchons de buse ?
Un filament humide est une cause majeure d’extrusion irrégulière et peut entraîner des bourrages avec le temps. Lorsque du plastique chargé d’humidité atteint le hotend, l’eau se transforme en vapeur, provoquant des variations de pression et des bruits de « crépitement » audibles. Pendant l’été humide canadien, cette vapeur peut entraîner la formation de croûtes internes et un débit irrégulier qui finit par nécessiter une réparation d’une buse bouchée d’imprimante 3D complète pour être corrigé.
À quelle fréquence dois-je changer la buse de mon imprimante 3D ?
Il n’existe pas de calendrier fixe pour remplacer une buse, car cela dépend entièrement des matériaux que vous imprimez. Si vous utilisez des filaments abrasifs comme la fibre de carbone ou les phosphorescents avec une buse en laiton, vous devrez peut-être la remplacer après une seule bobine. Pour une impression standard en PLA, une buse peut durer des centaines d’heures jusqu’à ce que vous remarquiez que la pointe s’arrondit ou que l’orifice s’élargit.
Pourquoi ma buse continue-t-elle de se boucher juste après que je l’ai nettoyée ?
Des bouchons récurrents indiquent souvent que la cause profonde n’a pas été traitée, comme un espace entre le tube PTFE et la buse. Si du plastique fondu s’infiltre dans cet espace, il va carboniser et provoquer un nouveau bourrage. Vous devez également vérifier la présence de poussière sur votre filament ou un ventilateur de refroidissement défaillant. Un ventilateur faible peut provoquer un heat creep, où le filament fond trop tôt dans la tête d’outil.
Puis-je utiliser un chalumeau pour nettoyer ma buse ?
Bien que certains créateurs utilisent un chalumeau pour brûler le plastique, nous recommandons généralement d’utiliser plutôt un décapeur thermique plus contrôlé. Une chaleur extrême provenant d’un chalumeau peut modifier le revenu du métal, rendant la buse cassante ou endommageant son revêtement protecteur. Si un bouchon est si grave qu’il nécessite un chalumeau, la géométrie interne est probablement déjà compromise au point que nous ne la considérerions plus comme une réparation fiable.