
What if the right under-extrusion at high print speeds fix isn’t a higher flow setting, but finding the bottleneck first? If prints look clean at slower speeds but turn thin, weak, or uneven when you speed things up, your frustration makes sense. The printer may be asking the hotend to melt filament faster than it can. A slicer setting, filament issue, partial clog, or extruder problem can cause similar symptoms.
Changing temperature or extrusion multiplier at random can hide the cause and create new print defects. A more reliable approach is to test one factor at a time, starting with the filament path and extruder, then checking the nozzle, temperature, and maximum volumetric flow. This guide walks you through that sequence, explains how to distinguish settings, material, and hardware issues, and shows when to stop adjusting and seek professional repair. You’ll have a practical way to diagnose the problem before trading print quality for speed.
Key Takeaways
- Gaps between lines, sparse infill, and weak layers can reveal that your printer isn’t depositing enough filament.
- Layer height, line width, and print speed combine to determine how much filament the hotend must melt each second.
- Separate flow demand, slicer settings, filament condition, and feed-path restrictions before changing your profile.
- Find an effective under-extrusion at high print speeds fix by recording a baseline and changing one variable per test.
- Pause troubleshooting if feeding failures continue or a repair feels unsafe. Clear test notes and photos can help a technician assess the issue.
Under-Extrusion at High Print Speeds: Recognize the Pattern
Under-extrusion occurs when a 3D printer deposits less filament than the toolpath requires. The nozzle follows its planned route, but the printed line doesn’t contain enough material to match it.
Look for gaps between adjacent lines, inconsistent line width, sparse infill, thin sections, or layers that separate easily. The surface may look rough or incomplete, and walls can seem weaker than expected. These clues show that the print isn’t forming as intended, but they don’t identify the cause on their own. A speed-related pattern can suggest that the printer is struggling to keep up with the requested flow, but it doesn’t prove that flow capacity is the only issue.
Start by describing exactly what changes when you print faster. A clear record makes the next troubleshooting steps more useful and helps prevent guesswork.
How to tell speed-related under-extrusion from a general extrusion problem
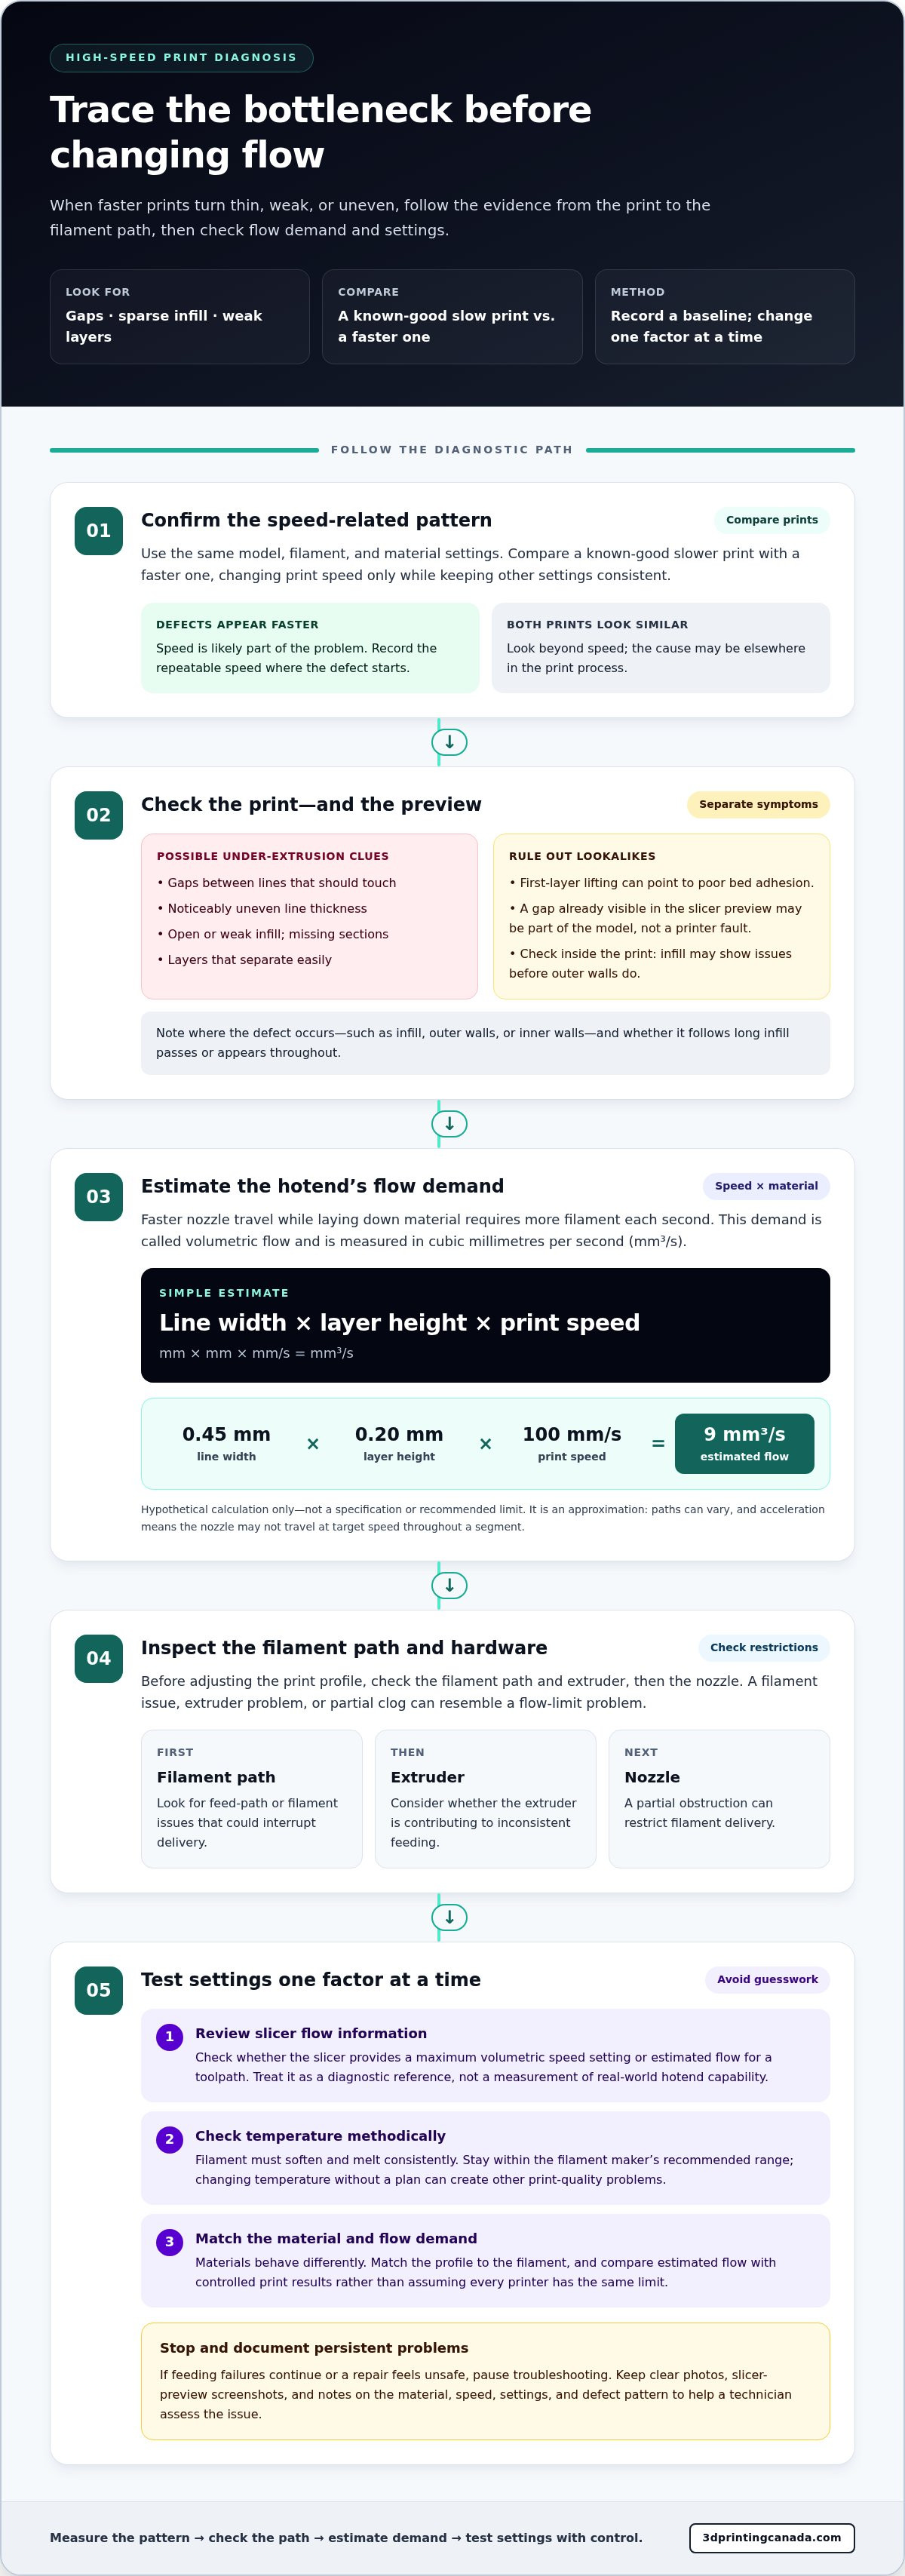
Compare a known-good slower print with the same model, filament, and material settings printed faster. Change print speed only, as much as your slicer allows, while keeping the other settings consistent. If the slower version looks sound and defects appear in the faster version, speed is likely part of the problem. If both versions show similar defects, look beyond speed.
Notice whether the defect starts at a repeatable speed or appears unpredictably. A consistent onset gives you a threshold worth recording, while random gaps may suggest an intermittent issue. Note where it happens, too: infill, outer walls, inner walls, or several areas. Infill can be affected before visible walls, so inspect the inside of the print as well as its outer surface.
What print defects should you look for?
Check both the printed part and the slicer preview. Under-extrusion clues include gaps between lines that should touch, lines that vary noticeably in thickness, weak or open infill, and layers with visible missing sections. Record whether the pattern follows particular toolpath features, such as long infill passes, or appears throughout the model.
Don’t mistake every gap for under-extrusion. Poor bed adhesion usually appears when the first layer fails to stay in place or lifts from the build plate. A model-specific gap may be part of the design or visible in the slicer preview before printing. If the preview shows a gap, it may not be a printer fault.
Take clear photos of affected areas, including a wider view of the print and close-ups of the defects. Save a screenshot of the relevant slicer preview and note the material, speed, and settings used. This evidence helps you compare results and gives a technician useful context if your under-extrusion at high print speeds fix requires hardware troubleshooting.
Why Higher Speeds Can Outrun Your Printer’s Filament Flow
A printer’s speed setting describes how quickly the nozzle moves, not how quickly the hotend can melt and deliver plastic. As the nozzle travels faster while laying down material, it must push more filament through the hotend each second. That demand is called volumetric flow, usually measured in cubic millimetres per second (mm³/s).
As print speed rises, extrusion demand rises too, but each printer and material has its own practical flow limit. A slicer can command a fast toolpath without confirming that the hotend can keep up. If the requested flow exceeds what the material and hotend can sustain, the nozzle may deposit less filament than the path calls for. Find the limiting factor rather than assuming every printer has the same ceiling.
How to estimate volumetric flow from slicer settings
For a simple estimate, multiply line width by layer height by print speed. Use millimetres for width and height, and millimetres per second for speed. The result is mm³/s. This is an approximation: slicer paths can vary, and acceleration means a print may not travel at its target speed throughout a segment.
Hypothetical calculation: A 0.45 mm line width × 0.20 mm layer height × 100 mm/s print speed gives 9 mm³/s. This example illustrates the calculation only. It isn’t a specification or recommended limit for a particular printer. Increase any one of the three inputs and the estimated flow demand increases. For instance, a thicker layer or wider line requires more material for each millimetre of nozzle travel.
Some slicers include a maximum volumetric speed setting or report the estimated flow for a toolpath. Use that information to spot when a print may be reaching a configured cap or demanding more flow than your current profile allows. A slicer limit can restrict the commanded flow, but it doesn’t measure your hotend’s real-world capability. Treat it as a diagnostic reference, then compare it with controlled print results.
Why temperature, filament, and the hotend affect flow
Filament needs to soften and melt consistently before it can pass through the nozzle. If the material is too cool for the requested rate, it may not flow smoothly enough to match the toolpath. Temperature is one factor to test, but stay within the filament maker’s recommended range and change it methodically. Raising it without a plan can introduce other print-quality problems, so don’t use heat to mask an unmeasured flow limit.
Materials don’t all behave alike. Their composition and recommended print settings affect how they soften and flow, so match the profile to the filament you’re using. Hotend condition matters, too: a partial obstruction or worn component can restrict delivery even if the speed and temperature seem reasonable. If repeatable tests point to a persistent hardware issue, professional 3D printer repair can help assess the machine. A reliable under-extrusion at high print speeds fix begins with measuring demand and isolating which factor is holding flow back.
Compare the Likely Causes Before Changing Your Print Profile
Similar-looking gaps can come from different parts of the printing process. A fast infill section that looks thin may reflect high flow demand, but a mismatched profile, filament condition, or restricted feed path can cause similar symptoms. Treat each clue as a lead, not a diagnosis. Start with checks that don’t require changing hardware or making major profile adjustments.
| Possible cause | Clues to look for | Low-risk first check |
|---|---|---|
| Excessive flow demand | Defects appear mainly in fast sections, while slower toolpaths look more consistent. | Compare the affected toolpath’s estimated flow with the slicer’s configured maximum volumetric speed. |
| Unsuitable settings | The issue began after changing profiles, material presets, or extrusion-related values. | Confirm the selected profile matches the printer and filament, then review recent changes. |
| Filament condition | Feeding or print quality varies, or the spool has been stored in conditions that may affect it. | Try a known-good, properly stored sample of the same material, using its matching profile. |
| Extrusion-path restriction | The extruder clicks or slips, feeding looks uneven, or defects also occur at slower speeds. | Check for spool snags and visible debris around the drive gears, following the printer maker’s instructions. |
An infill-only defect narrows the investigation to the toolpaths and conditions used there, but it doesn’t prove that flow demand is the cause. Infill may print faster than walls, making excess demand one possibility. However, a profile setting or intermittent feed problem can also show up there first. Compare the affected region with the slicer preview and note whether the same pattern appears on repeated prints.
Settings and material clues that can look like hardware failure
Start by checking that the material preset matches the filament loaded in the printer. A profile intended for a different material may call for unsuitable temperatures or extrusion behaviour. Once the baseline profile is verified, review flow ratio or extrusion multiplier against its normal value. Avoid changing either just to cover up thin lines. If moisture or storage is a reasonable concern, test a dry, properly stored sample with the same settings before suspecting a failed component.
When the extruder, nozzle, or hotend may be involved
Clicking, slipping, or visibly inconsistent feeding can point to a restriction or extruder issue, especially if symptoms persist at slower speeds. A partial nozzle blockage is another possibility, not a conclusion. Use the printer manufacturer’s guidance for safe checks. Don’t disassemble hot components or force adjustments you’re unsure about. For nozzle-specific checks, follow this clogged nozzle troubleshooting guide. If repeatable symptoms remain, record what you tested before moving on to the next diagnostic step.
Fix High-Speed Under-Extrusion with a Controlled Test Sequence
A repeatable test is more useful than a quick succession of profile changes. Start from a print that worked, adjust one variable at a time, and write down what happens. This helps you see whether a speed or flow limit is involved, or whether the problem persists regardless of the settings.
Run a baseline test and change one variable at a time
Choose a familiar model with enough infill and wall sections to make defects easy to spot. Use the last known-good settings and a verified material profile. Keep the printer, filament, model, and other slicer settings consistent throughout the test.
- Print a baseline. Record the printer and profile, filament type, print speed, temperature, and whether the part shows any defects.
- Raise speed in measured increments. Change only print speed, leaving temperature, layer height, line width, and extrusion settings untouched.
- Inspect the same areas each time. Note whether defects appear in infill, walls, or both, and record the speed at which they first show up.
- Repeat the test. Check whether the pattern returns at a similar speed. A repeatable result is more useful than a single print, which may be affected by an intermittent feed issue.
Keep a simple test log or table. Include the material, speed, temperature, profile changes, and defect location for every print. Photos can help you compare results without relying on memory.
Adjust flow demand, temperature, and extrusion settings carefully
If defects appear as speed increases, first reduce print speed or lower the slicer’s maximum volumetric flow setting. Test the adjustment, then inspect the same areas again. If the measured demand exceeds what your printer has demonstrated it can handle consistently, a lower speed or flow ceiling can bring the toolpath back within that demonstrated capacity. For broader context on balancing speed and print performance, see this high-speed 3D printing guidance.
Don’t increase temperature automatically. If you test it, stay within the filament maker’s recommended range and change temperature alone, then compare results. Avoid raising flow ratio or extrusion multiplier to compensate for a suspected obstruction. That can conceal the symptom without resolving a physical restriction. A careful under-extrusion at high print speeds fix should improve the repeatable test, not just one section of one model.
Know when a setting change is not enough
If under-extrusion continues at modest speeds with known-good material, stop cycling through profile changes. Follow the printer manufacturer’s instructions for safe inspection and maintenance, and don’t attempt repairs you’re uncertain about. Save your test log, slicer settings, photos, and any feeding sounds or error messages. This gives a technician useful information to assess the issue.
If repeatable tests point to a hardware problem, get professional 3D printer repair support from experienced technicians.
When to Seek 3D Printer Repair for Persistent Under-Extrusion
Not every thin line means a component has failed. But if the same extrusion problem persists after controlled tests with suitable material and more than one appropriate profile, pause before making more adjustments. Repeated feeding failures, extruder skipping, or visibly inconsistent filament movement are reasons to investigate the hardware rather than keep changing slicer values.
Stop if an inspection or adjustment goes beyond the printer manufacturer’s safe instructions, or if you’re unsure how to proceed. Visible damage to an extruder part is another reason not to continue printing as though the machine is operating normally. Don’t force filament through a suspected obstruction or disassemble a hot assembly unless the manufacturer’s guidance specifically describes a safe procedure.
Which symptoms suggest a persistent hardware problem?
Look for symptoms that return across repeatable tests, including at modest speeds where the printer previously produced acceptable results. If the extruder repeatedly skips, the filament moves irregularly, or the same under-extrusion appears with a known-good material and a suitable profile, settings alone may not explain it. These clues don’t identify a specific failed part, but they indicate that further profile tuning may not be the safest or most useful next step.
Stop testing if feeding failures recur, you see a cracked or damaged component, or the next check would require unfamiliar disassembly. Repeatedly printing through a feed problem can waste material and make results harder to interpret. Preserve the printer’s current settings and note what you observed before seeking help.
Prepare useful information for a repair assessment
Clear notes help an experienced technician understand what you’ve already tested. Include the printer model, filament type, slicer and profile, print temperature, speed, and the point at which defects first appear. State whether symptoms affect infill, walls, or both, and whether they continue at slower speeds. If you changed a setting, record the original and test values.
- Keep photos showing both the overall print and close-ups of the affected layers or lines.
- Capture the slicer preview around the area where the defect appears, if available.
- Note feeding symptoms such as repeated clicking, slipping, or visible irregular filament movement.
- Share any error messages and the checks you completed, including whether the issue repeated.
A short video can also show an intermittent feeding symptom that may not appear in a still photo. Don’t take the printer apart just to collect evidence; document only what you can safely observe. These details support a more informed repair assessment, though they don’t establish a particular diagnosis before the machine is evaluated.
When repeatable tests point to a persistent hardware issue, 3D Printing Canada’s professional repair services offer a practical next step. Share your notes and photos to help experienced technicians assess the problem. Explore professional 3D printer repair services when your under-extrusion at high print speeds fix calls for technical support.
Turn Your Test Results into a More Reliable Next Print
Once you’ve identified a speed range your printer handles consistently, keep that profile as a dependable starting point for future jobs. Save it alongside the material details and test notes. When you try a different filament or adjust a nozzle or hotend, you’ll have a useful reference for spotting what changed instead of starting from scratch.
A measured approach is the most useful under-extrusion at high print speeds fix because it helps you decide whether to tune the profile, review the material, or stop before attempting an uncertain repair. If feeding problems persist despite controlled tests, you don’t have to keep guessing. Experienced technicians at 3D Printing Canada provide professional 3D printer repair services to help assess ongoing printer issues.
Get expert help with persistent 3D printer issues and take the next step with confidence. Your next print can be a fresh start, backed by better information and a clearer plan.
Frequently Asked Questions
Can increasing the flow rate fix under-extrusion at high print speeds?
Sometimes, but increasing the flow ratio isn’t a reliable first fix. It changes how much filament the slicer commands, not how quickly the hotend can melt it. If the requested flow already exceeds the printer’s demonstrated capacity, a higher ratio may worsen inconsistent extrusion or cause over-extrusion in slower sections. For a safer under-extrusion at high print speeds fix, compare a known-good profile with a controlled test before adjusting extrusion values.
How do I calculate volumetric flow for a 3D print?
Multiply line width by layer height by print speed, using millimetres and millimetres per second; the result is cubic millimetres per second (mm³/s). For example, 0.4 mm × 0.2 mm × 80 mm/s estimates 6.4 mm³/s. This is a toolpath estimate, not a measurement of actual hotend capacity. Check whether your slicer reports a flow limit, then compare settings and test results on your own printer.
Can wet filament cause under-extrusion only at high speeds?
It can affect print consistency, but high-speed under-extrusion alone doesn’t confirm moisture is the cause. Listen for popping or crackling and look for a rough, bubbly surface, which can provide additional clues. To compare, use a properly stored sample of the same filament and keep the profile unchanged. Follow the filament manufacturer’s storage and drying instructions, since appropriate handling can vary by material.
Should I raise nozzle temperature when under-extrusion starts at higher speeds?
Only test a temperature increase if it’s appropriate for the filament and you can stay within its manufacturer’s recommended range. A warmer nozzle may help material flow in some situations, but it isn’t a universal solution and can affect surface quality or create other defects. Change temperature alone, then compare the result with your baseline. If the print doesn’t improve, restore the prior setting rather than raising it repeatedly.
Why does high-speed under-extrusion affect infill but not the outer walls?
Infill may use different speed or acceleration settings from outer walls, so its toolpath can demand more material in a short period. Check the slicer preview and compare the feature-specific settings before assuming a hardware fault. As a diagnostic, temporarily bring infill and wall speeds closer together while leaving other settings unchanged. If the defect shifts or disappears, that result helps narrow which toolpath conditions to examine next.
Can a larger nozzle prevent under-extrusion at high print speeds?
Not by itself. A larger nozzle can allow wider lines, which may change how much material a toolpath requests, but it doesn’t guarantee that the hotend can melt and deliver more filament consistently. Before swapping parts, check that the installed nozzle is clear and correctly fitted using the printer manufacturer’s instructions. A controlled test at reduced speed can help show whether the current setup’s flow demand is the main issue.