
The best filament for articulated models may not be the most flexible one. A joint’s movement depends on how the filament behaves alongside the model’s clearances and your printer’s settings. Choose the wrong combination, and even a well-designed print can come off the bed fused, stiff or fragile.
If you’re weighing PLA, PETG and TPU, the right choice depends on how the model will be used. A display piece has different demands from a print that will be handled often, bent or played with. Your printer matters too, especially when working with flexible TPU.
This guide compares PLA, PETG and TPU for articulated prints, explains what can cause joints to fuse, stick or break, and walks through a simple test-print workflow. Start by matching the material to the model’s intended movement, then check the fit with a small test before printing the full model.
Key Takeaways
- The best filament for articulated models depends on the movement you want, how the model will be handled and your printer’s capabilities.
- Compare PLA, PETG and TPU by rigidity, flexibility, detail and printing demands before settling on a material.
- Fused, stiff or broken joints can point to different issues, so use the symptoms to guide what you check next.
- Follow a simple test-print workflow to assess joint movement before printing the full model.
- Before buying filament in Canada, check the listing’s material, diameter and manufacturer guidance against your printer and model requirements.
What makes a filament suitable for articulated models?
Articulated models have connected sections designed to move after printing, such as linked limbs, hinged parts or a chain of joints. Each connection needs enough clearance to separate cleanly, while remaining strong enough for the way the model will be handled. That makes material choice only one part of the result.
Material flexibility describes how much a filament can bend; articulation describes whether a model’s designed joints can move. A soft filament won’t make a solid or fused connection articulate. Likewise, a rigid material can work well if the joint geometry and print tolerances allow the parts to move.
In the Fused Filament Fabrication process, material is deposited in layers to build the print. For articulated models, those layers must form the parts without closing the gaps between them. Joint geometry, clearances, extrusion accuracy and first-layer calibration all influence whether the sections release and move as intended.
Why do articulated prints need more than the right filament?
Models are designed with small gaps between connected parts so the printer can form them separately. If those gaps are too tight for your printer’s accuracy, changing the material may not solve the problem. Excess extrusion, first-layer squish or inaccurate calibration can also reduce clearance and leave joints stuck together.
Flexible filament and articulated design aren’t interchangeable. TPU may bend more readily than PLA, but the model still needs joints designed to move. Check the design and print settings together.
What should you decide before choosing a spool?
Start with the model’s intended use. Does it need crisp, rigid detail, resistance to knocks or sections that bend? Then check the creator’s material recommendations, print instructions and printer requirements. These details can indicate whether a particular material or setup is unsuitable.
Before buying, confirm that the filament diameter and material are compatible with your printer by checking its documentation. A printer that handles one material may not handle another in the same way. The best filament for articulated models suits both the model’s movement and your machine, rather than simply being the most flexible option.
PLA, PETG or TPU: which filament works best for articulated models?
There’s no universal winner. PLA, PETG and TPU behave differently, and the right choice depends on how a model’s joints are designed, how much movement you want and what your printer can handle. Use this comparison as a starting point, then check the model creator’s recommendations and test a joint before printing the full model.
| Material | Typical behaviour | Best fit to consider | Printing considerations |
|---|---|---|---|
| PLA | Rigid, holds detail well | Display models and defined joints | Common starting point; can be brittle under stress |
| PETG | Tougher-feeling, with some give | Models likely to be handled or knocked | Results depend on settings and joint clearance |
| TPU | Flexible and bendable | Designs intended to flex | Can be harder to feed and tune; check printer compatibility |
For broader material context, Xometry’s comprehensive 3D printing materials guide compares characteristics across materials. Use it alongside model-specific instructions: general material properties can’t tell you whether a particular joint will move freely.
When is PLA a practical choice for articulated models?
PLA is a practical starting point for rigid, detailed articulated prints where the joints don’t need to flex. Its stiffness can help preserve small features, but it won’t make a joint move on its own. A rigid print may still have stuck connections if the gaps are too tight or the print settings close them. Follow the model instructions and check joint movement on a small test print before printing the full model.
When should you consider PETG or TPU?
PETG can suit models that need a tougher-feeling alternative to rigid PLA. Its slight give may be useful for pieces that will see more handling, though it doesn’t guarantee stronger or freer-moving joints. Geometry, extrusion and printer setup still matter.
TPU is a better candidate for a design intended to bend. Its flexibility can make feeding and printing more demanding, and some printers may not be suitable for it. Check your printer’s material guidance before choosing a spool, and expect to tune settings carefully. Match the material to the intended movement rather than choosing by flexibility alone.
Ready to compare options? Browse filament categories, and confirm each listing’s material and diameter suit your printer.
Why do articulated joints fuse, stick or break?
A joint that won’t move doesn’t automatically mean you chose the wrong filament. Tight model clearances, first-layer squish, extrusion settings and material behaviour can all contribute. Diagnose what you see before changing several settings at once, so it’s easier to identify which factor may be affecting the print.
| Symptom | Possible contributors | What to check |
|---|---|---|
| Fused joints | Insufficient model clearance, excess material or gaps closed by the first layer | Model geometry, slicer preview, first-layer squish and extrusion calibration |
| Stiff movement | Small clearances, rough contact surfaces or stringing between sections | Joint gaps in the preview, extrusion and material-specific slicer guidance |
| Weak links | Thin geometry, a material that doesn’t suit the use, or poor layer bonding | Link thickness, model scale, filament choice and recommended print temperature |
| Stringing between parts | Settings that allow fine strands to form during travel | Filament-specific temperature and retraction guidance, plus cooling settings |
How can you troubleshoot fused or stiff joints?
Start with the model file and slicer preview. Check whether separate parts have visible gaps throughout the joint, not just at the top layers. If the preview shows the gaps closing, the design, scaling or slicing may be the issue. If the gaps appear open in the preview but print closed, check first-layer squish and extrusion calibration before blaming the filament.
Change one factor at a time and print a small joint section or calibration piece before repeating the full model. This helps you see whether a change improves separation without compromising the rest of the print.
What causes weak links, stringing or rough movement?
Thin links can break if the design is too delicate for the model’s intended handling or if the material is too brittle for the stresses involved. Scaling a model down can make those sections even less robust. Poor layer bonding may also contribute. Review the temperature guidance for your filament rather than assuming one setting suits every material and printer.
Stringing can leave fine strands between moving parts, adding friction even when the joints aren’t fused. Check your filament and printer recommendations for temperature, retraction and cooling. There’s no universal setting that guarantees a clean joint. The best filament for articulated models still needs compatible geometry and a well-tuned print process.
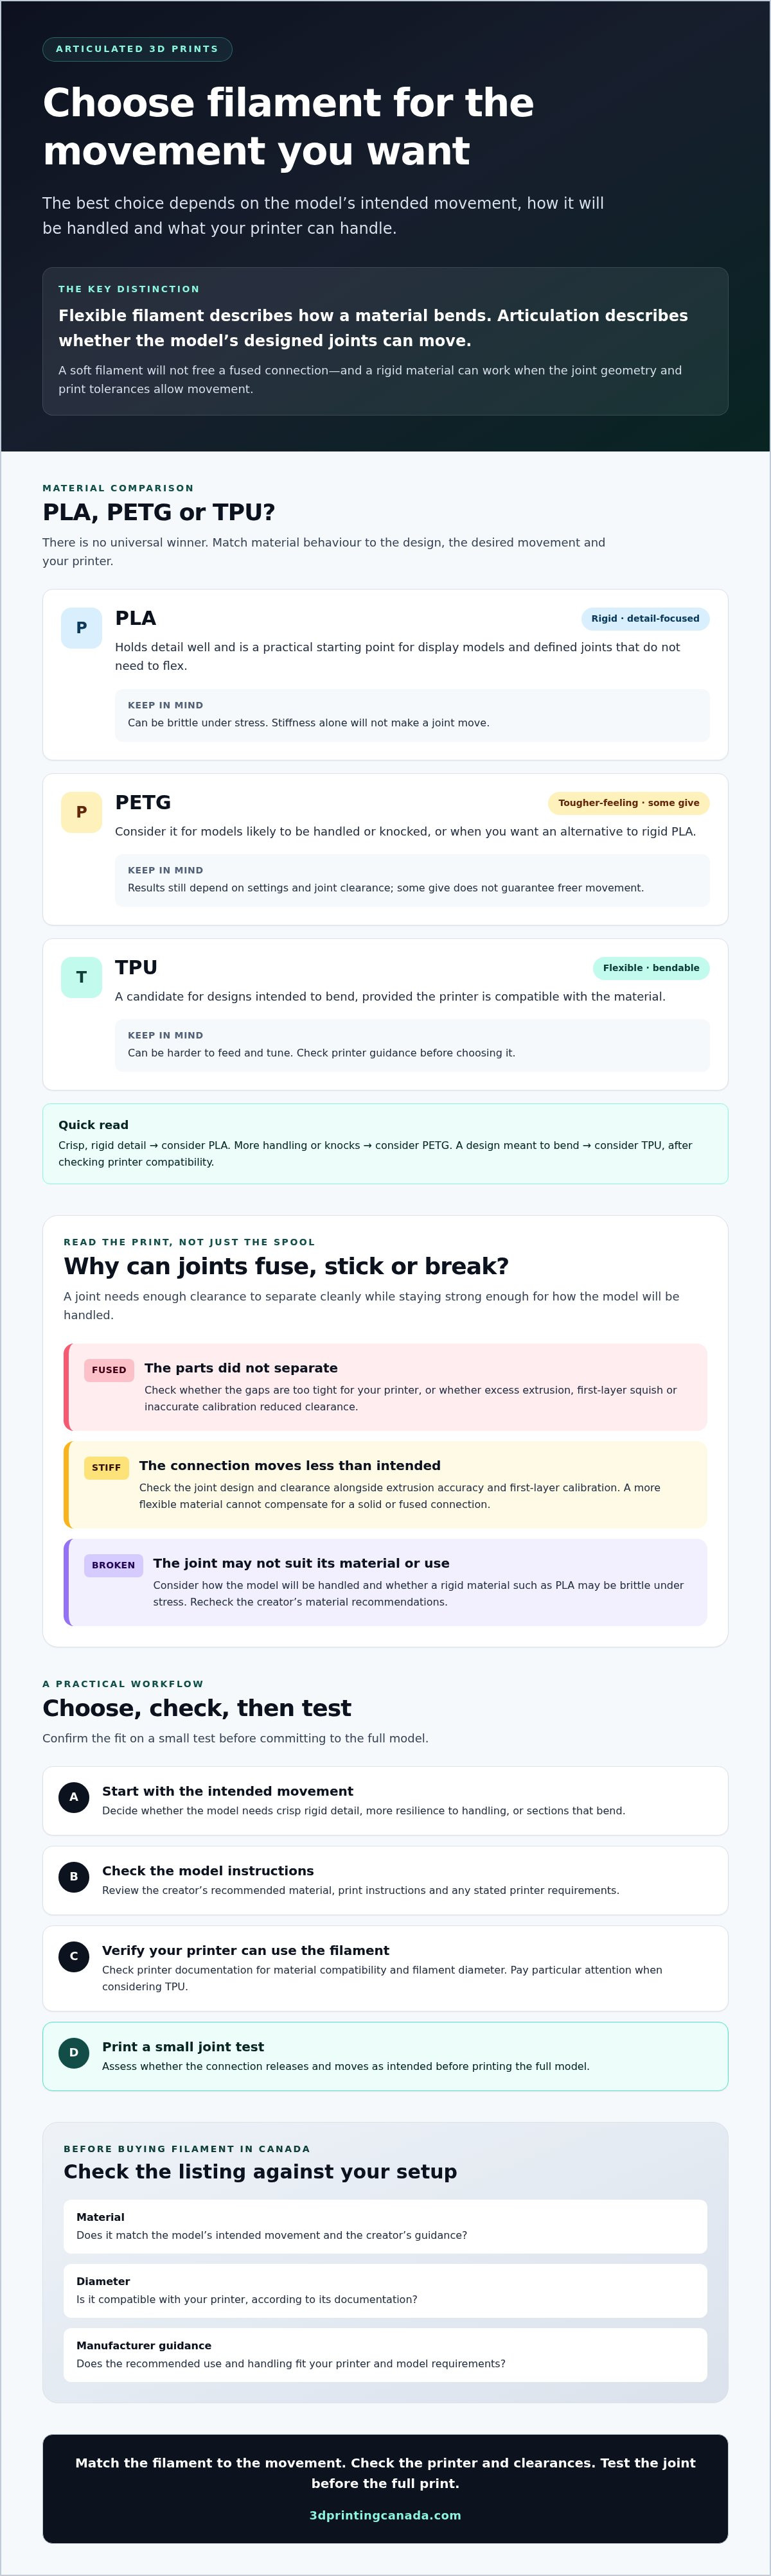
How to choose and test filament for your articulated print
A short check before printing can help you avoid using filament on a full model that won’t move as intended. Use this workflow to narrow down your material choice and see how it performs on your printer.
- Read the model instructions. Note the recommended material, print orientation, settings and any warnings about joint movement or scaling.
- Match material to use. Consider whether the model needs crisp, rigid detail, resistance to regular handling or flexible movement. Don’t assume a more flexible filament is automatically a better fit.
- Check printer compatibility. Review the printer manufacturer’s guidance for the material, including any equipment or setup requirements.
- Confirm filament diameter. Make sure the diameter listed for the spool matches what your printer accepts. Check the product listing and printer documentation rather than assuming all filament is interchangeable.
- Print a representative test. Use a joint sample or small articulated section if the model creator provides one. Let it cool, then check whether it moves as intended and whether the connection feels sound.
- Adjust methodically. If the test has rough movement, weak connections or visible defects, consult the printer and filament guidance. Change one setting at a time so you can judge its effect.
What should you check before buying filament?
Start with the model’s stated requirements, then consider how the print will be handled. Confirm that your printer supports the material and spool diameter, and follow the manufacturer’s setup recommendations. Product listings can help you compare filament categories, but check current material options and availability before choosing a spool. Base the decision on what the model and printer need.
How can a small test print prevent a failed model?
A test joint gives you a practical read on movement, surface quality and connection strength before you print the full model. After it cools, move the joint gently and look for sticking, excessive looseness or signs of stress. If the result isn’t right, revisit the model instructions and printer or filament guidance before changing settings. A controlled test makes it easier to find the best filament for articulated models on your setup.
Ready to compare material categories? Browse 3D printing filaments and check each listing against your printer’s requirements.
Where to buy filament for articulated models in Canada
Choose in this order: model requirements first, printer compatibility second, material preference third. That keeps the focus on how the joints are meant to move and what your equipment can print, rather than on a colour or finish that may not suit the job. The best filament for articulated models meets the design’s needs and is compatible with your printer.
3D Printing Canada offers filaments to hobbyists and professional customers across Canada. Check the current product listing rather than assuming a particular material, diameter or option is available.
How do you compare filament listings with confidence?
Check the material type and filament diameter against both the model instructions and your printer’s supported specifications. Review the manufacturer’s setup and handling guidance, along with any technical details provided in the listing. If a detail you need is missing, confirm it before ordering. Treat colour and finish as secondary: they won’t compensate for a material or diameter that isn’t right for your print.
Compare like with like. A material labelled flexible still needs to suit the model’s joint design and your printer. Use the model creator’s recommendations as your starting point, then weigh the practical requirements of the print, such as rigid detail, frequent handling or intended bending.
What should you do if your print still will not move?
Don’t switch materials straight away. Recheck the model design and slicer preview for clear joint gaps, then review first-layer calibration and extrusion settings. Consult the printer and filament manufacturers’ guidance for material-specific troubleshooting. If the same movement or extrusion problems persist across different prints, consider whether the printer may have a hardware issue rather than assuming the filament is at fault.
If hardware problems are suspected, 3D Printing Canada provides professional 3D printer repair services. For material selection, compare current listing details with your model and printer requirements before buying.
Explore filaments at 3D Printing Canada and check the product information to find an option that fits your articulated print.
Choose your material, then test the movement
The best filament for articulated models depends on what the joints need to do, how the print will be handled and what your printer supports. PLA can suit rigid, detailed models, PETG may be worth considering for more demanding handling, and TPU fits designs intended to bend. None can make a joint move if the model’s clearances or print calibration prevent it.
Check the model maker’s recommendations, confirm the filament’s material and diameter match your printer, then test a representative joint before printing the full model. If it sticks or feels weak, review the geometry and settings before switching materials. A small test helps you make adjustments with more confidence.
3D Printing Canada offers filaments to customers across Canada. If troubleshooting points to a possible printer hardware issue, professional 3D printer repair services are also available. Explore 3D printing filaments and compare current listing details with your model and printer requirements.
Choose carefully, test the movement and give your next articulated print a solid start.
Frequently Asked Questions
What is the best filament for articulated models?
The best filament for articulated models depends on the intended movement, handling and printer compatibility. PLA can suit rigid, detailed prints; PETG may suit models that need a tougher feel, while TPU can work for designs meant to bend. No material guarantees freely moving joints. Check the model creator’s recommendations and test a representative joint before printing the full model.
Is PLA good for printing articulated dragons?
Yes, PLA can work well for an articulated dragon designed for rigid, detailed parts and ordinary display or handling. The model’s joint clearances and your printer’s calibration matter as much as the filament. Follow the creator’s material and print instructions, and check that the joints move after a small test print. If the model will face frequent handling or stress, consider whether another compatible material better suits its use.
Can you print articulated models with PETG?
Yes, PETG can be used for articulated models if the printer supports it and the model’s design is suitable. Its added give compared with rigid PLA may be useful for a print that will be handled more, but it doesn’t automatically create stronger links or smoother joints. Check the model instructions and filament manufacturer’s settings, then test a joint to assess movement, surface quality and connection strength.
Is TPU too flexible for articulated 3D prints?
Not necessarily. TPU can suit models designed to bend or flex, but it may be a poor match for a design that needs rigid, precise parts. Flexible filament can also be harder to feed and tune, depending on the printer. Confirm your machine is compatible with TPU and follow its manufacturer’s guidance. A small test section can show whether the material provides the movement and stability your model needs.
Why are my 3D printed articulated joints fused?
Fused joints can result from tight model clearances, excess extrusion or first-layer squish that closes the gaps between moving parts. Stringing or inaccurate printer calibration may also contribute. Inspect the model and slicer preview to see whether the gaps are present before printing. If the preview looks clear, review your first-layer setup, extrusion and material-specific settings. Change one factor at a time and test a small section.
How do you make articulated 3D prints move more freely?
First check the model’s joint geometry and slicer preview for clear separation between parts. If the gaps look adequate, review first-layer squish, extrusion calibration and the filament’s recommended settings. Fine strands between joints can also create friction, so check the manufacturer’s guidance for temperature, retraction and cooling. Test a joint or small articulated section after it cools, and make one adjustment at a time to understand its effect.
Can any 3D printer print articulated models?
Not every printer will suit every articulated model or filament. The machine needs to support the chosen material and spool diameter, and its calibration must be accurate enough to preserve the model’s small joint clearances. Check both the printer manufacturer’s specifications and the model creator’s requirements. If you’re using flexible filament such as TPU, verify compatibility and setup guidance before printing, as it can be more demanding to feed and tune.
What should I check before buying filament for an articulated model?
Start with the model’s material recommendations and intended use, then confirm the filament’s material and diameter match your printer’s supported specifications. Review manufacturer guidance for setup and handling, and check current product listing details before choosing a spool. Treat colour and finish as secondary to compatibility and the model’s movement needs. If you’re unsure, test a small joint with a compatible material before committing to the full print.