
A lighter probe doesn’t automatically produce a more consistent first layer. In the biqu microprobe vs bltouch weight and precision test, the published figures make the MicroProbe look compelling: BIQU lists it at 6 g and reports standard deviations of 0.001 mm and 0.003 mm under different temperature conditions. BIQU’s comparison lists the BLTouch at 10 g, with repeatability around 0.005 mm. These figures aren’t from a head-to-head independent test, and BIQU doesn’t specify the method behind its accuracy claim.
It’s reasonable to want clearer evidence before taking on a probe swap, firmware changes and setup work. This guide separates what the weight figures establish from what precision claims can tell you, then walks you through a repeatable comparison on the same printer. You’ll learn how to control conditions, take multiple readings and judge variation without confusing a manufacturer specification with your own results. The goal is practical: decide whether either probe improves measurable repeatability on your machine, or whether your current setup is already doing the job.
Key Takeaways
- Learn why probe weight is a component specification, while repeatability helps assess consistency across readings.
- Use the biqu microprobe vs bltouch weight and precision test method to compare probes on the same printer, at the same bed points and under consistent conditions.
- Keep manufacturer claims separate from your test observations so the comparison stays fair and useful.
- Assess mount geometry, wiring, firmware support and probe offsets before deciding whether a change suits your setup.
- Choose based on measured repeatability and workflow fit, not weight alone.
BIQU MicroProbe vs BLTouch: What the weight and precision comparison means
Probe weight and probing performance answer different questions. Weight describes the mass of the component being mounted to the printer. Precision describes how consistently it reports a measurement when the same point is probed repeatedly. A lighter sensor may be useful in a particular toolhead setup, but weight alone can’t tell you whether it returns more consistent readings or produces a more reliable first layer.
Keep three ideas distinct when comparing specifications and test results:
- Weight: The mass of the probe or defined assembly, depending on what the figure includes.
- Repeatability: How closely repeated readings agree under the same conditions. A small spread suggests consistent results in that test.
- Accuracy: How close a reading is to a known reference. Readings can be consistent but offset from the reference, so repeatability alone doesn’t establish accuracy.
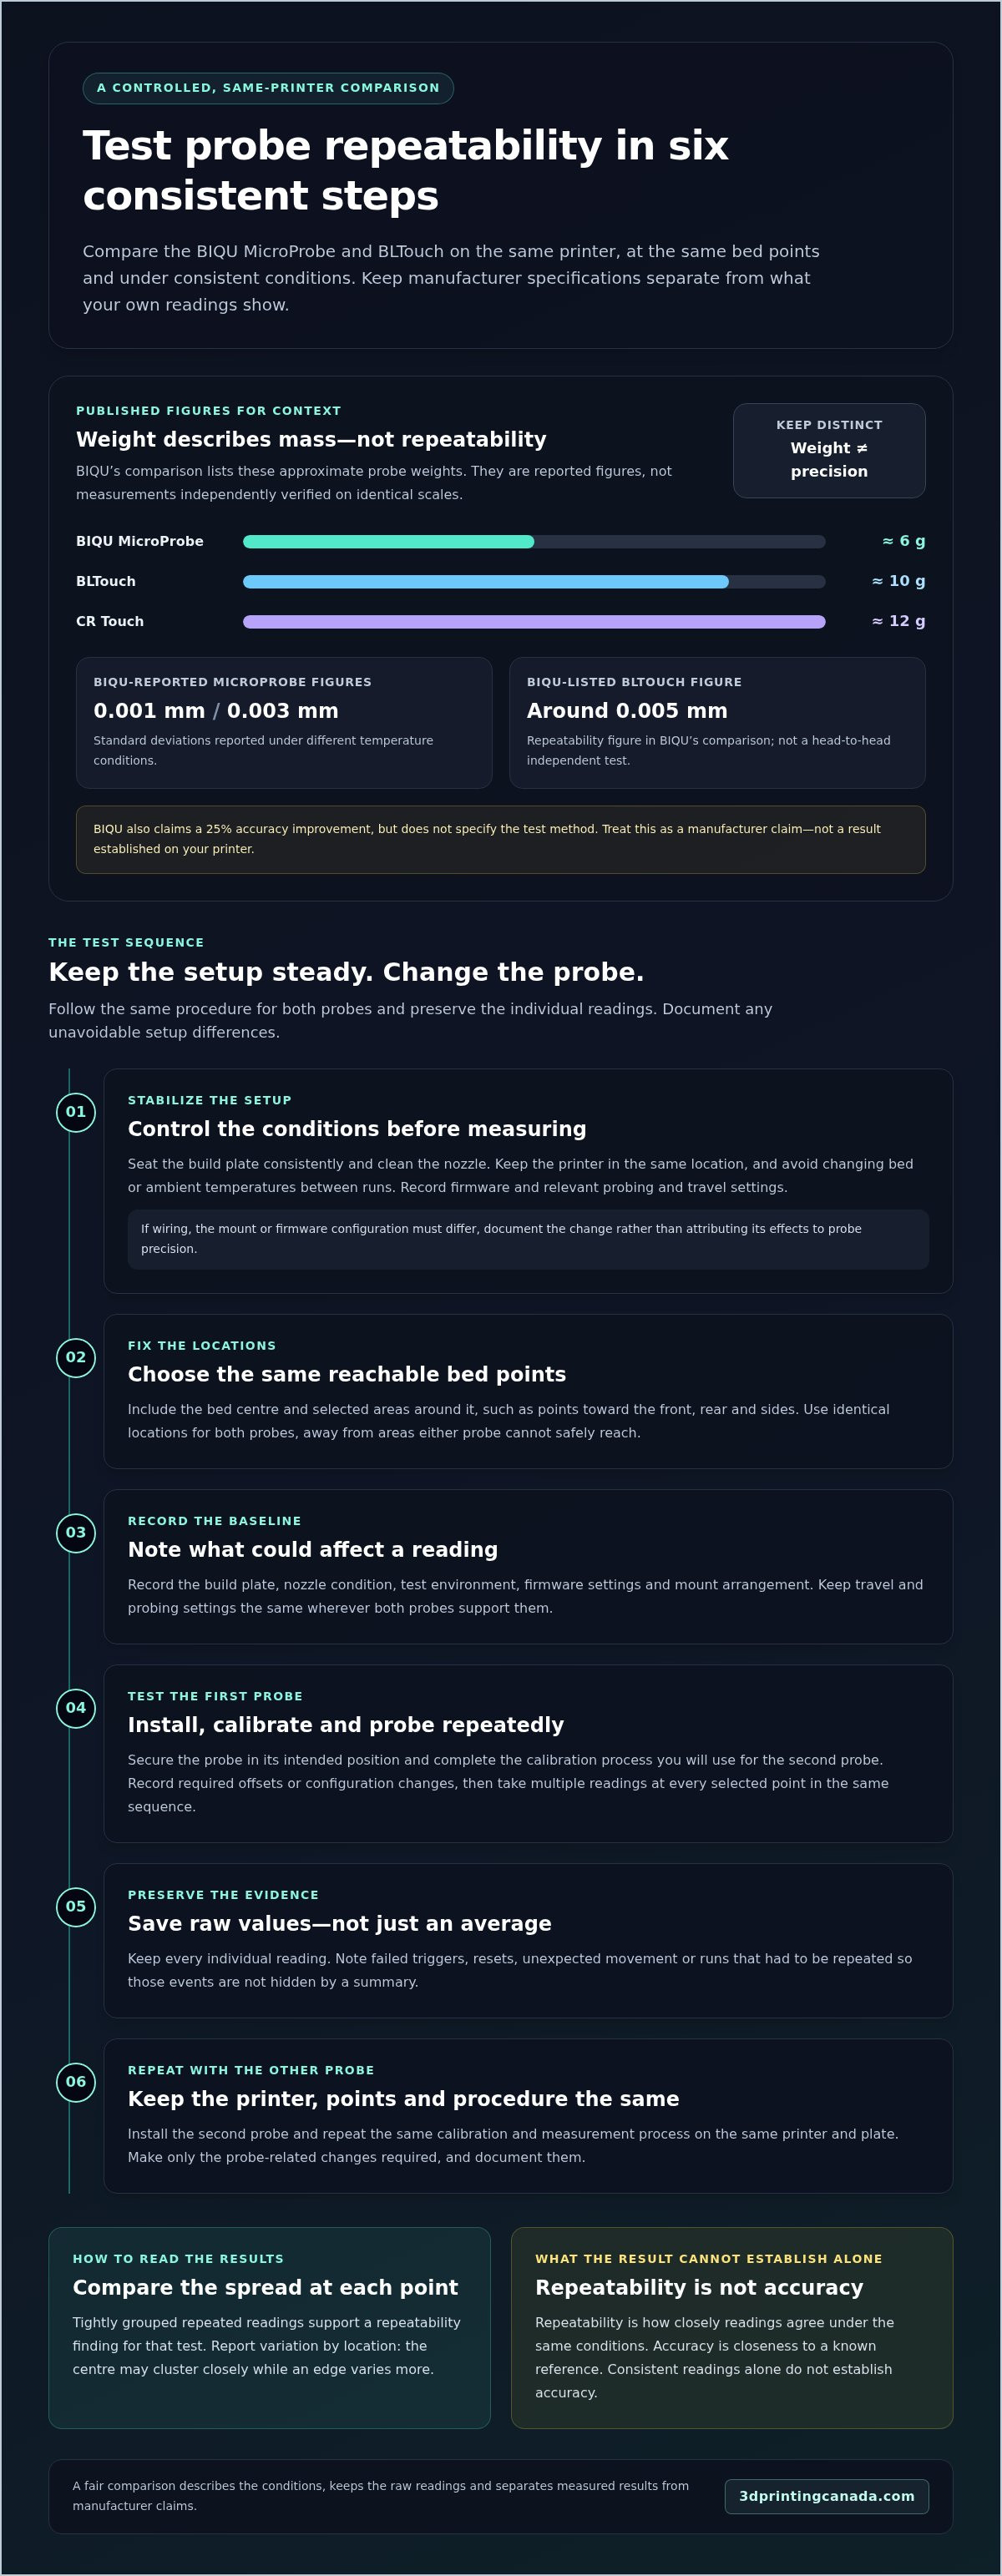
This distinction is central to a fair biqu microprobe vs bltouch weight and precision test. Tightly grouped readings support a claim about repeatability on that printer. An accuracy claim needs a suitable reference and a clearly described method.
What do the published MicroProbe and BLTouch weights show?
BIQU’s comparison lists the MicroProbe at approximately 6 g and the BLTouch at approximately 10 g. It also lists the CR Touch at approximately 12 g. Treat these as figures reported by BIQU, not measurements independently verified on identical scales. They show the relative weights in that comparison, but don’t establish how much mass each probe adds to a particular printer.
For a useful hands-on comparison, define the assembly before weighing it. Weigh both probes in the same configuration: either the probe components alone or each complete installed package. Include equivalent items, such as mounting brackets and wiring, in both totals. Comparing a bare probe with another probe plus its bracket and cable isn’t an apples-to-apples result. Record what you included so someone else can interpret or repeat the measurement.
Does a lighter bed-levelling probe mean better precision?
Not by itself. Less mass may matter mechanically on a moving toolhead, but it doesn’t prove that the sensor detects the bed more repeatably. Installation and test conditions also affect readings. A mount that shifts or flexes, inconsistent probe installation, or different firmware settings can influence results. Control these variables before attributing a difference to the probe.
BIQU also claims a 25% accuracy improvement, but doesn’t specify the test method or provide an independent, controlled comparison. Treat the percentage as a manufacturer claim, not a result established by readings from your printer.
Manufacturer claims describe what a company reports; an independent test establishes only what was measured under that test’s conditions. The weight figures offer useful context, while a controlled repeatability test is needed to compare performance on your own machine.
How to test MicroProbe and BLTouch precision under the same conditions
A useful comparison depends on controlling the setup, not chasing a particular result. Test each probe on the same printer and build plate, using the same test points and conditions. Change the probe, then keep everything else as consistent as the hardware allows. This helps separate probing variation from effects caused by a different mount, firmware configuration or test environment.
Control the printer setup before comparing probes
Before taking measurements, check that the build plate is seated consistently and the nozzle is clean. Keep the printer in the same location, and avoid changing bed or ambient temperatures between runs. Record the firmware version and relevant probing and travel settings. If a probe requires different wiring, a different mount or probe-specific firmware configuration, document the difference rather than treating it as a precision result.
- Choose fixed test points. Use the bed centre and selected areas around it, such as points toward the front, rear and sides. Keep the locations identical for both probes and away from areas the probe cannot safely reach.
- Record the baseline setup. Note the build plate, nozzle condition, test environment, firmware settings and mount arrangement. Keep travel and probing settings the same where both probes support them.
- Install the first probe. Secure it in its intended position, then complete the same calibration process you’ll use for the second probe. Record any required offset or configuration changes.
- Probe every selected point repeatedly. Take multiple readings at each location instead of relying on one mesh or measurement. Use the same sequence of points for each probe.
- Save the raw readings. Keep the individual values, not just a final average. Note failed triggers, resets, unexpected movement or runs that had to be repeated.
- Install the second probe and repeat. Use the same printer, plate, test points and calibration procedure. Make only the probe-related changes required for installation, and document them.
Measure repeatability instead of relying on one reading
Compare the spread of readings at each point for each probe. For example, if repeated readings at the centre cluster closely but readings near one edge vary more, report that difference by location. Don’t select only the best reading or combine all points into one number that could hide a local inconsistency. Keep the raw observations so you can review the pattern and spot unusual runs.
A fair probe test changes only the probe, while holding the printer, measurement points and test conditions constant as far as the installation allows. If the mounts or firmware settings differ, state that clearly. Your result then describes the complete setups, not just the sensors in isolation. This matched approach gives your biqu microprobe vs bltouch weight and precision test practical value without presenting a result from one printer as a universal specification.
If inconsistent readings continue after a controlled test, the cause may extend beyond the probe. Persistent printer problems may call for professional 3D printer repair services.
How to compare MicroProbe and BLTouch results without overreading the data
Keep specifications and observations separate. Published figures describe what a company reports; your test observations describe what happened on one printer under documented conditions. Don’t fill gaps in a comparison with assumed results. If you haven’t completed the test, leave the observation fields blank rather than implying a measurement was taken.
A table makes those distinctions visible. Attribute each claim and include enough setup detail for readers to understand what the observations apply to.
| Comparison item | BIQU MicroProbe | BLTouch | Evidence to record |
|---|---|---|---|
| Published weight | Approximately 6 g | Approximately 10 g | BIQU’s comparison; note which components the figures include, if stated. |
| Measurement spread | Enter your observed range for each test point. | Enter your observed range for each test point. | Your raw repeated readings and calculation method. |
| Installation variables | Record mount, wiring and firmware changes. | Record mount, wiring and firmware changes. | Notes from each installation and calibration. |
| Claim or observation source | Identify manufacturer statements separately from test results. | Identify manufacturer statements separately from test results. | Claim attribution and date; printer and test conditions for observations. |
What does BIQU’s 25% accuracy claim establish?
BIQU claims a 25% accuracy improvement. The company doesn’t define the accuracy metric or identify the comparison baseline, so the percentage can’t be interpreted as a specific reduction in measurement error from the information provided. Attribute it directly to BIQU. Don’t present it as independently verified or as a result that will apply to every printer.
How should readers interpret variation between repeated readings?
For each point, calculate the spread by subtracting the lowest reading from the highest. A tighter cluster indicates greater repeatability in that test setup, not necessarily greater accuracy against a calibrated reference. If readings vary unexpectedly, check the installation and test conditions before drawing a product-level conclusion. Report what you observed, including inconsistent runs, rather than filtering out inconvenient readings.
Make the scope explicit. Your results apply to the printer, mount, firmware, calibration and conditions you tested; another configuration may behave differently. A careful biqu microprobe vs bltouch weight and precision test identifies the claims being compared and reports measurements only after they’ve been collected and documented. That’s more useful than turning a manufacturer statement into a universal verdict.
Which probe fits your printer, mounting setup and levelling workflow?
A probe can have promising published specifications and still be a poor fit for a particular printer. Before choosing one, look beyond sensor measurements to the physical mount, electrical connection, firmware support and calibration steps your setup requires. A mismatch in any of these areas can add installation work or affect your readings, making it harder to judge whether the probe itself is performing consistently.
What compatibility details matter before a probe swap?
Start with your specific printer model and toolhead arrangement. Check whether there’s a suitable mounting position, whether the connector and wiring match the printer’s requirements, and whether your firmware supports the probe and its configuration. BIQU’s examples include BIQU Hurakan, BIQU B1, Rat Rig VC3 and Voron 2.4. These are examples, not a guarantee of fit for every version or modified setup.
- Mount geometry: Confirm that the probe can sit securely in the intended position without obstructing the nozzle or bed movement.
- Wiring and connector: Compare the probe’s connection requirements with the printer’s wiring and control board arrangement.
- Firmware support: Account for any required configuration changes instead of assuming existing settings will work unchanged.
- Probe offsets: Record the probe’s position relative to the nozzle and apply the appropriate offset after installation.
Don’t assume BLTouch mounting hardware or firmware settings transfer directly to the MicroProbe. Even if the mounting points appear similar, a changed probe position can affect the measured offset and the area the probe can reach. Treat compatibility statements as a starting point, then assess the actual printer configuration.
When is a probe result a setup issue rather than a precision issue?
Before blaming inconsistent results on the sensor, inspect the installation. A mount that can move, irregular triggering, loose wiring or an incorrect probe offset can complicate readings or first-layer results. After installing either probe, complete its calibration process and verify the relevant offsets before comparing measurements or prints.
Use first-layer results as supporting evidence, not as a standalone precision measurement. A print can show whether the levelling workflow is working well in practice, but the outcome can also reflect calibration and other printer conditions. Compare it with the recorded probe readings: consistent measurements alongside an uneven first layer point to a different issue than readings that vary between repeated tests.
For a useful biqu microprobe vs bltouch weight and precision test, record the mount, wiring, firmware adjustments and offsets for each installation. That makes the conclusion specific and honest: it reflects the complete setup you tested, rather than promising that one probe will suit every printer.
If persistent hardware problems remain after checking installation and calibration, explore professional 3D printer repair services.
Choose between BIQU MicroProbe and BLTouch using evidence, not weight alone
The published figures offer a starting point, not a verdict. BIQU lists the MicroProbe at 6 g and the BLTouch at 10 g in its comparison. Published MicroProbe V2.0 specifications report standard deviations of 0.001 mm at 24°C ambient and a 60°C bed, and 0.003 mm at 60°C ambient and a 100°C bed. The BLTouch is reported at around 0.005 mm standard deviation. These figures aren’t from one matched, independent test, so don’t treat them as a direct performance ranking.
Keep manufacturer specifications separate from any readings you collect yourself. Your test observations should identify the printer, installation, firmware, test points and conditions. If you haven’t run the comparison, leave the observation column empty. Don’t imply that a test was completed or use figures from a different setup as your own.
When might the MicroProbe’s lower published weight matter?
Weight may matter if you’re assessing the mass mounted to a moving toolhead. But the 6 g and 10 g figures are useful only if you compare equivalent assemblies and understand what each figure includes. Mounts, wiring and installation can change the weight of the complete setup. Even a clear difference in probe mass doesn’t establish an improvement in print quality or measurement repeatability.
Consider weight alongside practical evidence: whether the probe fits securely, whether the required firmware and wiring work with your configuration, and how tightly repeated readings cluster at the same points. A lighter probe may suit your priorities, but only results from your own setup can show how its readings compare there.
When should a printer owner keep the current probe?
If repeated readings are consistent and first layers are coming out as expected, a probe swap may add installation and calibration work without addressing a real problem. Before changing hardware, inspect the mount, confirm the probe offset and review relevant firmware settings. If readings still vary, repeat the test after checking the installation instead of assuming the probe’s weight is the cause.
For the biqu microprobe vs bltouch weight and precision test, choose based on repeatability on your printer, secure fit, firmware support and how well the option suits your existing levelling workflow. A lighter probe is a specification, not proof of superior precision. If hardware issues continue to disrupt levelling after setup checks, professional 3D printer repair services can help.
Make your next probe decision with confidence
Turn your comparison into a practical next step: decide what you want to improve, then measure that outcome on your own printer before changing parts. If your current probe gives repeatable readings and dependable first layers, keeping your setup may be the simplest choice. If results remain inconsistent, use your notes to pinpoint whether the issue follows the probe, its installation or the printer itself.
The biqu microprobe vs bltouch weight and precision test is most useful when it helps you make a decision based on evidence from your machine, not a headline specification. Keep your readings and configuration notes handy as you plan any adjustment. A clear record makes troubleshooting more focused and helps you judge whether a change actually made a difference.
For your next 3D printing project, explore 3D printers, scanners, filaments and accessories from 3D Printing Canada. If a persistent hardware issue is getting in the way, 3D Printing Canada also provides professional 3D printer repair services. Explore the products and support available, or book a repair for an ongoing printer issue.
Frequently Asked Questions
Is the BIQU MicroProbe lighter than the BLTouch?
Yes. BIQU’s comparison lists the MicroProbe at approximately 6 g and the BLTouch at approximately 10 g. These figures compare the probes as reported, but may not represent the complete installed assemblies. For a hands-on comparison, weigh both with equivalent components included, such as brackets and wiring. That gives you a more useful estimate of the mass each setup adds to your printer’s moving toolhead.
Does a lighter 3D printer probe improve print precision?
No, not by itself. Lower mass may be relevant when assessing a moving toolhead, but it doesn’t show how consistently a probe detects the bed. For example, a lighter probe could still give variable readings if its mount shifts or the installation is unreliable. Compare repeated measurements and check the complete setup before deciding whether a weight difference has practical value on your printer.
How accurate is the BIQU MicroProbe compared with the BLTouch?
Published figures report MicroProbe V2.0 standard deviations of 0.001 mm at 24°C ambient with a 60°C bed, and 0.003 mm at 60°C ambient with a 100°C bed. The BLTouch is reported at around 0.005 mm standard deviation. These figures don’t establish a direct winner unless test methods and conditions match. In a biqu microprobe vs bltouch weight and precision test, compare your own repeated readings under the same conditions.
Can a BIQU MicroProbe fit a BLTouch mounting bracket?
Don’t assume it will fit. Physical fit depends on the bracket’s hole spacing, probe dimensions, clearance and position relative to the nozzle. Compare the mounting information for the exact probe and bracket, then check that the installed probe can reach the intended bed area without obstruction. Even if a bracket can be adapted, you’ll need to secure the probe properly and set its position and offsets for your printer.
How can I check whether my printer firmware supports a replacement probe?
Check the firmware documentation and configuration for your printer, control board and installed version. Look for instructions specific to the probe type, including the required input connection and settings. Then confirm that the configuration can be updated and that you can recalibrate the probe offset after installation. General support for a probe doesn’t automatically mean your current firmware configuration is ready for it.
What does probe repeatability mean in 3D printing?
Repeatability describes how closely the probe’s readings agree when it measures the same location multiple times under unchanged conditions. For example, readings that cluster tightly at one bed point show better repeatability there than readings spread farther apart. It doesn’t tell you by itself whether those measurements match a calibrated reference. Record the individual readings so you can see variation instead of relying on one result.
Should I replace my BLTouch if my first layer is inconsistent?
Not as your first troubleshooting step. Recheck the nozzle-to-bed offset, bed condition, probe mounting and firmware settings, then run the same calibration process and test again. If the probe’s repeated readings are stable but the print still varies, replacing it may not address the cause. If hardware problems persist after setup checks, professional 3D printer repair services can help investigate the printer.