
More fans don’t automatically mean better prints. A dual 5015 blower fan duct upgrade cooling setup can help with overhangs and bridges, but the result depends on the duct’s airflow, printer fit, and slicer settings. If the air misses the part, crowds the nozzle, or cools a material that needs warmth, adding blowers may create new problems instead of solving old ones.
Before installing a duct, check whether it suits your toolhead, works with your printer’s wiring, and is likely to improve the prints you care about. This guide explains how to assess compatibility, choose a design for your printer and materials, and install the setup with careful checks for voltage, polarity, clearance, and fan control. You’ll also learn how to tune cooling for different print features and judge results with controlled test prints.
Stronger part cooling can improve some print features, but it can’t fix problems such as poor first-layer adhesion or unsuitable print settings. Follow the steps below to make an informed upgrade without assuming that more airflow is always better.
Key Takeaways
- Identify whether your print problem calls for stronger part cooling before changing hardware.
- Compare duct options by confirmed printer and toolhead fit, airflow direction, access, and ease of maintenance.
- For a dual 5015 blower fan duct upgrade cooling setup, assess duct geometry and balanced airflow as carefully as fan count.
- Use a safe, methodical installation workflow: save settings, power down, verify electrical requirements, then inspect and test.
- Tune slicer cooling settings and assess results with controlled prints before deciding whether the upgrade helps.
Why consider a dual 5015 blower fan duct upgrade for 3D printing?
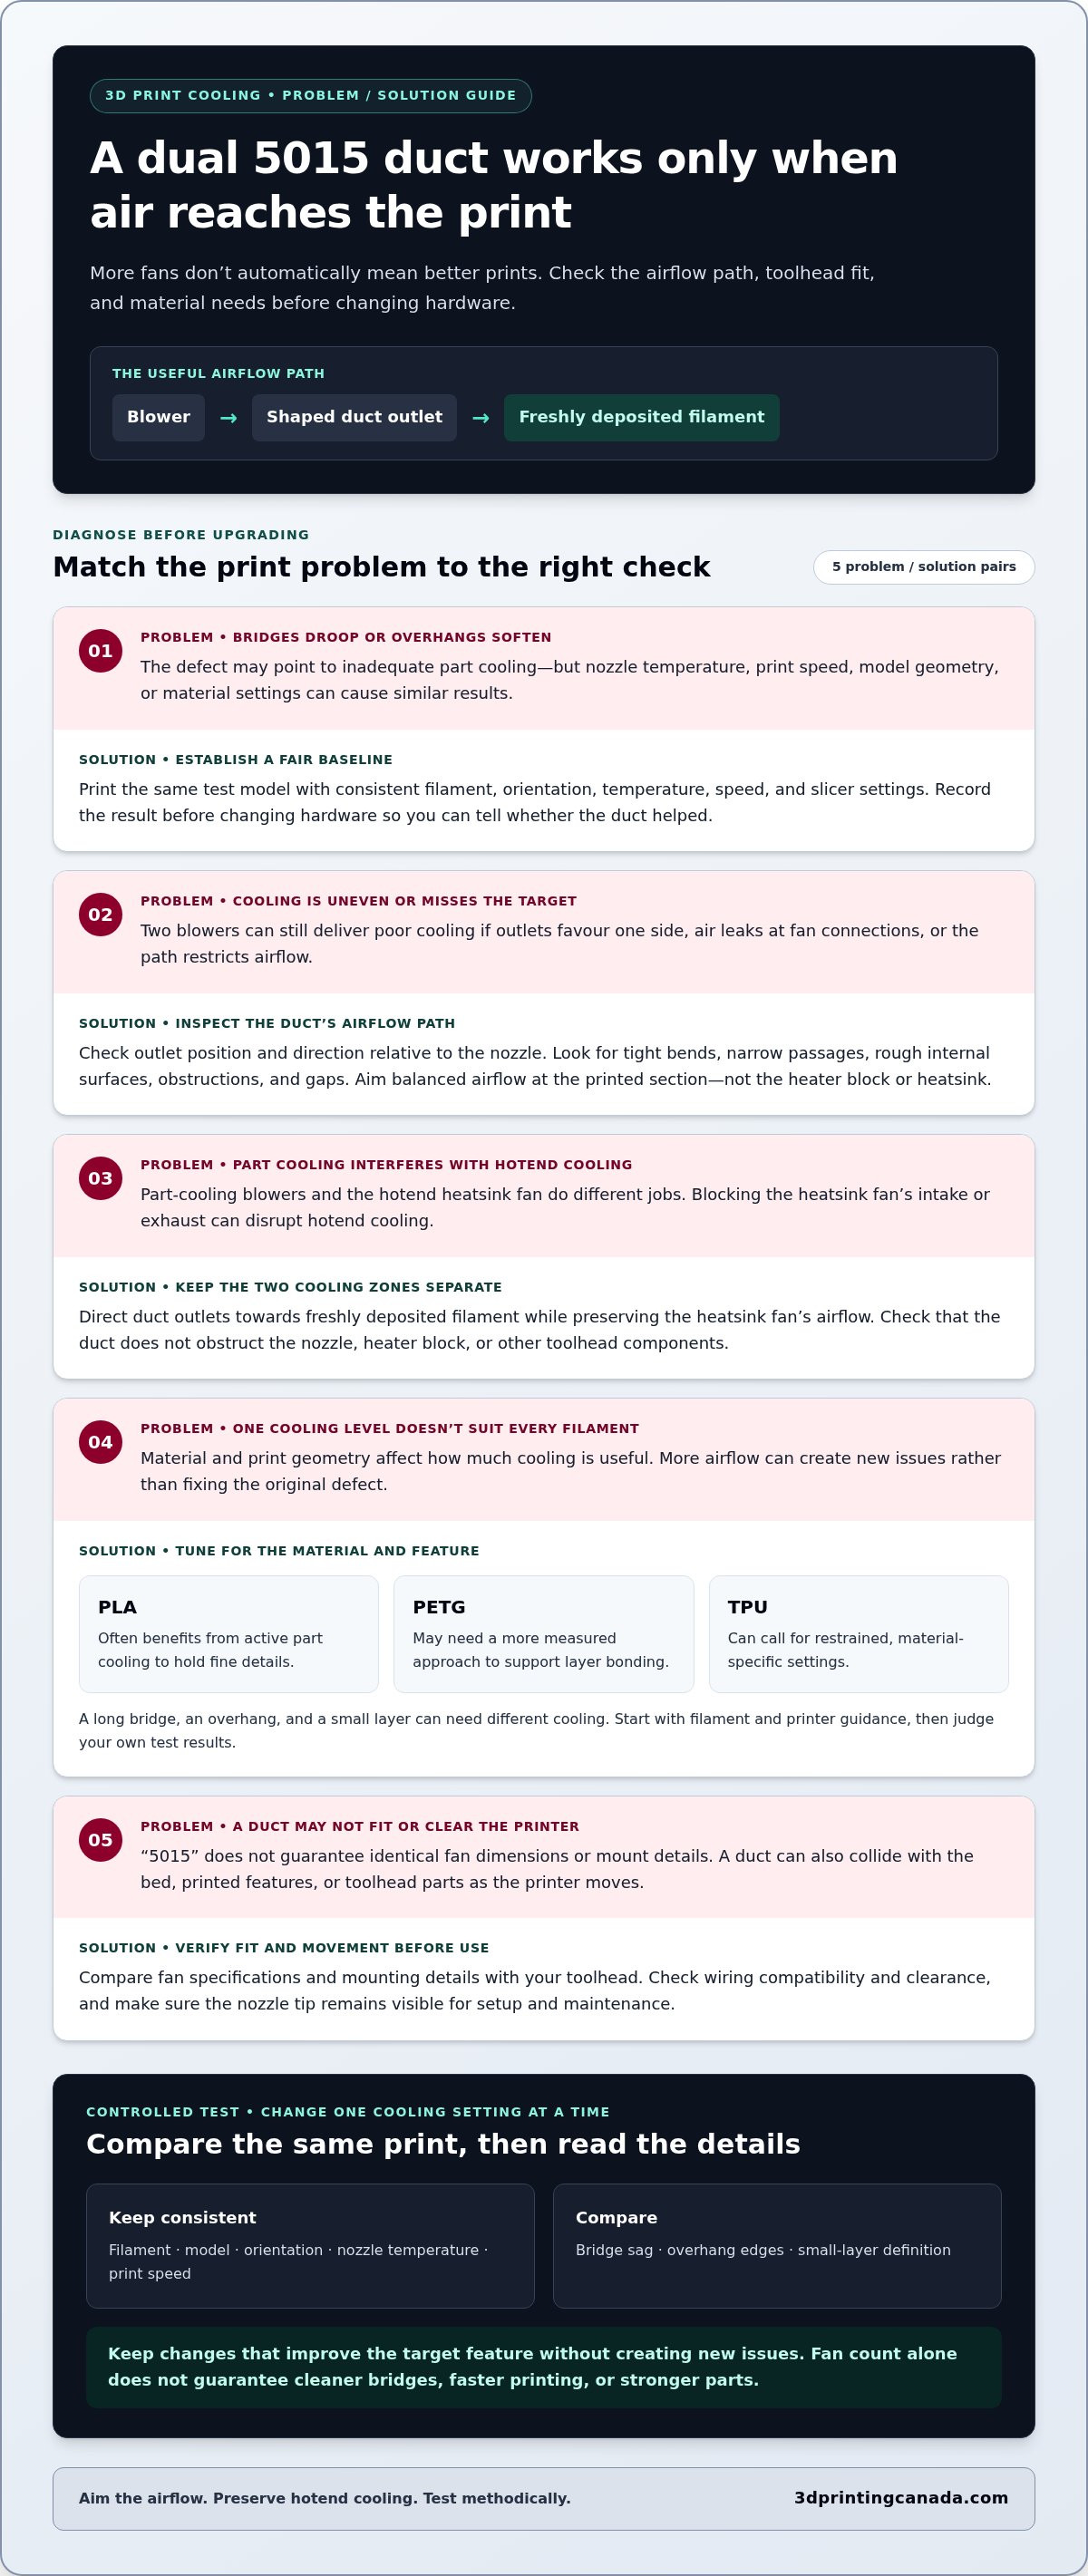
A dual 5015 duct uses two compact centrifugal blower fans to send part-cooling air through shaped outlets aimed at freshly deposited filament. The goal isn’t simply to move more air around the toolhead. It’s to direct airflow where plastic needs to cool and solidify, especially on bridges, overhangs, or short layers that leave little time for the previous layer to set.
Part cooling and hotend cooling serve different purposes. A printer’s hotend heatsink fan helps keep heat from travelling up the filament path. A part-cooling blower targets the print. Treating these fans as interchangeable can cool the wrong area or disrupt hotend operation. The duct’s shape and outlet direction determine where much of the airflow goes.
What does a 5015 blower do in a printer toolhead?
“5015” is a size designation commonly used for this blower format, but don’t assume every fan or mount with that label has identical dimensions. Compare the fan specifications and duct mounting details with your toolhead. Unlike a typical axial fan that pushes air broadly, a centrifugal blower draws air in and directs it through an outlet, where a duct can guide it towards the print.
In a dual setup, both outlets should deliver air to the intended area without obstructing the nozzle, heater block, or other toolhead components. The target is the recently printed section, not the heatsink or the entire build area.
Which print problems might stronger part cooling address?
Targeted airflow may help a bridge hold its shape instead of drooping, or keep an overhang from becoming soft as each new line is laid down. It may also help when small layers remain warm because the nozzle returns before the plastic has had enough time to cool. These are reasons to investigate part cooling, not proof that the fan duct is the cause.
Similar defects can result from a nozzle temperature that’s too high, print speed, model geometry, or material-specific settings. Changing fans before checking those factors can add wiring and fit work without addressing the problem. Establish a baseline first: print the same test model with consistent filament, orientation, temperature, speed, and slicer settings, then record the results. That gives you a fair comparison after a hardware change.
A dual 5015 blower fan duct upgrade cooling arrangement is most useful when a repeatable test points to inadequate part cooling and the duct can direct air evenly at the problem area. More fan capacity alone doesn’t guarantee cleaner bridges, faster printing, or stronger parts. Excessive or poorly aimed airflow can also affect the print, and material requirements differ. Keep the goal specific: improve cooling where the print needs it while preserving stable hotend operation and reliable adhesion between layers.
How airflow, duct shape, and material affect dual 5015 cooling
Two blowers only help if their air reaches the print in a useful, controlled way. Outlet direction, distance from the nozzle, and airflow balance all influence whether cooling is even or concentrated on one side. Judge a dual 5015 blower fan duct upgrade cooling setup by where it sends air, not by fan count alone.
Part cooling and hotend cooling also need to remain separate. The duct should guide air towards freshly deposited filament without blocking the hotend heatsink fan’s intake or exhaust. If airflow around the heatsink is restricted, the toolhead may not cool as intended, even if the printed part receives more air.
How duct geometry changes where cooling air lands
Balanced outlets can cool both sides of a line or bridge more evenly. A duct that favours one side may produce uneven results, especially when the toolhead changes travel direction. Inspect outlet positions relative to the nozzle, and check that the duct leaves the nozzle tip visible for setup and maintenance. The assembly also needs enough clearance to avoid colliding with the bed, printed features, or other toolhead parts as the printer moves.
Pay attention to the airflow path. Tight bends, narrow passages, rough internal surfaces, or gaps at fan connections can restrict or leak air before it reaches the outlets. Two fans feeding a poorly shaped path may deliver less useful cooling at the print than expected. Check for obstructions and gaps, and make sure each outlet points towards the intended area rather than the heater block or heatsink.
Match cooling expectations to the filament and print
Filaments respond differently to cooling, so there’s no universal fan setting for every printer or material. PLA often benefits from active part cooling to hold fine details, while PETG may need a more measured approach to support layer bonding. TPU can also call for restrained, material-specific settings. Start with the filament and printer guidance, then adjust based on your own test results.
Print geometry changes the cooling target too. A long bridge may need different airflow from a small layer that gives the nozzle little time away from the same area. Overhang angle, wall thickness, print speed, and the slicer’s minimum layer time all affect how much cooling is useful. More airflow won’t correct a temperature or speed setting that’s causing the defect.
Test methodically. Keep filament, model, orientation, nozzle temperature, and speed consistent while adjusting one cooling setting at a time. Compare bridge sag, overhang edges, and small-layer definition, then keep the changes that improve results without creating new issues. For printer accessories and compatible equipment, explore the 3D printing accessories range as you plan your setup.
How to compare dual 5015 blower fan duct designs before printing one
A duct can look like a close match in a rendered image and still fail to fit your toolhead. Printer revisions may change mounting points, probe position, wiring routes, or the space available around the hotend. Compare documented fit and assembly details before printing a design. Treat visual similarity as a starting clue, not proof of compatibility.
Use the checklist below to compare practical details. If a design’s dimensions or revision notes are missing, you’ll have less information to assess its fit before committing time and material to a print.
- Printer and toolhead fit: Look for the exact printer model and toolhead revision. Compare mounting points and stated clearances with your hardware.
- Fan orientation: Check how each blower sits and whether the design explains its installation direction and required hardware.
- Outlet position: See where both outlets aim relative to the nozzle. Look for a layout that directs air towards the print without blocking nozzle visibility.
- Access: Consider whether you can reach the nozzle, probe, and routine service points after assembly.
- Serviceability: Review how the fans and duct sections attach. Clear assembly notes make inspection, cleaning, or later removal easier to plan.
Check printer and toolhead compatibility first
Match the design file to your exact printer and toolhead revision, not just the printer family name. Check dimensions and mounting locations against manufacturer documentation or measurements of your own assembly. Confirm that the design leaves room for the nozzle, probe, wires, and moving parts throughout the toolhead’s travel. Read the designer’s notes for required hardware, fan orientation, and assembly steps before printing.
For Bambu Lab owners comparing related upgrades, the Bambu Lab accessories guide offers broader context for planning printer accessories. Assess any duct against your specific machine and revision; a similar-looking toolhead doesn’t establish a fit.
Compare airflow layout and maintenance access
Check that both outlets aim consistently towards the print while leaving the nozzle visible and the hotend’s own airflow path unobstructed. Think beyond installation too: can you remove the duct or reach the nozzle for a change without dismantling unrelated parts? A clearly documented design with stated dimensions and assembly requirements is easier to assess than a polished render with few practical details.
Before printing, compare each candidate using the same criteria:
- Fit evidence: Does the documentation name your exact model and revision, and show mounting dimensions?
- Clearance: Are probe, wire, nozzle, and movement clearances addressed?
- Air path: Can you see how both outlets are positioned and oriented?
- Upkeep: Are attachment points and removal steps understandable?
A dual 5015 blower fan duct upgrade cooling design is easier to evaluate when its documented dimensions, fit notes, and assembly requirements answer these questions before printing. Choose evidence over appearance, then verify the fit carefully during a dry assembly before powering or testing the modified toolhead.
Install and tune a dual 5015 blower fan duct step by step
A careful installation protects your printer and gives you a fair way to judge the change. Work through the checks in order. Don’t assume the new fans are electrically or mechanically compatible just because they fit the printed duct.
Prepare the printer and install the duct
Before disassembly, save or record your slicer’s cooling settings and print a baseline bridge or overhang test. Check the duct file’s recommended orientation, print material, fasteners, and assembly notes. Follow the printer and fan manufacturers’ instructions for electrical work, and power down the printer before handling wiring.
- Confirm the fit. Compare the duct with your exact printer and toolhead revision. Check mounting points, nozzle and probe clearance, wire routing, and space around moving parts. Don’t rely on visual resemblance alone.
- Verify electrical compatibility. Use manufacturer documentation to check each fan’s voltage, connector, and polarity, along with the printer’s fan-control method and firmware limits. Don’t connect a fan based on wire colour or connector shape alone. If the setup requires wiring changes, follow the manufacturers’ electrical instructions.
- Install the assembly. Secure the fans and duct as specified by the design. Keep wiring clear of the heater block, moving joints, and other areas where it could rub or become pinched.
- Inspect movement and clearance. With power still off, move the toolhead carefully through its travel by hand if the printer’s instructions allow it. Check for collisions, cable strain, loose fasteners, or a duct that could touch the bed or print.
- Test fan operation. Restore power and use the printer’s normal controls to check that both blowers respond as expected. Confirm that airflow reaches the intended outlets and that the hotend heatsink airflow remains unobstructed.
Validate airflow with a controlled test print
Stop immediately if a fan behaves unexpectedly, a component rubs, wiring is strained, or the duct interferes with hotend cooling. Correct the issue before printing. Once the assembly passes its checks, use the same test model, filament, orientation, temperature, and speed as your baseline.
- Choose a repeatable test. A bridge or overhang model makes it easier to compare sagging, edge definition, and surface finish.
- Inspect both outlets. Check that airflow is present and directed consistently towards the print, not the heatsink or heater block.
- Change one setting at a time. Adjust the slicer’s fan curve or feature-specific cooling values in small steps, then repeat the test. There’s no universal fan percentage or curve that suits every printer, filament, and duct.
- Record the result. Note settings and visible defects, including any new issues. Keep changes only when the controlled comparison supports them.
For compatible 3D printing equipment and accessories, explore 3D printing accessories as you plan your setup.
Decide whether a dual 5015 duct is the right cooling upgrade
A dual 5015 setup may help if repeatable tests show that a print needs more targeted part cooling. It also adds fans, wiring, fit checks, tuning, and another assembly to maintain. Before replacing hardware, troubleshoot nozzle temperature, print speed, material settings, and slicer cooling values. A duct can’t correct a problem caused by an unsuitable setting or printer fault.
Your existing arrangement may already do the job. If bridges and overhangs print cleanly at the speed and quality you need, a stock duct or single-fan setup may be enough. Consider an upgrade when a specific cooling-related defect persists after you’ve checked settings and found a compatible design that can direct air where the print needs it.
Use a before-and-after checklist to judge results
Where practical, compare the same model, filament, orientation, and settings. Record what changes, including print time, so you can judge whether any improvement matters for your projects. A one-off result isn’t a reliable reason to keep extra hardware; look for a repeatable difference under comparable conditions.
- Bridge quality: Note sagging, strand shape, and how cleanly the bridge meets its supports.
- Overhang appearance: Compare drooping, rough edges, and surface consistency.
- Other defects: Watch for weak layer bonding, warped edges, or new marks that weren’t present before.
- Practical trade-off: Record changes in print time, noise, access, or maintenance effort that affect your regular use.
Keep the upgrade only if the results are consistent and useful. The aim of a dual 5015 blower fan duct upgrade cooling change isn’t to maximize airflow. It’s to improve the prints you care about without adding complexity that outweighs the benefit.
Know when broader printer support may help
A duct-fit issue is different from a fault involving wiring, the printer’s control system, or toolhead movement. If a fan behaves abnormally, wires become strained, or the toolhead rubs or catches, stop using the modified setup until the issue is addressed. Don’t keep running the printer in the hope that the problem will resolve itself.
For hardware issues beyond a duct adjustment, 3D Printing Canada provides professional 3D printer repair services to address printer faults rather than treating them as slicer-tuning problems. If you’re still planning the setup, explore 3D printing accessories and equipment to compare hardware and accessory options for your printer.
Make your next cooling change with confidence
Think of a dual 5015 blower fan duct upgrade cooling project as one step in learning how your printer handles different jobs. Keep a simple record of what works across the models and materials you use, so future adjustments build on real results instead of guesswork.
That experience can guide more than fan choices. It can help you decide which accessories suit your setup, when a different toolhead configuration makes sense, and whether your current printer is already meeting your needs. Make changes deliberately, and you’ll be better equipped to focus on adjustments that make a practical difference.
Ready to plan your next printer improvement? Explore 3D printing accessories and equipment for hardware and ideas for your next project.
Frequently Asked Questions
Do two 5015 blower fans provide twice the cooling of one?
No. Two fans don’t necessarily deliver twice the useful airflow at the print. The result depends on how the duct divides and directs air, how restrictive its passages are, and whether both blowers operate as intended. A design with poorly matched outlets can cool unevenly, while a well-directed single fan may already meet your needs. Compare prints under the same conditions rather than estimating performance from fan count.
Will a dual 5015 fan duct fit any 3D printer?
No. Ducts are shaped for particular toolheads, and printers within one product family can have different revisions. Check the design’s stated model and revision against your machine, then compare mounting locations and clearances around the nozzle, probe, and wiring. A file labelled for a similar printer isn’t proof of fit. If possible, test the assembly without powering the printer and check the toolhead’s full movement before printing.
Can a dual 5015 upgrade improve bridges and overhangs?
It can help if inadequate part cooling is contributing to sagging bridges or soft overhangs. A dual 5015 blower fan duct upgrade cooling arrangement won’t automatically fix those defects, though. Excessive nozzle temperature or a bridge speed that doesn’t suit the filament can cause similar symptoms. Compare a repeatable test before and after the change, and check whether the affected features improve without creating new print issues.
Do I need to change slicer settings after installing a dual blower duct?
Review them and test whether adjustments are needed. Existing fan settings were tuned for the previous airflow setup, so they may not produce the same result with a new duct. Check the slicer’s part-cooling controls for the filament and print features you use, such as bridges or small layers. Change one setting at a time and compare results. Don’t assume a higher fan value or faster print speed is automatically appropriate.
Can I use a printed duct made from PLA?
Only if the duct’s location and operating conditions are suitable for that material. PLA can soften when exposed to heat, so a printed part close to the hotend may deform and shift the airflow path. Check the duct design’s material guidance and consider how close it sits to heated components. If the duct warps, touches the toolhead, or changes shape during use, stop and reassess the material choice before continuing.
How can I tell whether my new fan duct is causing print problems?
Look for symptoms that appeared after installation, such as new rubbing sounds, toolhead collisions, strained wires, uneven cooling, or defects that weren’t present in a comparable baseline print. Inspect the duct and fan mounts for movement, and check that airflow isn’t blocked. If a fan behaves unexpectedly or the toolhead catches, stop the printer rather than running another test. Recheck fit and electrical connections before resuming.