
A warped bed isn’t automatically a failed bed. It’s too warped when the first layer remains uneven after the PEI sheet is seated correctly and the bed is trammed, or when mesh leveling can’t compensate across the print area. For warped heated bed troubleshooting and shimming, first check the sheet, then measure the bed at its usual printing temperature.
It’s frustrating when one side of a print sticks while another lifts, especially when repeated leveling doesn’t help. A wavy-looking surface doesn’t always mean you need a new bed: a sheet that isn’t sitting flat, loose support, or uneven mounting can also cause problems.
Learn how to inspect the PEI sheet and bed, understand what mesh leveling can and can’t correct, and decide whether to shim, replace a damaged sheet, or arrange bed service. These checks follow a practical order, helping you identify the cause instead of chasing first-layer symptoms.
Key Takeaways
- Check that the PEI sheet sits flat and that no debris is trapped beneath it before adjusting the bed.
- Measure bed flatness after it has warmed to your usual printing temperature to see how the surface behaves in use.
- Use mesh leveling to compensate for uneven areas, then fine-tune Z-offset only after hot tramming and mesh setup.
- Place shims beneath low spots between the bed and its mounting surface, and avoid forcing a bed that may crack.
- Replace a persistently wavy PEI sheet or seek repair when the bed is badly twisted or first-layer problems remain.
Checking whether the removable PEI sheet is warped or seated incorrectly
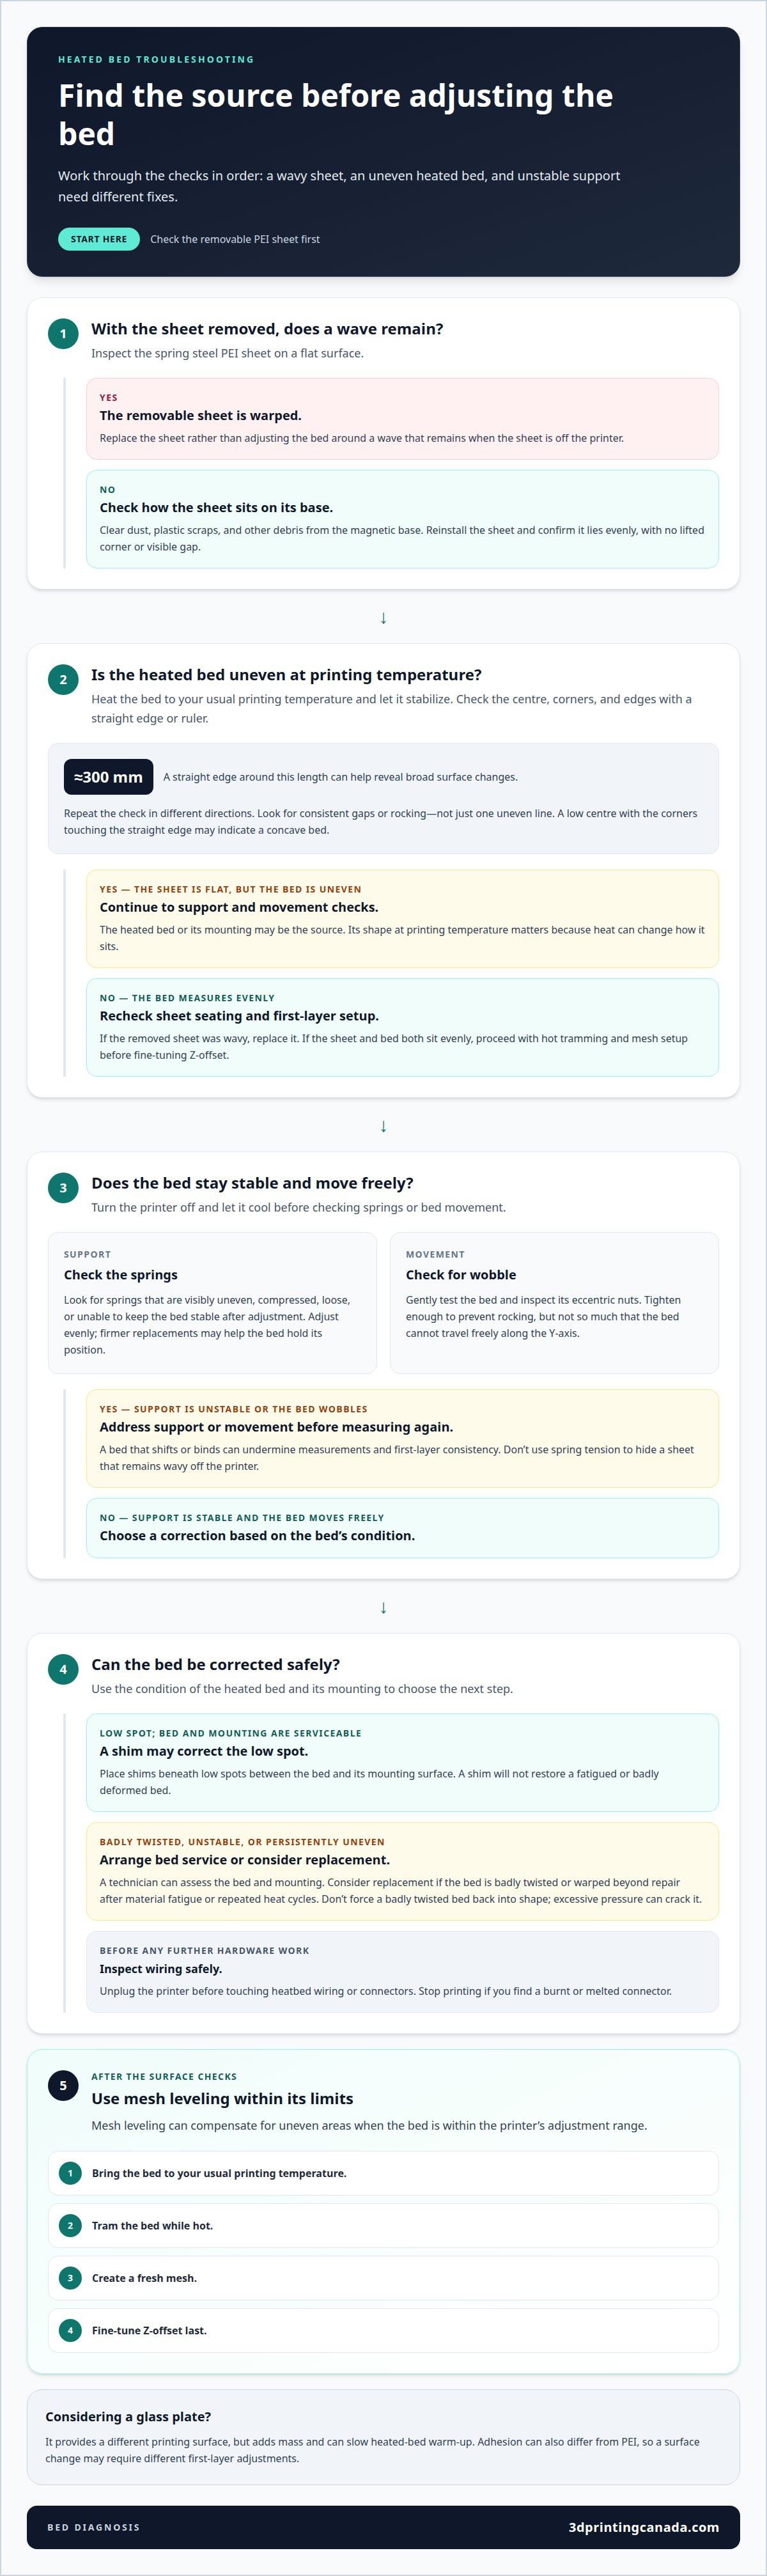
To diagnose a warped heated bed, separate sheet problems from bed problems before making adjustments. Inspect the removable PEI sheet, then measure the heated bed at its usual printing temperature.
-
Inspect the PEI Sheet and Its Seating
Remove the spring steel sheet and inspect it on a flat surface. If a wave remains when the sheet is off the printer, the sheet is warped and should be replaced rather than adjusted around. Before reinstalling it, clear dust, plastic scraps, and other debris from the magnetic bed base. Even a small obstruction can keep the sheet from sitting flat.
Put the sheet back in place and check that it lies evenly across the base. A lifted corner or visible gap can affect nozzle distance, even when the bed beneath it is reasonably flat.
-
Diagnose Heated Bed Warping
Heat the bed to your usual printing temperature and let it stabilize, then check the surface with a straight edge or ruler. Compare the centre, corners, and edges. If the centre sits low while the corners touch the straight edge, the bed may be concave. Repeat the check in different directions to spot a twist rather than treating one uneven line as the whole surface.
A straight edge around 300 mm long can help reveal broad surface changes. Look for consistent gaps or rocking, not just one reading. The shape at printing temperature matters because heat can change how the bed sits.
-
Check bed support. With the printer off and cool, inspect the springs beneath a spring-supported bed. Look for springs that are visibly uneven, compressed, loose, or unable to keep the bed stable after adjustment. Old or inadequate springs can contribute to uneven support, and firmer replacements may help the bed hold its position.
Adjust the springs evenly, then check that the bed stays stable. Don’t use spring tension to hide a PEI sheet that remains wavy off the printer.
- Check for movement. Gently test the bed for wobble and inspect its eccentric nuts. Tighten them enough to prevent rocking, but not so much that the bed can’t travel freely along the Y-axis. A bed that binds or shifts during movement can undermine measurements and first-layer consistency.
- Inspect wiring before further work. Unplug the printer before touching heatbed wiring or connectors. Stop printing if you find a burnt or melted connector. Before considering shims, confirm that the sheet is clean and seated, the bed is evenly supported, and the heated surface is the source of the unevenness.
Deciding when to replace the sheet or service the bed
Choose your next step based on the surface condition and the bed’s repeatable performance. A damaged sheet, a repairable support issue, and a badly twisted bed require different solutions.
-
Decide Whether to Replace the Sheet
Remove the PEI sheet and inspect it away from the printer. If a wave remains on a flat surface, replace the sheet rather than trying to compensate with bed adjustments. The removable sheet needs to sit evenly against its base; persistent ripples can change nozzle distance across the print area.
Look for damage that can affect printing, such as a distorted section or marks from aggressive PETG removal. If PETG has bonded too firmly, use a release layer such as glue stick for future prints, and let the plate cool before removing prints. Wash a PEI plate periodically with warm water and detergent to remove residue that can affect adhesion.
-
Service or Upgrade the Bed Surface
Arrange bed service when the sheet is sound but the heated bed remains uneven, unstable, or difficult to level. A technician can assess the bed, its mounting, and the source of the unevenness to determine whether adjustment or replacement is appropriate. Don’t force a badly twisted bed back into shape, as excessive pressure can crack it.
Consider replacing the bed if it is badly twisted or warped beyond repair after material fatigue or repeated heat cycles. A shim may correct a low spot if the bed and mounting are still serviceable, but it won’t restore a fatigued or badly deformed bed.
- Weigh the trade-offs before changing surfaces. A glass plate provides a different printing surface, but adds mass and can slow heated-bed warm-up. It can also change adhesion compared with PEI, so switching surfaces may require different first-layer adjustments. Choose based on your printer’s needs, not just the appearance of the top layer.
- Separate sheet replacement from bed replacement. If the removed sheet is wavy but the heated bed measures evenly, replacing the sheet addresses the likely cause. If the sheet lies flat but the heated bed remains uneven, focus on the bed instead. This distinction helps avoid replacing a sound bed for a sheet problem or repeatedly replacing sheets over a warped base.
- Get persistent hardware problems assessed. When the bed stays twisted or loses stable support despite basic adjustments, 3D Printer Repair Services can address the printer’s hardware issue. Keep notes on where the bed appears low or high and whether the issue persists at printing temperature; those observations help direct the repair assessment.
Should I keep using mesh bed leveling if my bed is warped?
Yes, mesh leveling can compensate for uneven areas when the bed is within the printer’s adjustment range. Tram the bed while hot, create a fresh mesh, then set Z-offset last.
-
Tram the Bed While Hot
Bring the bed to your usual printing temperature before tramming. Heat can change its shape, so a cold adjustment may not match the surface during printing. First adjust the bed’s mechanical level according to your printer’s tramming process, then let it stabilize at temperature before probing.
Keep the nozzle and probe clear of the build surface during setup. A mesh recorded before hot tramming may reflect an earlier bed position, leaving the printer to compensate for changes that basic adjustment could address.
-
Generate a fresh mesh. Run your printer’s bed-probing routine after tramming. The mesh records height differences across the print area, allowing the printer to adjust the print head’s height as it moves. Some firmware uses the G29 probing command and can return a mesh listing for review.
Use the mesh display to identify a low centre, raised edge, or gradual slope. A smooth, repeatable variation is easier to compensate for than a sudden step or a bed that shifts during probing.
-
Adjust Z-Offset and Mesh Compensation
Set Z-offset after hot tramming and mesh generation. Change it in small increments of 0.02-0.05 mm, then assess a first-layer print. If the nozzle is too high across the bed, lower the offset gradually; if it presses too close, raise it. Avoid changing offset and mesh settings together, since that obscures which adjustment helped.
Universal Bed Leveling (UBL) is a firmware method for storing and applying a bed mesh. Follow the printer’s UBL sequence to create and activate the mesh. Probing alone won’t help if the saved compensation isn’t used during printing.
- Check compensation across the print area. Print a first-layer test that covers the centre and edges, not just one corner. Check for consistent line contact and adhesion. If the centre prints well but an edge remains too high or low, review the mesh points in that area before making another small Z-offset adjustment.
- Know when mesh correction is not enough. Mesh leveling maps unevenness; it doesn’t physically flatten a bed or secure loose hardware. If repeated probing produces inconsistent readings, or the bed moves during a print, fix the mechanical cause first. A stable bed and a fresh mesh work together, while Z-offset fine-tunes nozzle distance across the surface.
What Causes Bed Warping?
Heat, mounting pressure, and uneven support can all affect a heated bed’s shape. Measure it after heat-soaking, then use the readings to decide whether a low spot needs a shim.
- Heat-soak the bed before measuring. Set it to your usual printing temperature and let it stabilize before checking flatness. A cold measurement may not show the shape the bed takes during printing. Use the same temperature and setup for later checks so you can compare results consistently.
- Check flatness with a straight edge. Lay a ruler or other straight edge across the heated bed, then check several paths: side to side, front to back, and diagonally. Look for gaps beneath the edge or rocking that reveals a high area. A feeler gauge can help compare a gap with another location. Record where each reading occurs.
- Map low spots before shimming. Note whether the centre sits below the corners, or one edge dips while the opposite edge stays level. Repeat each measurement after the bed has heat-soaked. If the readings change between checks, inspect bed support and mounting pressure before adding material beneath the bed.
- Choose shim material for a small correction. Heat-resistant tape or aluminium foil can serve as shim material beneath a bed’s low spot. Place it between the bed and its mounting surface, not on the printing face. Add material only where measurements show a low area, then recheck the surface rather than covering the whole bed.
- Recheck after each adjustment. Record the location and number of shim layers used. Reinstall the bed, heat-soak it to the same printing temperature, and repeat the straight-edge checks. A change in the gap shows whether the shim affected the measured low spot. Don’t assume the same correction suits every bed.
- Separate a local dip from broader distortion. A low centre with stable corners may respond to a shim beneath that area. A twist across several directions, or readings that shift after heating, points to a wider support or bed-shape issue. Don’t keep adding layers to chase changing measurements; address the underlying mounting or warping first.
- Protect wiring during access. Unplug the printer before touching heatbed wiring or connectors. Keep shim material clear of wiring and connectors, and stop printing if you find a burnt or melted connector. A straight-edge map taken after heat-soaking helps you decide whether a small shim is appropriate.
Effects of a warped printer bed
A warped bed changes the nozzle-to-surface gap across the print area. Observe how that affects the first layer, adhesion, and larger prints.
- Compare first-layer lines across the bed. On a raised area, the nozzle may press filament too firmly, flattening the lines or scraping the surface. Over a low spot, the nozzle may lay down rounded lines that fail to bond. One print can show both symptoms, such as a smooth centre and loose corners.
- Track adhesion problems by location. Note whether lifting or gaps repeatedly appear in the same area. If the back-left corner fails while the front-right prints cleanly, for example, uneven bed height may be the cause rather than a problem with the whole print. Record the location before changing settings.
- Look for first-layer defects that continue upward. A weak or uneven first layer gives later layers an inconsistent foundation. The print may have a rough base, poor bonding at one edge, or a footprint that lifts during printing. Mesh compensation can adjust nozzle height, but it can’t physically flatten or stabilize a distorted bed.
- Use a small test print to reveal the pattern. Choose a first-layer test that covers the centre and edges, then compare line width and contact. If the nozzle seems too close in one region and too far away in another, bed shape may be affecting the result. If every region shows the same symptom, investigate other print settings too.
- Check whether the problem changes with print size. A small part near the bed’s centre may print acceptably, while a wide part crosses low and high areas. Larger footprints expose more surface variation, so inspect the full contact area before starting a broad print. A consistent defect in one zone deserves attention even when smaller parts succeed.
- Separate bed effects from other causes. A poor first layer can also result from an incorrectly set Z-offset, a dirty PEI surface, or unstable bed support. Compare prints in different bed locations and review the mesh. If defects follow the same surface area, bed shape is a stronger clue than a defect that moves with the model or print settings.
- Act on repeatable symptoms. Keep a short record of the affected zones and first-layer results after each adjustment. If the same area continues to fail despite accurate tramming and mesh compensation, get 3D printer repair help to address persistent bed hardware problems.
3D Printing Canada
3D Printing Canada offers 3D Printer Repair Services for persistent bed and printer hardware problems. Turn to the service when a stable mesh and careful adjustments still leave the same areas printing unevenly, or when the bed’s support or movement needs attention. Technicians resolve hardware issues, helping you address the mechanical cause rather than relying on repeated first-layer compensation.
Before reaching out, note where defects appear, whether they persist after heating, and which adjustments you’ve tried. These details provide a clearer starting point for discussing the printer’s symptoms. If the bed remains unstable or visibly distorted, describe that too.
Contact 3D Printing Canada to discuss your printer repair needs.
Make your next adjustment with confidence
Let repeatable print results guide your next move. Keep a simple record of which areas fail and how the first layer changes after adjustments. The pattern can help distinguish a setting that needs refinement from a hardware issue that requires a different approach.
A measured approach to troubleshooting and shimming a warped heated bed can also prevent unnecessary changes. Adjust one factor at a time, then assess the result before moving on. If the same bed area continues to cause trouble, bring your observations to a repair discussion instead of compensating indefinitely in software.
For help with a persistent printer issue, contact 3D Printing Canada. Share the symptoms and the adjustments you’ve already tried, and take the next step toward more consistent printing.
Frequently Asked Questions
How much warp is “too much”?
Warp is excessive when the printer can’t produce a consistent first layer across the area you need to print. Check whether mesh compensation corrects the height variation without causing poor nozzle clearance or adhesion elsewhere. A small part near the centre may print successfully while a wide part fails at the edges. Effective warped heated bed troubleshooting and shimming considers the whole print area.
Is it usually the bed or the sheet?
Either can cause uneven first layers, so inspect them separately. Remove the PEI sheet and check whether it holds a wave on its own, then inspect the bare bed. If the sheet is flat but the bed is uneven, the bed or its support is the likely source. If the bed appears even but the sheet doesn’t sit flat, focus on the sheet or debris beneath it.
Why is it bad to have a warped 3D printer bed?
A warped bed creates different nozzle gaps across the print surface. Filament can be squashed too tightly in a high area and fail to stick in a low one. That uneven foundation can lead to lifted corners, gaps, or a rough base. The effect is more noticeable on a wide part that crosses raised and dipped areas than on a small print near the centre.
Will a glass plate fix everything?
No. Glass adds mass, which can slow bed warm-up, and changes adhesion compared with PEI. A glass plate provides a different printing surface, but it doesn’t repair loose bed support or fix underlying hardware problems. Consider the effect on heating and first-layer adhesion before switching surfaces, especially if the issue appears to come from bed movement rather than the removable sheet.
How do I check whether a heated bed is warped when hot?
Heat the bed to your normal printing temperature, let it stabilize, and remove the flexible sheet before measuring the exposed surface. Lay a straight edge across the centre, corners, and diagonals. Use a feeler gauge to compare gaps, recording their locations so you can distinguish a low centre from a twisted edge. Keep hands and tools clear of the hot surface and nozzle.
How do I shim a warped 3D printer bed safely?
For warped heated bed troubleshooting and shimming, unplug the printer before accessing the bed underside. Place a small shim between the bed and its mounting surface at a measured low spot, keeping it clear of wiring, connectors, and moving parts. Reassemble the bed securely and check its flatness again after heating. Don’t force an aluminium bed straight by hand, as excessive force could crack it.
What materials and thicknesses are suitable for heated bed shims?
Heat-resistant tape, aluminium foil, and steel shim stock are possible shim materials. Steel shim stock is available in 0.001-inch increments for fine adjustments. Choose material that can sit securely between the bed and its mount, without interfering with wiring or movement. Add only enough material to address the measured low area, then recheck the heated surface before adding another layer.
How do I level a 3D printer bed after shimming?
After reinstalling the bed, heat it to your usual printing temperature and tram it before probing a new mesh. Then set Z-offset last, making a small adjustment if the first layer needs refinement. Recreate the mesh after shimming rather than relying on values recorded before the bed changed. Test a print across the centre and edges to confirm the correction holds across the usable area.