
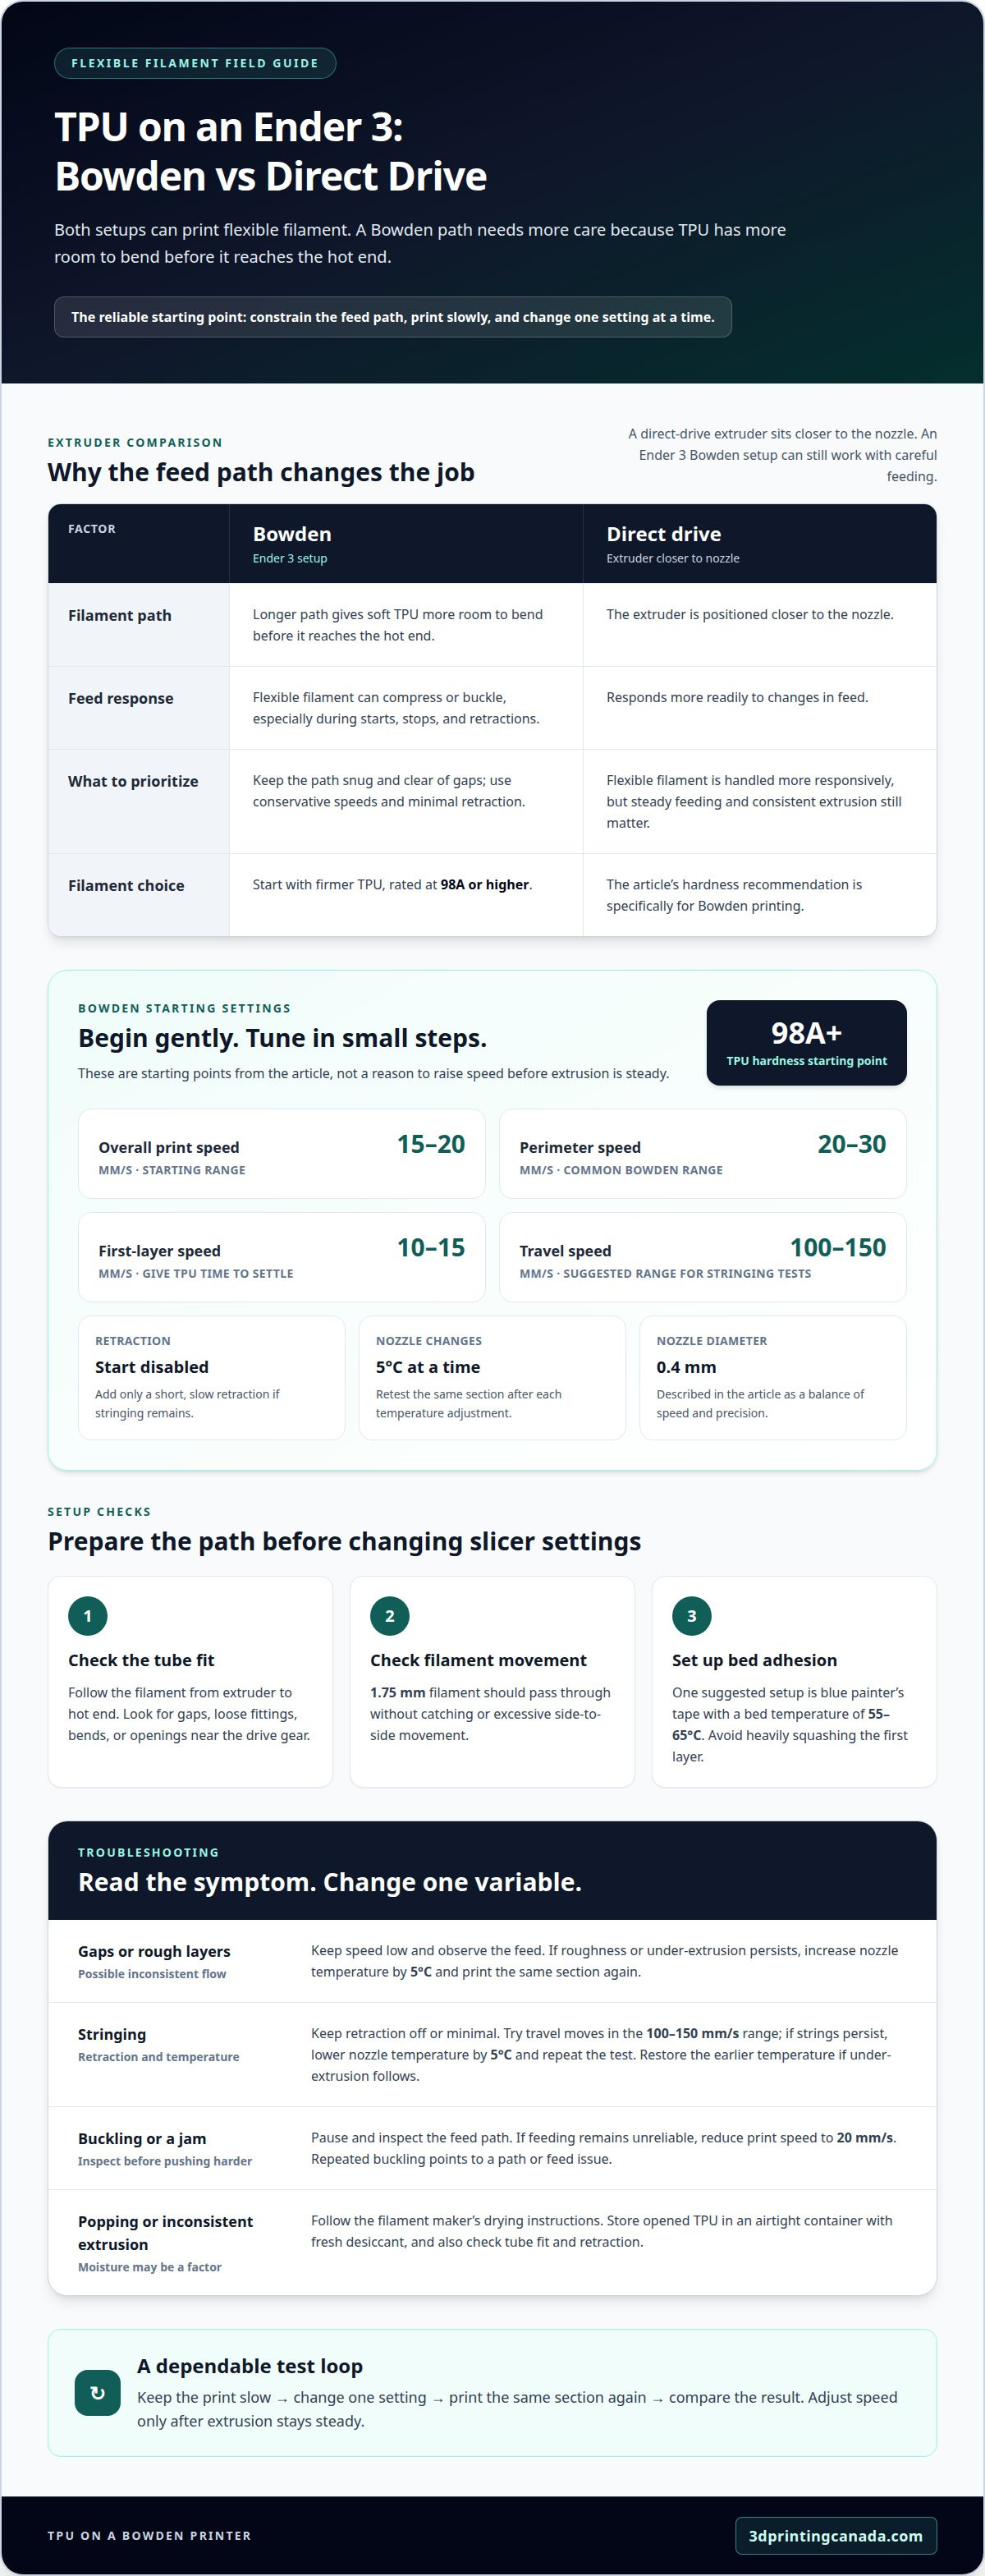
An Ender 3 can print TPU, but a Bowden setup rewards patience over speed. Use these tips for printing flexible TPU on a Bowden-tube printer as a starting point: choose a firmer filament, keep the feed path constrained and begin around 15-20 mm/s. You’ll get more reliable results by making small, measured adjustments than by changing several settings at once.
If you’ve heard that flexible filament and Bowden extruders don’t mix, the concern makes sense: TPU can buckle or jam when the filament path has too much room to move. The good news is that careful setup can make an Ender 3 work with TPU. This article walks you through choosing a suitable filament, setting nozzle temperature and flow, and minimizing retraction to help prevent feeding problems. You’ll also learn what to adjust when you see stringing, rough layers or inconsistent extrusion, so you can troubleshoot one variable at a time and build a dependable starting profile.
Key Takeaways
- Understand why a direct-drive extruder handles flexible filament more responsively, and what that means for an Ender 3 Bowden setup.
- Keep the filament path snug and clear of gaps to reduce the chance of TPU buckling or escaping near the extruder.
- Choose TPU hardness with feedability in mind: softer filament can be more challenging to guide through a Bowden tube.
- Start with retraction disabled, then make a small, slow adjustment only if stringing calls for it.
- If printer hardware problems persist, 3D Printing Canada’s 3D Printer Repair Services can help address equipment issues.
Bowden versus direct-drive extrusion for TPU
A 0.4 mm nozzle offers a balance of speed and precision for TPU, according to the European Commission. Set the first layer so it adheres without being heavily squashed; blue painter’s tape with a bed temperature of 55°C-65°C is one suggested adhesion setup.
- Match your expectations to the extruder. An Ender 3 with a Bowden system can print TPU, but its longer filament path gives soft material more room to bend before reaching the hot end. Direct-drive extrusion places the extruder closer to the nozzle, so it responds more readily to changes in feed. That difference matters during starts, stops, and retractions, when flexible filament can compress or buckle rather than move cleanly.
- Use conservative movement to protect extrusion. A common Bowden perimeter-speed range is 20-30 mm/s, while reducing overall print speed to 15-20 mm/s can help the filament feed consistently. Slow the first layer to 10-15 mm/s so TPU has time to settle and bond to the surface. Treat these values as starting points, not a reason to increase speed before extrusion remains steady across the whole print.
- Read under-extrusion as a symptom, then adjust one setting. Gaps between lines, a rough surface, or weak layer adhesion can indicate that TPU isn’t flowing consistently. First, keep speed low and observe whether the extruder feeds without slipping or clicking. If under-extrusion or rough texture persists, increase nozzle temperature by 5°C, then print the same section again. Changing one variable at a time makes it easier to tell whether temperature improved the result.
- Clear jams without forcing the filament. If the Ender 3 stops extruding, pause and inspect the feed path rather than pushing harder. A jam can form when flexible filament buckles at the extruder or meets resistance on its way through the Bowden tube. Reduce print speed to 20 mm/s if feeding remains unreliable, and watch whether the extruder advances TPU smoothly. Repeated buckling points to a path or feed issue, not simply a need for faster printing.
- Judge layer bonding before raising speed. Examine a cooled test print for gaps between adjacent lines and weak joins between layers. If the layers separate easily, keep the print slow and adjust nozzle temperature in 5°C steps, testing each change on a fresh print. If temperature improves adhesion but creates stringing, revisit that setting in small increments. A direct-drive printer may handle flexible filament more responsively, but steady feeding and consistent extrusion still matter on either setup.
Printing flexible filament on Bowden printers
Use a controlled filament path and cautious slicer settings to reduce feed problems. These tips for printing flexible TPU on a Bowden-tube printer provide a practical starting point.
- Guide the filament carefully. Flexible filament compresses and bends more readily than rigid filament, so gaps near the extruder can let it buckle instead of advancing towards the hot end. Feed TPU slowly and watch the extruder gear. If the filament slips sideways or folds at the drive gear, stop the print and fix the feed path before changing slicer settings.
- Set measured speeds. Start with a print speed of 15-20 mm/s for TPU on a Bowden printer. Slower movement gives the extruder more time to feed flexible material consistently. Choose a travel speed suited to your printer and setup to limit time spent moving between printed areas. If a change causes new feed problems, return to the previous setting and test one adjustment at a time.
-
Inspect the Filament Path and Tube Fit
Before printing, follow the filament from the extruder through the Bowden tube to the hot end. Check that 1.75 mm filament passes through without catching or excessive side-to-side movement, and that tube connections have no gaps. Look for bends, loose fittings, or an opening where TPU could escape near the drive gear. A supported path helps keep flexible material moving towards the nozzle.
-
Set Retraction for Flexible Filament
Begin with retraction disabled, then add only a short, slow retraction if stringing remains. Pulling TPU back too far can make it buckle in the extruder or Bowden path, causing blobs, gaps, or a jam. Change only one retraction setting at a time and compare the same print. If a jam occurs, reduce retraction, with 0.5 mm as a troubleshooting setting.
- Tune stringing with single changes. Keep retraction off or minimal and use faster travel moves within the 100-150 mm/s range. If strings persist, lower nozzle temperature by 5°C and repeat the same test. If under-extrusion follows, restore the earlier temperature before testing another adjustment. For printing flexible TPU on a Bowden-tube printer, this controlled approach helps separate temperature effects from retraction or feed-path issues.
- Dry and store TPU properly. Follow the filament maker’s instructions for drying temperature and duration. After opening the spool, store it in an airtight container with fresh desiccant. Popping sounds, rough surfaces or inconsistent extrusion can indicate moisture, but also check the tube fit and retraction. Change one factor at a time so each test helps identify the cause.
Shore hardness and TPU feedability
- Choose firmer TPU for a Bowden setup. Shore hardness helps you compare how soft or firm a TPU filament is. For Bowden printing, start with TPU rated at 98A or higher. Firmer material resists bending as readily inside the feed path, which can make it easier for the extruder to push consistently towards the hot end. A higher hardness rating is a practical starting point, not a guarantee that every print will feed perfectly.
- Match the hardness to the part’s job. If your design needs a very soft, highly flexible feel, TPU rated at 85A-88A may suit the application, but it requires very slow printing speeds. That softness can make feeding more difficult through a Bowden tube. Consider the trade-off before slicing: a softer part may provide more flexibility, while a firmer filament is generally easier to feed on this printer style.
- Don’t assume every TPU spool behaves alike. Shore hardness is one factor in feedability, so a rating alone doesn’t describe every part of the printing experience. Check the spool label and record its stated hardness before printing. For example, 95A TPU is softer than the 98A-or-higher starting point recommended for Bowden setups. If you choose it, use a cautious speed and watch the extruder for signs of inconsistent feeding.
- Use a small test to assess the feed. Print a 20 mm test cube and observe how the extruder handles the selected filament. Look for skipped feed, gaps in the walls, or irregular surfaces. If TPU bunches near the extruder, stop rather than continuing a longer print. A short test helps reveal whether the filament’s softness is challenging the Bowden path before that problem affects a larger part.
- Separate hardness problems from setting problems. If softer TPU feeds inconsistently, reduce print speed and test again before changing several slicer settings. Note the spool’s Shore hardness and the speed used for each test. If the same symptoms persist with firmer filament, hardness may not be the only factor. Comparing results can help distinguish material that is too soft for your setup from a broader feed issue.
- Balance flexibility against reliable extrusion. Choose the softest TPU your Bowden printer can feed consistently at a controlled speed. Very flexible material can suit parts that need substantial give, while a firmer grade is a more practical starting point for learning the process. Compare test results across hardness ratings, and let the part’s required flexibility guide your final choice.
Retraction settings to reduce buckling
To reduce TPU buckling and jams in a Bowden tube, start with retraction disabled and keep print speed low. If stringing persists, try a short, slow retraction and change one setting at a time.
-
Reduce Filament Buckling
Start with retraction off, then watch the filament as the extruder feeds it into the Bowden tube. TPU can compress when pulled back, so repeated retraction may cause it to buckle near the drive gear. If stringing affects the print, test a small retraction adjustment rather than a long pull. Watch the feed during travel moves, and stop if the filament folds or slips out of the extruder.
-
Prevent Bowden Tube Jams
Keep the filament path supported and the Bowden tube connections seated without gaps before starting a print. A loose connection or open space near the extruder can give TPU room to deform and obstruct feeding. If a jam occurs, pause the print, remove pressure from the filament, and reduce retraction to 0.5 mm for the next test. Don’t force filament through a blockage.
- Add retraction only when stringing calls for it. Begin with zero retraction and print a test with travel moves between separate features. If strings remain, try 0.5 mm at 20 mm/s, then inspect the same areas again. TPU retraction guidance commonly falls between 0.5-1.5 mm at 20-30 mm/s, but a Bowden setup may need less. Increase distance only if the shorter setting leaves visible strings without disrupting feed.
- Change distance and speed separately. Retraction distance controls how far the filament moves back; retraction speed controls how quickly it moves. Keep one value fixed while adjusting the other, so each test shows which setting changed the result. For example, if 0.5 mm at 20 mm/s feeds reliably but leaves stringing, test a small distance increase before changing speed. Record each profile adjustment.
- Pair retraction tests with slow printing. Use a print speed of 15-20 mm/s while evaluating retraction on the Ender 3 Bowden system. Faster printing can demand more from the feed path, making it harder to tell whether buckling comes from retraction or speed. If the extruder skips, filament bunches, or extrusion stops, reduce retraction first. Then repeat the same test at the same print speed.
- Use travel moves to assess the result. Inspect the print after each retraction adjustment, focusing on strings between features and gaps where extrusion should resume. A successful setting reduces stringing without causing under-extrusion after a travel move. If a jam or feed interruption returns, revert to the last reliable setting and test 0.5 mm retraction. Keep temperature and flow unchanged during this comparison.
What TPU shore hardness and filament diameter work best on a Bowden 3D printer?
- Start with a firmer Shore A rating. For a Bowden printer, choose TPU with a Shore hardness of 98A or higher as your starting point. A firmer filament resists bending in the feed path better than softer TPU, helping the extruder push it towards the hot end. This is a practical choice for an Ender 3 when steady feeding matters more than maximum flexibility.
- Match softness to the part’s purpose. TPU rated at 85A-88A suits very soft, highly flexible applications, but it needs very slow printing speeds. That softness can make it harder to feed through a Bowden tube. Before choosing a spool, consider whether the printed part needs that extra flexibility or whether a firmer grade can meet its needs more reliably.
- Read the full hardness label. Check the spool or product specifications for the stated Shore hardness, including any tolerance. For example, a rating written as 95A +/-2 Shore hardness communicates both the nominal value and its stated variation. Use the label to compare filaments, but don’t treat a small difference in rating as a substitute for a controlled feed-path test.
- Confirm the filament diameter and tube fit. The Bowden path should accommodate 1.75 mm filament without catching or leaving excessive room for sideways movement. Check the filament’s stated diameter, then confirm it moves freely through the tube and its connections. Don’t assume a tube is a good fit just because the filament enters at one end; resistance or looseness along the path can affect feeding.
- Test one spool before committing to a large print. Start with a short test using the selected hardness and 1.75 mm filament. Watch the extruder for slipping, skipped movement, or TPU bending near the drive gear. If those symptoms appear, pause and inspect the path before changing several slicer settings. A small test helps isolate whether the chosen material and fit are working together.
- Use print results to refine your choice. Compare a short test with a firmer spool and one with a softer grade, keeping printer settings consistent. Note the Shore hardness, filament diameter and whether extrusion remains steady through the Bowden tube. If the softer option buckles while the firmer one feeds cleanly, use the firmer grade with this setup and reserve softer TPU for applications that need it.
3D Printing Canada: 3D Printer Repair Services
3D Printing Canada provides 3D Printer Repair Services for hardware issues that interfere with reliable printing. If TPU still stops feeding after you’ve adjusted speed and retraction, or the extruder slips with different filament, a mechanical problem may be affecting results. Repair support is a practical next step when symptoms persist beyond a single spool or slicer profile.
Clear troubleshooting notes help pinpoint the issue: record when extrusion fails, what the extruder does and which settings you’ve changed. These details can help distinguish a hardware problem from an adjustment to your TPU setup.
Contact 3D Printing Canada to discuss a printer issue.
Build a TPU profile you can refine
Make your next TPU print a learning run, not a one-off experiment. Save a dedicated slicer profile and record the filament brand, part type and each change you make. These notes help you build on successful results instead of starting from scratch with every new model. Use tips for printing flexible TPU on a Bowden-tube printer as a starting point, then refine your profile for the part’s intended feel and function.
For a practical next step, choose a simple design with a clear purpose, such as a flexible cover or grip. After printing, assess how the part performs in use, not just how it looks on the build plate. A profile that works for one design may need adjustment for another filament or application. Make changes deliberately, and your print history will become a useful guide.
If a persistent printer hardware issue is getting in the way of testing, contact 3D Printing Canada about repair support. Keep experimenting, learn from each print, and give your next TPU project room to improve.
Frequently Asked Questions
Can I print TPU on an Ender 3?
Yes, an Ender 3 can print TPU, though a Bowden setup needs careful feeding and conservative settings. Start with a short test print before attempting a detailed model, and watch for skipped extrusion or filament bunching near the extruder. If the test runs smoothly, keep its settings as a baseline. A stock Ender 3 may need close supervision because flexible filament can jam during printing.
Why does my TPU keep jamming?
TPU often jams when it buckles in an unsupported section of the feed path or meets resistance before reaching the hot end. Check that the filament moves freely through the Bowden tube and that the connections have no gaps. Excessive retraction can also pull flexible filament into a position where it deforms. Pause if feeding stops, then inspect the path instead of forcing more filament through.
How slow should you print flexible TPU on a Bowden extruder?
Start around 15-20 mm/s for TPU on a Bowden extruder, then assess whether extrusion stays consistent. Use a slower pace for the first layer, since a steady start helps the filament lay down cleanly. If the extruder skips or the print develops gaps, reduce speed and repeat a small test. Avoid increasing speed until the printer feeds reliably through the whole test.
What nozzle temperature and heated bed temperature are recommended for TPU?
A useful starting range is 220-240°C at the nozzle and 40-60°C at the bed. Filament formulations vary, so begin near the middle of the manufacturer’s stated nozzle range and assess the result. If extrusion looks rough or layers bond poorly, adjust nozzle temperature in 5°C steps. Change one setting per test so you can see which adjustment improves the print.
How should retraction distance and speed be set for TPU on a Bowden setup?
Start with retraction disabled; if stringing remains, test a short, slow retraction. A common TPU test range is 0.5-1.5 mm at 20-30 mm/s, but a Bowden setup may need less to avoid buckling. Begin at the low end, print a test with travel moves, and inspect for strings and interrupted extrusion. If TPU bunches or jams, reduce retraction or turn it off.
Can Bowden printers safely print soft 85A TPU, or is 95A TPU more reliable?
A Bowden printer can attempt soft TPU, but 85A material is more challenging to feed and calls for very slow printing. Between 85A and 95A, 95A is the firmer, more practical starting choice for a Bowden path. For the easiest feed, TPU rated at 98A or higher is the recommended starting point. Choose based on the flexibility the part needs, then test a small print.
What are common TPU printing failures on Bowden printers and how do you fix them?
Common problems include jams, inconsistent extrusion, stringing, and weak layer bonding. For a jam or skipped feed, pause and inspect the filament path for gaps or resistance. For stringing, keep retraction minimal and test nozzle temperature adjustments in 5°C steps. If layers separate or surfaces look rough, check extrusion consistency and temperature. Change one variable per test to identify the likely cause.
What nozzle size, first-layer height, and bed adhesion work best for TPU?
A 0.4 mm nozzle is a recommended balance of speed and precision. Set the first layer to adhere without being heavily squashed; blue painter’s tape with a bed temperature of 55°C-65°C is one suggested setup.