
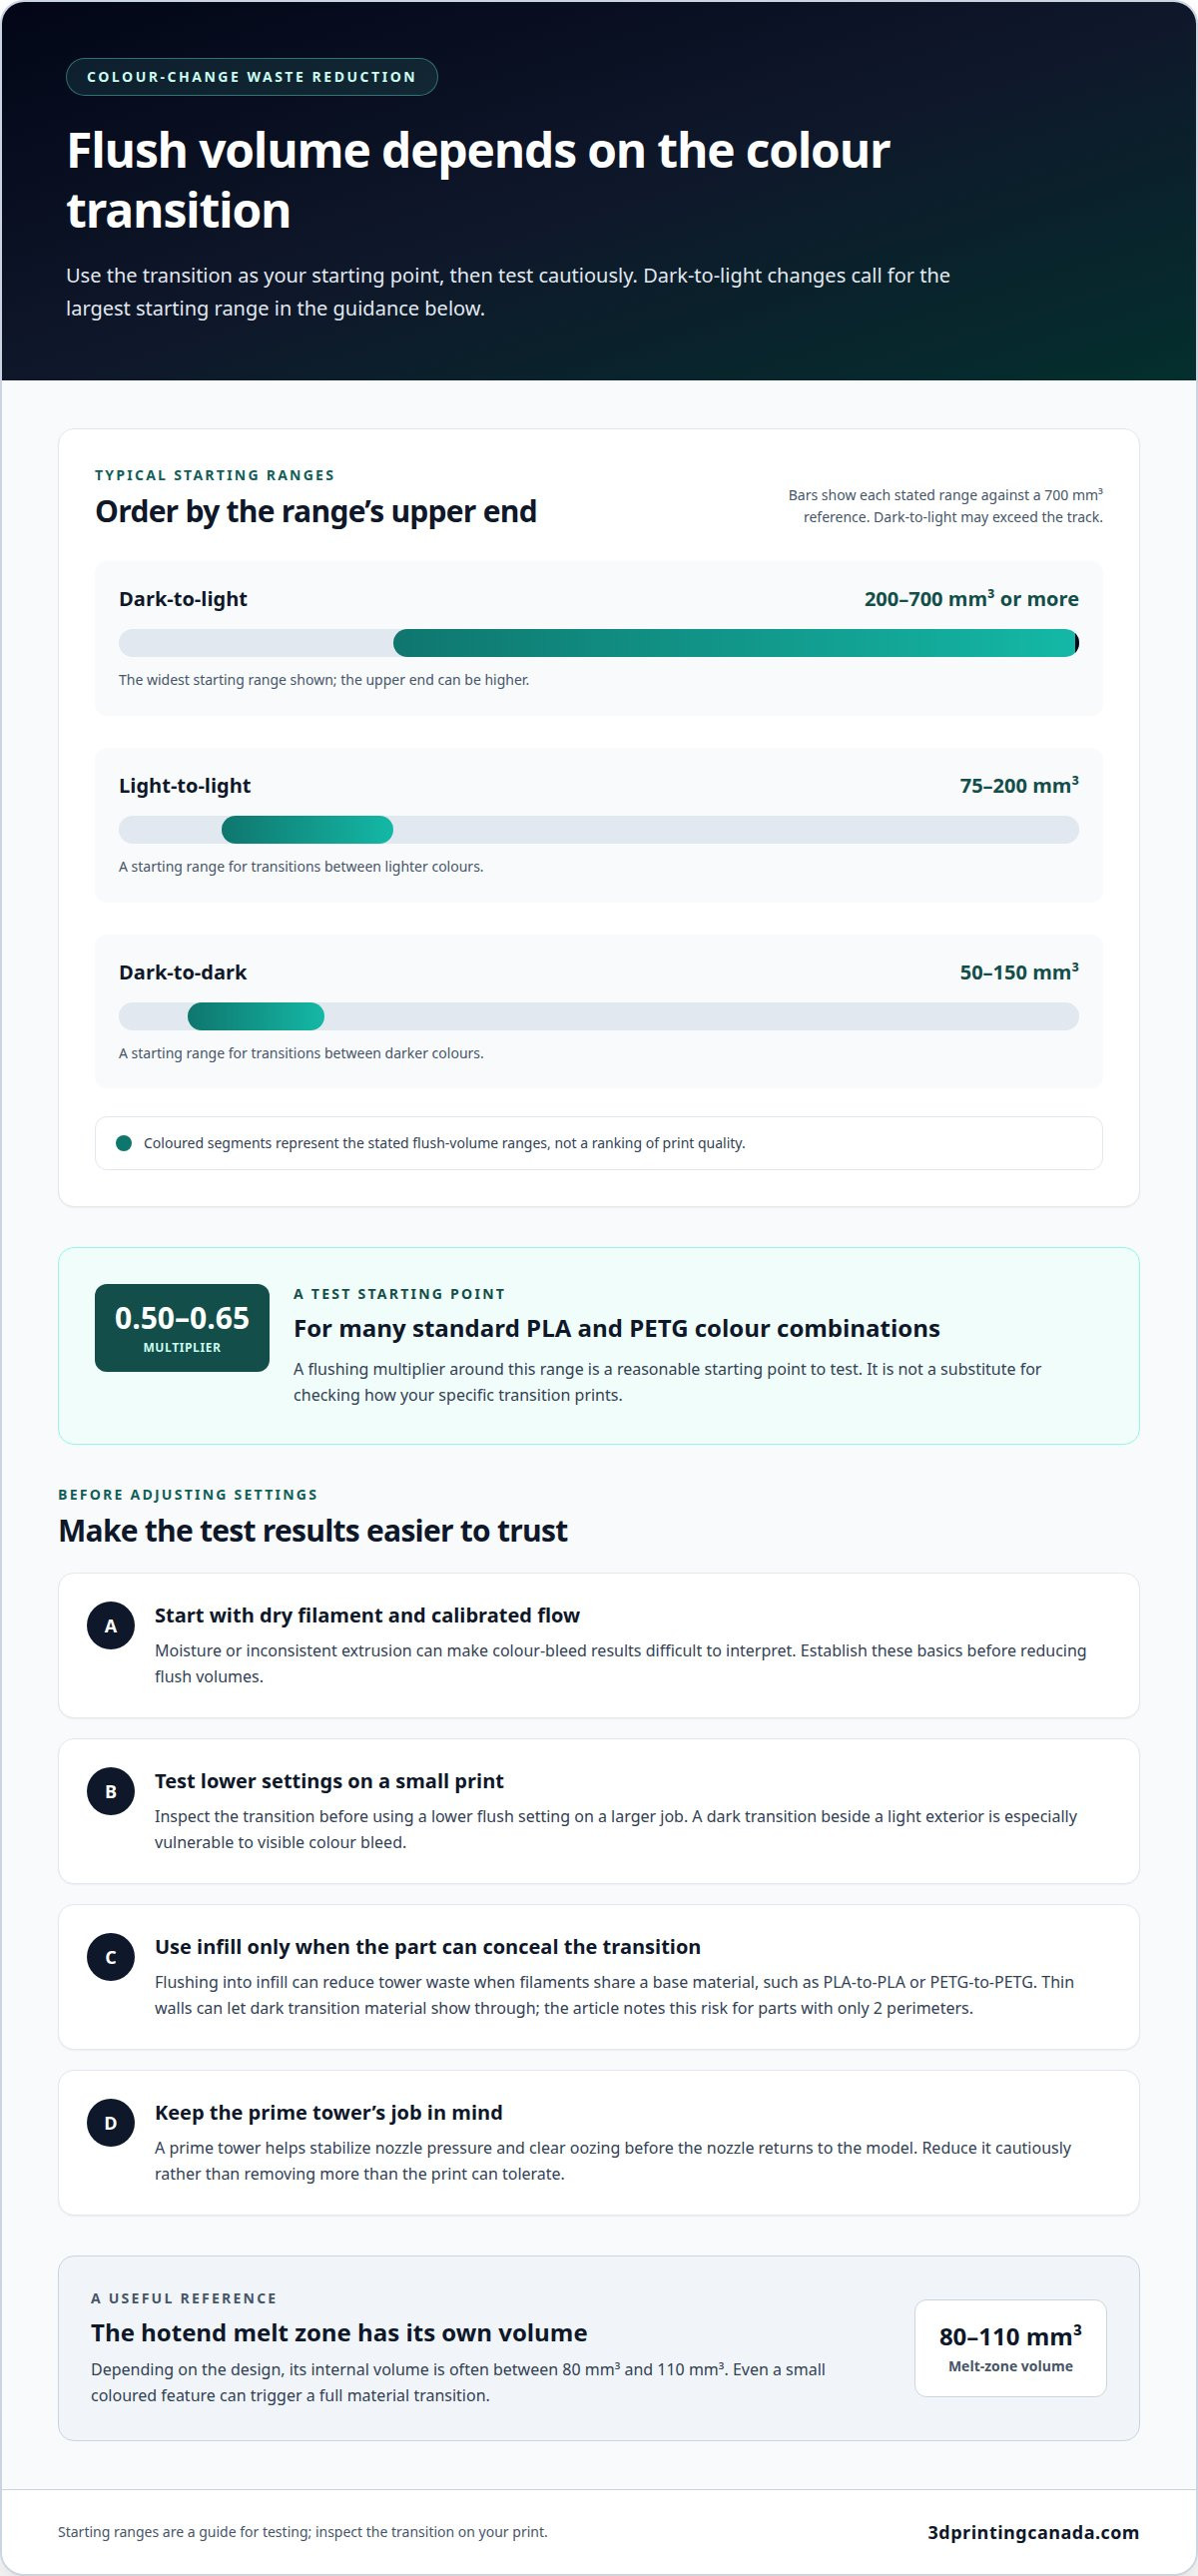
A purge tower isn’t the only place to manage colour-change waste. Effective colour-change purge-tower waste-reduction strategies start with flush volumes suited to the filament transition: typical starting ranges are 75-200 mm³ for light-to-light, 50-150 mm³ for dark-to-dark, and 200-700 mm³ or more for dark-to-light changes. For many standard PLA and PETG colour combinations, a flushing multiplier around 0.50 to 0.65 is a reasonable starting point to test.
If you’ve watched a dark transition show through a light-coloured wall or seen a tower grow during a print, you know that reducing purge waste takes more than lowering one setting. These color change purge tower waste reduction strategies explain how colour bleeding, model orientation, printing multiple parts together, flush settings, and tower functions affect material use during colour changes. You can then adjust settings with a clearer sense of what each change may improve and what it could put at risk.
We’ll cover practical ways to test transitions, use infill where it makes sense, and keep the tower working without making it larger than necessary. The goal is a cleaner print with less avoidable purge waste, using settings suited to the materials and model.
Key Takeaways
- Orient models to reduce colour changes where practical, while keeping the intended colour placement and visible surfaces in mind.
- Printing multiple parts together can spread purge waste across more finished pieces, though the colour-change sequence still matters.
- Start with dry filament and calibrated flow, then test lower flush settings on a small print before using them on a larger job.
- Flushing into infill can reduce tower waste, but works best when the filaments share a base material and the model has enough wall thickness to conceal transitions.
- Reduce the prime tower cautiously: it helps stabilize nozzle pressure and clear oozing before the nozzle returns to the model.
Orienting models to reduce color swaps
- Rotate the model to group colour changes into continuous height bands. A part with a blue base and white upper section may need only one transition between those regions. If the colours alternate across the same layers, the printer may switch repeatedly as it builds each band.
Use the slicer preview to inspect the layer sequence before changing the orientation. Look for repeated tool changes between colours, especially where small coloured details interrupt a larger region. Rotating the model may group those details vertically and simplify the sequence, but check that the finished appearance still matches your design.
- Position visible colour boundaries where the model can tolerate transitions. For example, orient a two-colour enclosure so its seam sits along a rear edge rather than across the front. This can make the transition less noticeable without changing the colour assignments.
Check the model’s internal geometry as well as its outer shell. Flushed material directed into infill can show through thin walls with only 2 perimeters. A light exterior beside a dark transition is particularly vulnerable. More wall thickness can help conceal that material, but may change the part’s dimensions and print time.
- Prioritize material requirements over waste reduction. A soluble support interface needs enough flushing when the printer switches between model and support material. Orient the part to avoid unnecessary colour changes, but don’t lower flush volumes for that transition just to reduce purge.
Support placement also affects where colour boundaries appear and which surfaces need cleanup. For a model with a coloured overhang, rotate it so support contact lands on a less visible face, if the geometry allows. Review both tool changes and support contact in the preview before settling on an orientation.
- Account for the hotend’s melt zone when judging whether rotation will help. Its internal volume is often between 80 mm³ and 110 mm³, depending on the design. A small coloured feature can trigger a full material transition even when its visible area looks minor.
Test the chosen orientation with dry filament and calibrated basic flow before adjusting flush volumes. Otherwise, moisture or inconsistent extrusion can make colour-bleed results difficult to interpret. Compare the same model in a second orientation and inspect the layers where colours meet. Keep the position that reduces repeated changes while preserving the required appearance, wall strength, and support function.
Printing multiples to spread purge waste
For filament purge waste in Canada, follow your municipality’s waste-sorting guidance. Don’t assume purge scraps belong in curbside recycling. The material type and local collection instructions determine the appropriate disposal route.
- Group parts that share a colour sequence on one build plate. If several identical parts need a dark base and light top, printing them together can spread the transitions across more finished pieces. The printer still makes the colour changes, but the purge serves a batch rather than a single part.
Arrange the models in your slicer with enough space for the printer’s movements and any required tower. Inspect the preview to confirm that the group shares the same colour changes rather than adding extra swaps between parts. A batch helps only if the extra models don’t make the sequence more complicated.
- Choose parts with matching material and colour requirements. For example, combine several PLA parts with the same black-to-white sequence rather than adding a PETG part with different colours. Compatible jobs are easier to group because they avoid extra material changes and differing print requirements.
Keep print quality in view. A mixed batch can take longer, and one failed part may affect the other models on the plate. Use this approach for repeatable parts, such as matching brackets or small decorative pieces, when they can share the same settings and sequence. For long, uniform components where multi-colour 3D printing causes excessive purge waste, sourcing production profiles through abbeyextrusions.com can offer a practical manufacturing alternative for bespoke plastic tubing and extrusions.
- Use the slicer’s flushing-into-infill option only when the parts can safely contain the transition material. This directs some purge plastic into the models instead of a separate tower. It can suit different colours of the same base material, such as PLA-to-PLA or PETG-to-PETG.
Don’t treat PLA and PETG as interchangeable infill materials. They may bond poorly, weakening a part that relies on its internal structure. Also consider whether dark transition plastic could show through the exterior. Opaque, sturdy components are better candidates than thin-walled display pieces.
- Compare the complete batch in the slicer before printing. Review the part count, colour sequence, tower size, and estimated material use together. If another model triggers more swaps or changes the sequence, the batch may not reduce waste. Try a smaller group or parts with a shared transition pattern.
Keep material selection consistent across the plate. 3D printing filaments suited to the same material family make it easier to plan compatible batches. After printing, separate clean reusable filament from contaminated purge waste, then follow your municipality’s disposal guidance for the scraps.
The right disposal route depends on the filament material and your municipality’s sorting instructions. Check local guidance for the specific scraps.
Reducing flush multipliers and testing transitions
Start with a small calibration print, then adjust one slicer setting at a time. This makes it easier to assess colour quality and purge use without risking a long print.
-
Compare Flush Volumes Across Colour Changes
Set a starting flush range based on the colour transition: 75 mm³ to 200 mm³ for light-to-light, 50 mm³ to 150 mm³ for dark-to-dark, and 200 mm³ to 700 mm³ or more for dark-to-light. Treat these as starting points, not fixed requirements. Pigment strength and material affect how much residue remains visible.
For many standard PLA and PETG colour combinations, test a flushing multiplier around 0.50 to 0.65. Don’t assume the same value suits ABS or another filament type. Compare samples using the same colour order and inspect the first extrusion after each change.
-
Flush Purge Material Into Infill
Enable flushing into infill for different colours of the same base material, such as PLA-to-PLA or PETG-to-PETG. This sends some transition filament inside the model instead of into a separate purge structure. Avoid combinations such as PLA and PETG, which may bond poorly and weaken the part.
Choose a slicer with multi-material flushing controls and a purge-to-infill option. Feature names vary between programs, so preview the affected layers before printing. Dark transition material may show through thin exterior walls; use an opaque model with enough wall thickness to conceal its infill.
-
Adjust Purge Requirements for Print Settings
Review nozzle size, layer height, and colour order before changing flush values. Nozzle size and layer height shape the toolpath, while colour order affects how readily residue shows. A light filament printed after a dark one can reveal contamination more clearly than a dark-to-dark transition.
Keep the settings consistent on a two-colour calibration coin and change only one variable per test. This makes results easier to interpret. A clean transition line matters more than a lower slicer estimate, especially on visible surfaces or functional parts.
-
Assess Filament and Cost Savings
Compare the slicer’s purge estimate before and after an adjustment, then inspect the printed sample for colour carry-over. Savings depend on the model, filament pairing, and transition sequence. Estimate them from the specific job rather than assuming one reduction applies to every print.
For a cost estimate, multiply the filament saved by your own cost per unit. Test a two-colour calibration coin before applying a lower multiplier to a 30-hour print. While this methodical tuning controls waste during prototyping, high-volume production runs that become inefficient on a print bed can be transitioned to custom injection moulding services from Central Plastics. That measured, incremental approach remains a practical way to apply colour change purge tower waste reduction strategies and refine colour change purge tower waste reduction strategies without sacrificing a clean result.
The distinction between flushing and prime towers
- Distinguish the material change from the structure that manages it. Flushing purges old filament from the nozzle during a colour transition. A prime or wipe tower is a printed structure that supports nozzle behaviour during that change. In a black-to-white print, flushing clears dark material before white filament returns to the model.
Check the slicer preview to see where purge material goes. It may be directed to a tower or, when suitable, into infill. The tower is a destination or tool, not the flush volume itself. Keeping these settings distinct helps identify whether excess waste comes from too much flushing or unnecessary tower printing.
- Review flush volume separately from tower settings. Flush volume controls how much filament the printer pushes through during a colour change. The tower has a different role: helping stabilize nozzle pressure and wipe away oozing before the nozzle returns to the model.
A dark-to-light transition may need more flushing to clear colour contamination, even when the tower is already managing pressure and wiping. Reducing tower material won’t automatically change the volume needed to clear the nozzle. Inspect both controls in the slicer, then adjust the setting related to the problem you see.
- Reduce the prime tower carefully rather than deleting it immediately. Removing it can lead to blobs, stringing, or uneven extrusion when colour changes begin. These defects can appear on the model even when the transition’s flush volume is appropriate.
Print a small test with reduced tower settings, then inspect the model where the nozzle resumes extrusion. Look for a blob at the colour boundary, stray strings, or an inconsistent first line after a swap. If these issues appear, restore some tower function before changing the flush volume. This keeps troubleshooting focused.
- Use the slicer preview to connect each setting with its job. Follow one colour change from the old filament, through the purge path, to the nozzle’s return to the model. A tower may receive purge material and help prepare the nozzle, but these functions remain distinct.
Compare a test with the tower enabled against one with a cautious reduction. Keep the version that starts each colour section cleanly, without blobs or uneven extrusion. Then assess whether you can reduce the flush amount separately. This step-by-step comparison helps avoid replacing tower waste with failed transitions or visible defects.
How does a 3D printer purge tower reduce color-change contamination?
- Watch the nozzle’s path during a colour change in the slicer preview. A purge tower gives the nozzle a separate place to extrude transition material before printing the next colour on the model. For example, after a dark filament change, the tower receives some remaining dark material as the new filament moves through the nozzle.
This helps keep mixed-colour extrusion away from visible model surfaces, but it doesn’t mean the tower removes every trace of the previous filament. The required flush volume still depends on the transition, so assess the tower and flush settings separately.
- Use the tower to help stabilize nozzle pressure before printing resumes. During a filament change, extrusion pauses and nozzle pressure can shift. The tower provides a place to extrude before the nozzle returns to the model, helping the next line start more consistently.
Inspect the first line after a swap. If extrusion starts unevenly, the tower may need to remain active or be adjusted. A clean tower doesn’t prove that the model is free from colour contamination, so check both the transition area and the first layers of the new colour.
- Consider the tower’s wiping function when checking for oozing. A prime or wipe tower can remove material that oozes from the nozzle before it returns to the model. This can reduce stray marks at a colour boundary, such as on a light surface printed after a darker filament.
Inspect the model near each transition for blobs, strings, or an inconsistent start. These signs point to different issues from visible colour bleed within the printed line. Follow the nozzle from the tower back to the model in the slicer preview, then note where the defect appears.
- Reduce tower material cautiously rather than removing the structure at once. Removing a prime tower can cause blobs, stringing, or uneven extrusion when colour changes begin. Compare a test with the original setting to one with a reduced tower, keeping the model and colour sequence the same.
Check the tower’s extrusion and the model’s colour boundary after each test. If the model starts cleanly but shows mixed colour, revisit the flush volume. If the transition starts unevenly or leaves oozing marks, restore tower support. For help diagnosing persistent printer performance issues, get support with 3D printer repairs.
3D Printing Canada
3D Printing Canada can help you connect purge-waste decisions with the materials and printer equipment involved. Filament choice affects colour transitions, while persistent extrusion problems may point to a printer issue rather than a slicer setting. Bambu Lab Accessories and 3D Printer Repair Services are relevant options when you’re working with compatible equipment or addressing hardware trouble. For a multicolour print, bring together the material type, transition order, and symptoms you’re seeing so the issue is easier to describe. If a clean test still produces inconsistent extrusion, repair services may be the practical next step. Contact 3D Printing Canada to discuss your 3D printing needs.
Make your next multicolour print easier to tune
Turn each successful print into a useful reference. Record the filament pairing, colour order, model orientation, and slicer profile alongside the result. These notes can help you identify settings that work for similar parts and when a fresh test is needed. Treat colour-change purge-tower waste-reduction strategies as repeatable tuning, not a single setting to change and forget.
For your next project, choose one profile adjustment and assess its effect on the finished part before changing anything else. A clear comparison makes it easier to keep useful settings and avoid carrying a poor adjustment into future prints. If you want help with your setup or printer, contact 3D Printing Canada about your project. Keep experimenting thoughtfully, and let each print build your confidence for the next one.
Frequently Asked Questions
How can I minimize purge tower size for multi-colour 3D prints?
Reduce the tower cautiously while keeping colour transitions clean. First, check whether model orientation or print layout can reduce repeated colour changes. Then make a small tower adjustment in the slicer and inspect the model for uneven extrusion when the nozzle returns. A smaller tower isn’t useful if it causes defects that require a reprint, so compare the finished part and purge structure together.
What slicer settings reduce filament purge waste during colour changes?
Focus on flush volume, flushing multiplier, purge destination, and prime-tower settings. Change one setting at a time so you can connect the result to the adjustment. For example, if a transition looks clean but the slicer still sends purge to a tower, test a suitable alternative destination. Record the filament pair and profile so you can reuse effective settings.
How can a purge tower be replaced with an infill purge or purge-to-object strategy?
In the slicer, direct purge into infill or another object when the transition material suits that destination. Infill purge places transition filament inside a model; purge-to-object uses a separate printed object to receive it. Choose an object whose appearance and function can tolerate mixed filament. Preview the toolpath and avoid material combinations that may bond poorly.
What are the risks of reducing purge volume, including colour bleeding and weak layers?
Too little purge can leave the previous colour in the nozzle, causing streaks or muddy areas after a change. Material incompatibility brings a separate risk: poorly bonded filaments can weaken a part’s internal structure. Inspect dark-to-light transitions and functional parts with mixed materials carefully. Check the colour boundary and part strength before keeping a reduced setting for future prints.
How can I measure and calibrate the minimum purge volume for a filament pair?
Use a small two-colour calibration print and record the starting flush setting for the filament pair. Reduce the setting gradually, keeping the model, colour order, and print conditions consistent. Inspect the transition for colour carry-over and compare each result with the previous sample. Start with dry filament and calibrated basic flow so moisture or inconsistent extrusion doesn’t distort the results.
How do purge volumes differ between PLA, PETG, ABS, and other filament types?
For many standard PLA and PETG colour combinations, a flushing multiplier around 0.50 to 0.65 is a reasonable starting point. The article gives no separate purge-volume ranges for PLA, PETG, ABS, or other filament types; it recommends choosing starting flush volumes by colour transition and testing them.