
That bird’s nest of spaghetti on your build plate isn’t just a waste of expensive filament; it’s a stolen afternoon and a direct hit to your creative momentum. We’ve all been there, staring at a half-finished model and wondering why your 3D printer is not printing correctly despite following every calibration step in the manual. It’s incredibly frustrating to watch high-quality material turn into scrap while you struggle with complex slicer settings or worry about accidentally damaging your hardware during a desperate DIY repair.
We understand that you want professional-grade results without the constant headache of mechanical failure. This 2026 troubleshooting guide provides a clear, expert-led framework to help you identify the root cause of your failed prints and restore your machine to its full potential. Whether you're dealing with a clogged nozzle on a high-speed Bambu Lab machine or firmware glitches in Klipper v0.13.0, we have the answers. We’ll walk you through actionable steps to fix common issues, offer advice on when to upgrade your components, and show you how to access the reliable technical support you need to keep your workshop running smoothly.
Key Takeaways
- Learn how to balance the "Triangle of Troubleshooting" by evaluating your hardware, software, and materials to pinpoint exactly why your 3D printer is not printing correctly.
- Master the fixes for common quality hurdles like bed adhesion failures and under-extrusion to eliminate gaps or brittle layers in your finished models.
- Determine when a simple nozzle swap is enough and when it's time to seek professional 3D printer repair services for complex mechanical failures.
- Protect your investment by establishing a proactive maintenance schedule that keeps your linear rails lubricated and your hardware optimized for high-speed performance.
- Understand why sourcing genuine OEM parts and high-quality filaments within Canada is essential for the longevity of advanced machines like the Bambu Lab series.
Why is my 3D printer not printing correctly?
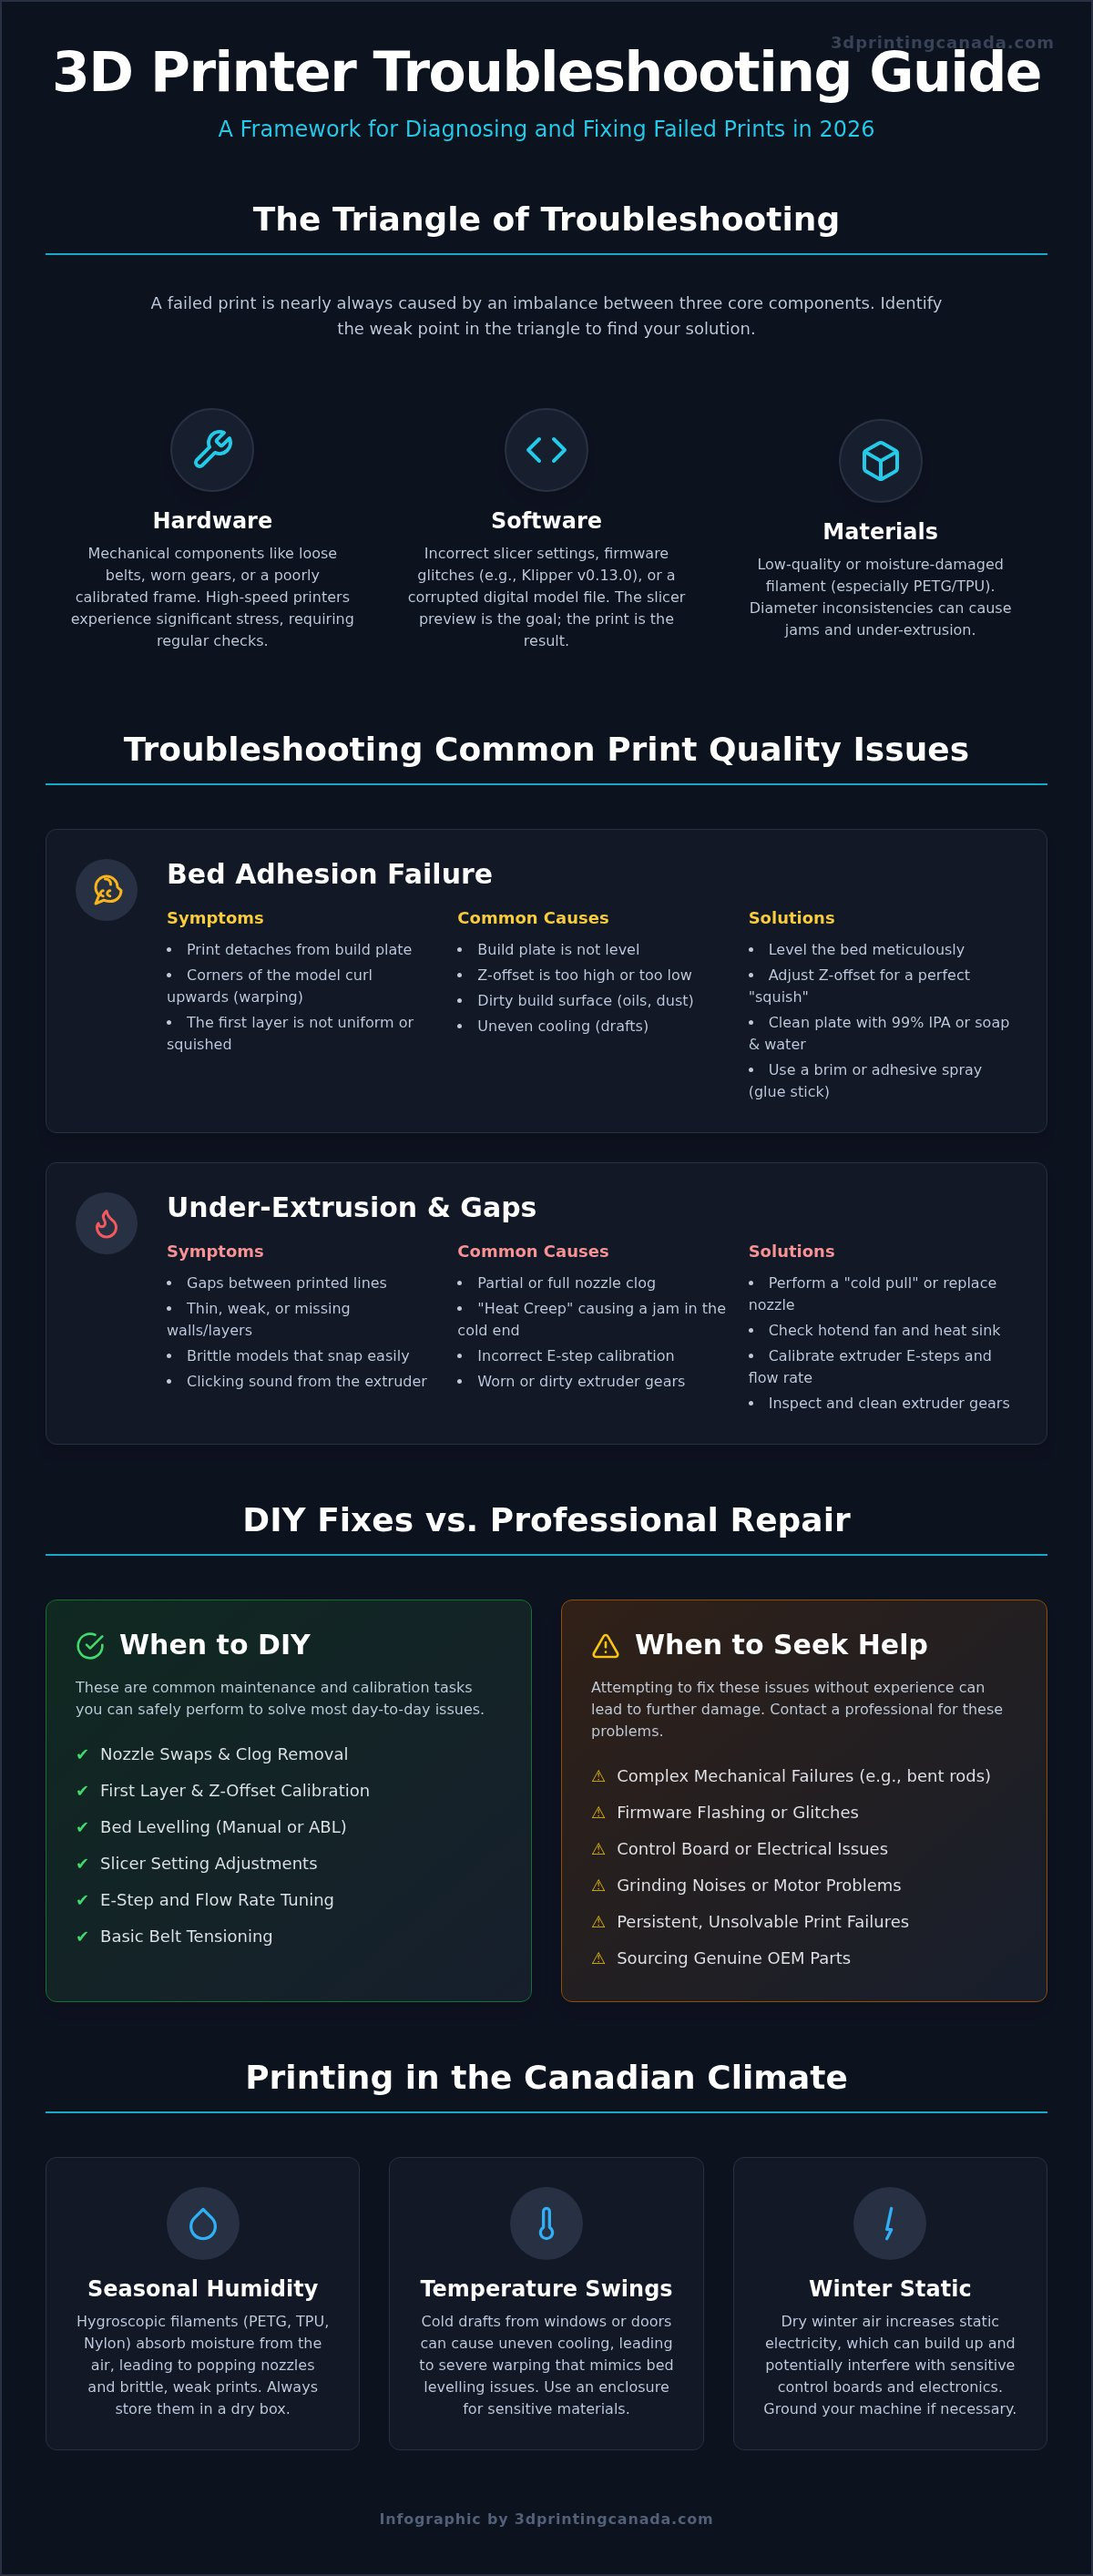
A 3D print failure is simply any deviation from your digital model's intent. It is the gap between the perfect preview in your slicer and the flawed object on your build plate. Even with the advancements in 2026, the core 3D printing processes rely on a delicate balance of variables. We call this the "Triangle of Troubleshooting," which consists of hardware, software, and materials. When one side of this triangle weakens, you will likely find your 3D printer not printing correctly.
Don't assume that high-end, high-speed machines are immune to these issues. Modern printers capable of 500mm/s speeds experience significant mechanical stress. Regular calibration and maintenance are essential for these systems to function properly. We generally categorize failures into two groups. Visual defects, such as minor surface imperfections, affect the look of your part. Total mechanical stoppages, however, are catastrophic failures that halt the process entirely.
Identifying the symptoms of a failed print
Learn to read the signs your machine provides. Visual cues like stringing, ghosting, or layer shifts often point to specific slicer settings or loose mechanical components. Listen closely to your hardware during operation. A clicking extruder often indicates a clog or under-extrusion, while grinding sounds suggest your belts need urgent tensioning.
Use the "first layer" litmus test as your primary health check. If that initial layer doesn't lay down perfectly smooth and consistent, the foundation of your build is compromised. Stop the print immediately. It is better to restart than to waste hours on a build that will eventually fail.
The role of environmental factors in Canada
Our Canadian climate creates specific challenges for 3D printing enthusiasts. Seasonal humidity shifts can quickly degrade hygroscopic filaments like PETG and TPU. These materials absorb moisture from the air, which leads to popping sounds at the nozzle and brittle finished layers.
Temperature fluctuations in your workshop can also cause significant warping. A cold draft from a window can lead to uneven cooling, which often mimics bed leveling issues. During the dry winter months, be aware of static electricity. It can build up and potentially interfere with sensitive control boards. Keeping your workspace stable and your filament dry will solve many problems before they start.
Troubleshooting common print quality issues
When you see your 3D printer not printing correctly, the issue often manifests as a physical defect you can touch. Bed adhesion is the most common culprit. If your prints curl at the corners or detach mid-process, the plastic is cooling too quickly or failing to bond with the surface. This mechanical bond is central to the additive manufacturing process. Understanding the fundamentals of how 3D printers work helps you realize that the first layer is the most critical stage of any build.
Under-extrusion presents a different set of challenges. You might notice thin walls, visible gaps between lines, or layers that snap apart with minimal pressure. This usually stems from a bottleneck in the hotend. A nozzle clog, whether partial or full, restricts the flow of molten plastic. For high-speed machines like the Bambu Lab series, even a tiny amount of friction in the filament path can lead to under-extrusion because the extruder cannot keep up with the rapid movement. Balancing retraction settings and nozzle temperature is also vital to prevent stringing and oozing, which can ruin the surface finish of complex models.
Mastering the first layer and bed adhesion
A level build plate is non-negotiable. If your Z-offset is too high, the filament won't squish into the plate; too low, and you'll scrape the bed or cause a backup. Keep your surface pristine. While 99% Isopropyl Alcohol (IPA) is great for quick wipes, a deep clean with warm water and dish soap removes skin oils that alcohol sometimes leaves behind. If you're still struggling with warping on large PETG parts, a thin layer of glue stick or specialized adhesive spray provides the extra grip needed to finish the job.
Fixing extrusion and flow rate problems
Start by calibrating your E-steps to ensure your extruder actually moves the amount of filament the software requests. If the hardware is fine but the flow stops after an hour, you might be facing "Heat Creep." This happens when heat travels up from the hotend and softens filament before it reaches the melt zone, causing a jam. Check your extruder gears too. Metal gears eventually wear down or get clogged with plastic dust, losing their grip on the strand. If you're tired of troubleshooting material failures, switching to high-quality filaments can eliminate many of these variables instantly.
DIY fixes vs. professional 3D printer repair
Deciding whether to open up your machine or send it to an expert is a pivotal moment for any maker. If you find your 3D printer not printing correctly, start by assessing your comfort level with both mechanical and electrical components. Most users can handle routine maintenance like nozzle swaps, belt tensioning, and bed leveling. These tasks are essentially the "oil changes" of the 3D printing world. However, when the problem involves the printer's brain or its structural integrity, the risk of accidental damage increases significantly. Much like how a specialist in laptop repair Antwerp handles delicate computer circuitry, your 3D printer's motherboard requires a professional touch to ensure a successful restoration.
Complex issues such as motherboard failures, bent lead screws, or erratic thermistor errors require a different set of skills. A mistake during a motherboard swap can lead to short circuits that ruin expensive components. Professional diagnostics provide more than just a fix; they offer a guarantee that the root cause is addressed. This prevents the cycle of "parts cannon" repair where you waste money on components that don't actually solve the problem.
Keep a dedicated toolbox ready. Every Canadian 3D printer owner should have a set of metric hex keys, needle-nose pliers, a digital caliper, and a brass brush. Before you start, prioritize safety. Always unplug the unit before touching the power supply or control board. High-voltage components can be dangerous if mishandled. Use online wikis and community forums to find step-by-step guides for basic component swaps. If the repair requires soldering or firmware flashing that you aren't familiar with, pause and evaluate if the time investment outweighs the cost of professional help.
Signs you need professional 3D printer repair services
Know when to call in the experts. If you have attempted multiple calibrations and the failures persist, you likely have a hidden mechanical or electrical flaw. Watch for serious red flags like burned connectors, strange smells coming from the electronics bay, or persistent "thermal runaway" errors that don't go away after a thermistor change. These symptoms often point to underlying issues that could become fire hazards if ignored.
For many Canadians, the "repair vs. replace" debate comes down to the value of the machine and the complexity of the hardware. Modern high-speed printers use proprietary parts and intricate assemblies that are difficult to service without specialized tools. If your machine is critical for your business or a high-stakes project, professional intervention is the safest route. You can learn more about 3D printer repair services Canada to see how expert technicians can restore your hardware to factory specifications without the DIY stress.
Preventative maintenance: keeping your hardware optimized
Maintaining a high-performance machine requires more than just clearing the occasional clog. If you want to stop your 3D printer not printing correctly, you need to move from reactive repairs to a proactive schedule. Think of your printer like a car; it needs regular check-ups to stay reliable. Establish a weekly routine to wipe down your build plate and check for loose belts. Every month, dive deeper into the mechanical assembly. Lubricate your linear rails and lead screws with a thin layer of PTFE-based grease to ensure smooth travel. This prevents the microscopic jitter that leads to surface artifacts and ringing.
Inspect your fans and heat sinks regularly. Dust accumulation is a silent killer that reduces cooling efficiency, which often triggers the heat creep we discussed earlier. While you're at it, check for firmware updates. In 2026, versions like Klipper v0.13.0 or the latest Marlin 2.1.2.5 releases offer improved safety features. These updates provide better thermal runaway protection and optimized motor timings that can actually improve your print quality without changing a single hardware part.
Filament storage and material care
Wet filament is the single most common cause of "unexplained" print failures. Materials like nylon, PETG, and TPU are extremely hygroscopic, meaning they pull moisture from the air. This moisture turns into steam in your hotend, which causes bubbling, stringing, and poor layer bonding. Use dedicated dry boxes or active dehydrators to keep your spools in top shape, especially during humid Canadian summers. Investing in high-quality 3D printer filament Canada ensures tighter diameter tolerances and better chemical consistency. This reduces the chance of clogs and ensures your slicer settings remain accurate from spool to spool.
Hardware upgrades for better reliability
Sometimes, the best way to prevent failure is to outpace it with better components. If you print with abrasive materials like carbon fibre or glow-in-the-dark PLA, switch to a hardened steel nozzle immediately. Standard brass nozzles can wear out in as little as 3 to 6 months of regular use, leading to inconsistent extrusion. Upgrading to a magnetic PEI spring steel build plate is another game changer. It provides excellent adhesion when hot and lets you pop parts off easily once cool. This saves your bed from the scratches and gouges often caused by a metal scraper. Finally, consider adding a filament runout sensor. It is a small investment that prevents a long, 40-hour print from ending in a hollow shell just because you ran out of material overnight.
Sourcing parts and technical support in Canada
Sourcing specialized 3D printing components within Canada often feels like a balancing act between price and lead times. When your 3D printer not printing correctly stops your workflow, you need a partner that understands the local landscape. Ordering from international retailers often results in unexpected cross-border duties and long customs delays that can turn a simple repair into a multi-week ordeal. By choosing a local resource, you gain access to national shipping that gets your machine back online quickly without the headache of international logistics.
Technical precision is non-negotiable for modern hardware. Using genuine OEM parts is vital for maintaining the performance standards of high-speed machines. Third-party components might seem like a bargain, but they often lack the strict tolerances required for 500mm/s print speeds. Whether you are a hobbyist or a professional, having a dependable Canadian-based partner ensures that the parts you receive are verified for quality and compatible with your specific hardware configuration.
Essential Bambu Lab accessories and spares
High-speed machines require a proactive approach to spare parts. If you own a Bambu Lab printer, you should always keep a few hotends and filament cutters in your toolbox. These are high-wear items that will eventually need replacement to maintain peak performance. You can discover the latest Bambu Lab accessories Canada to ensure your setup is equipped with the right components for your next project. Upgrading your AMS (Automatic Material System) with better internal tubing or improved feeders can also significantly increase your multi-material reliability and reduce the chances of a mid-print jam.
National support for every maker
Sometimes, even the most thorough DIY troubleshooting isn't enough to solve a persistent hardware failure. When your 3D printer not printing correctly becomes a recurring nightmare, it's time to seek a professional diagnostic. Our expert technicians provide comprehensive 3D printer repair services that cover everything from complex motherboard failures to subtle mechanical misalignments. Having a Canadian-based support team means you can communicate clearly with experts who understand your specific challenges and offer proactive solutions.
Before you start your next big project, run through this final checklist to ensure your hardware is ready:
- Surface Prep: Is the build plate cleaned with soap and water to remove oils?
- Material Status: Has your filament been dried in a dehydrator or dry box?
- Mechanical Check: Are the belts tensioned and the linear rails lubricated?
- Software Sync: Is your firmware updated to the latest 2026 version for your controller?
By following this framework and sourcing the right parts, you can move past the frustration of failed prints and get back to what matters most: creating high-quality, professional-grade models with confidence.
Restore Your Professional Print Quality
Success in 3D printing is rarely about luck; it's about mastering the delicate balance between mechanical precision and material integrity. We've explored how a stable environment, proactive maintenance, and high-quality filament can solve the most common reasons for a 3D printer not printing correctly. By identifying visual and auditory cues early, you can prevent minor surface defects from turning into catastrophic hardware failures. Remember that even the most advanced high-speed machines require regular attention to stay at their peak performance levels.
If you've reached the limit of your DIY comfort zone, don't risk damaging your sophisticated hardware through trial and error. Our team of experienced technicians handles professional repairs for all major brands, and we maintain a massive inventory of Bambu Lab accessories and premium filaments to keep your workshop fully optimized. With fast national shipping across Canada, you can get the exact components or expert support you need without the long wait times or cross-border duties of international orders.
Get Expert Help with Our Professional 3D Printer Repair Services and get back to the creative work you love. Your next masterpiece is just a few clicks away, and we're here to ensure your hardware is ready for the challenge.
Frequently Asked Questions
Why is my 3D printer nozzle getting clogged so often?
Frequent clogs often result from using low-quality materials or a cooling fan failure that causes heat creep. When heat travels too far up the hotend, the filament softens prematurely and creates a plug. Ensure your hotend fan is clear of dust and spinning at full speed. Switching to premium filaments with consistent diameter tolerances significantly reduces the accumulation of debris that leads to persistent blockages.
How do I fix a 3D printer that isn't extruding any plastic?
Start by checking for a physical jam in the nozzle or a break in the filament line. If the motor is turning but no plastic moves, your extruder gears might be worn down or clogged with plastic dust. Clean the gears with a small brush and adjust the tension. If the hardware seems fine, your 3D printer not printing correctly might be due to a failed heater cartridge or a faulty thermistor.
What is the best way to level a 3D printer bed in 2026?
Modern machines in 2026 utilize AI-driven automatic bed leveling sensors to create a high-resolution mesh of your build plate. While these systems are highly accurate, you should still verify the Z-offset manually. Use a standard feeler gauge or a clean piece of paper to ensure the nozzle has the perfect "squish" against the plate. This hybrid approach combines automated precision with a reliable physical check for the best results.
Can wet filament cause my 3D printer to stop printing correctly?
Yes, moisture is a primary reason for a 3D printer not printing correctly because it turns into steam inside the hotend. This process causes bubbling, popping sounds, and inconsistent extrusion that ruins surface quality. Materials like PETG and TPU are especially prone to absorbing humidity. Always store your spools in a dry box or use an active dehydrator to maintain the material integrity required for professional-grade prints.
When should I replace my 3D printer nozzle instead of cleaning it?
Replace your nozzle if you notice the tip is flattened or the exit hole has become enlarged from abrasive filaments like carbon fibre. While cold pulls can clear some clogs, persistent carbon buildup inside the nozzle is often impossible to remove completely. Given that standard brass nozzles are relatively inexpensive, it's usually more efficient to install a fresh one than to risk a failed 20-hour print on a partially cleaned part.
Why are my 3D prints warping and peeling off the bed?
Warping occurs when the plastic cools too rapidly and shrinks, pulling the corners of your model away from the bed. This is common in Canadian workshops where seasonal temperature shifts create cold drafts. To fix this, ensure your build plate is cleaned with dish soap and water to remove oils. Using an enclosure or a thin layer of specialized adhesive spray provides the thermal stability and grip needed for large builds.
Is it worth paying for professional 3D printer repair services?
Investing in professional 3D printer repair services is highly beneficial when dealing with complex electrical failures or structural misalignments. Our expert technicians can diagnose motherboard issues and bent lead screws that are difficult to fix at home. Professional service saves you from the frustration of buying unnecessary parts and ensures your machine is restored to factory specifications. It's the most reliable way to protect your investment and minimize your workshop's downtime.
How often should I lubricate my 3D printer's moving parts?
You should lubricate your lead screws and linear rails approximately once a month or after every 150 hours of print time. Use a high-quality PTFE-based grease to ensure smooth travel and reduce wear on your motors. If you notice any squeaking or visible "chatter" on your print surfaces, it is a clear sign your moving parts are dry. Regular maintenance keeps your machine quiet and extends the lifespan of its mechanical components.