
Changing retraction isn’t always the first step to stop wispy strands. PETG can string even when your slicer settings seem reasonable, and random tweaks can create new problems. To learn how to eliminate stringing on PETG prints, identify the likely cause before changing settings. Common causes include damp filament, excess nozzle heat, retraction settings and residue on the nozzle.
If you’ve adjusted several settings at once, it’s difficult to tell what helped. Instead, change one variable, run a small test and compare the result. This guide takes you through a practical troubleshooting sequence, from checking filament condition and nozzle temperature to tuning retraction and reviewing travel moves. You’ll learn how to make controlled adjustments, spot new defects and recognize when persistent stringing may point to a hardware issue. Start with the evidence on your print, then work through the possible fixes one at a time.
Key Takeaways
- Learn how to eliminate stringing on PETG prints by diagnosing the likely cause before changing settings.
- Follow the filament maker’s drying and temperature guidance, then inspect the nozzle for PETG residue.
- Compare temperature tower results and adjust one setting at a time to see what improves the print.
- Run a small, repeatable test before committing time and filament to a full-size model.
- Reduce recurring moisture issues with sealed storage and desiccant, and recognize when persistent stringing may need hardware troubleshooting.
Why PETG prints string: identify the strands before changing settings
Before adjusting slicer settings, look closely at where the unwanted plastic appears. Stringing is a fine strand left behind as the nozzle travels through open space between separate features. PETG can be prone to this kind of wispy trail, but persistent strands are still worth troubleshooting methodically. The pattern can help narrow down the cause, so note what you see before changing anything.
Moisture, nozzle temperature, retraction, travel paths and nozzle condition can all contribute. They can also overlap: a damp spool and a hot nozzle may produce similar-looking wisps. A single messy print rarely identifies the cause on its own. First distinguish stringing from other surface defects, then use a small test to make comparisons easier.
What does PETG stringing look like?
Look for fine hairs stretched across gaps, holes or open space between two towers. They often appear when the print head moves from one feature to another without laying down a solid wall. A small test model with separate posts or openings makes these strands easy to see and compare between runs.
Blobs are different. They’re thicker deposits, often gathered near a start or stop point, or along a seam where a layer begins and ends. Oozing may appear as plastic accumulating around the nozzle or on a nearby surface. Rough seams are localized marks on the print itself, not necessarily strands connecting separate features. These defects can occur together, but their locations offer useful clues: strands across open gaps suggest travel-related oozing, while repeated bumps in one line are a reason to inspect the seam and extrusion transitions.
Which causes should you check first?
Use the print’s pattern as a clue, not a verdict. Check the simplest possibilities before changing several slicer controls at once:
- Filament condition: PETG can absorb moisture. Damp filament may extrude inconsistently and leave fine strands. Consider whether the spool has been exposed to humid air, and follow the filament maker’s drying guidance.
- Nozzle temperature: Excessive heat can make PETG ooze more readily as the nozzle moves between features. If strands appear throughout the travel gaps, temperature is one variable to investigate. Stay within the manufacturer’s recommended range.
- Retraction and travel: Retraction pulls filament back during a move, while the travel path determines where the nozzle goes. Either can affect whether plastic is dragged across an open gap. Test them separately so you can compare results.
- Nozzle condition: PETG residue stuck to the nozzle can collect or drag plastic across a print. Check for visible buildup and clean it according to the printer maker’s guidance.
These checks help you decide what to test rather than guess at a universal fix. To learn how to eliminate stringing on petg prints, record your starting conditions and change one variable at a time. A repeatable pattern is more useful than a one-off improvement.
How to troubleshoot PETG stringing without changing everything at once
A useful test starts with a stable baseline, not a pile of new settings. Keep your current slicer profile and note the filament brand and spool, nozzle temperature, retraction settings and anything unusual about the print. Then check the material and printer before making changes. This gives you a fair comparison and helps show whether a fix reduced the strands without harming the rest of the print.
Check filament condition before tuning
PETG can absorb moisture, which may affect how consistently it extrudes. Popping sounds during printing or uneven extrusion can be clues, but they don’t prove the filament is damp. Other issues can cause similar symptoms. Consider how the spool has been stored, then follow the filament manufacturer’s drying instructions if drying is appropriate. Avoid guessing at drying temperatures or times, since guidance can vary by material.
Once the filament is ready, inspect the nozzle for visible PETG residue. Clean it using the printer maker’s guidance, taking care around hot components. A clean nozzle removes one possible source of dragged plastic, making it less likely that you’ll mistake residue for a slicer-setting problem.
Run a controlled stringing test
Choose a compact test model with separate towers or repeated gaps that make travel strands easy to compare. Use the same model and spool for each run, and keep the printer and slicer profile consistent except for the single setting you’re testing. A temperature tower can help you compare temperatures within the filament maker’s recommended range. A retraction test can help you assess retraction separately. Don’t change temperature and retraction together, or you won’t know which adjustment affected the result.
Follow a repeatable sequence:
- Prepare the baseline: Check filament condition, inspect the nozzle and print the test using your current profile. Save or photograph the result.
- Test temperature: If the maker’s guidance allows a range, compare suitable points within it while keeping other settings fixed.
- Test retraction: Return to the baseline temperature, then adjust only the retraction setting your test is designed to evaluate.
- Review travel and cleanliness: If strands remain, inspect the travel paths and nozzle again before testing another relevant setting.
Keep a simple log with the date, spool, setting changed, old and new values, and your observations. Record the strand length or location, along with any new defects such as gaps or rough surfaces. A change that removes wisps but damages the print isn’t a clear improvement. Repeat the same small test after each adjustment, and keep the best-performing profile rather than relying on memory. This measured process helps you learn how to eliminate stringing on petg prints without guesswork.
If stringing persists after consistent tests and basic checks, the cause may involve printer hardware rather than settings alone. 3D Printing Canada provides 3D printer repair services to help address persistent printer issues.
PETG temperature vs. retraction: choose the right adjustment
Temperature and retraction can both affect stringing, but there’s no single setting that works for every PETG spool and printer. Start with the filament maker’s recommended range and the correct material profile for your setup. If the filament is in good condition and the nozzle is clean, temperature is a useful first test because it affects how readily molten plastic oozes during travel.
How can you find a suitable PETG nozzle temperature?
Print a temperature tower using values within the manufacturer’s recommended range, keeping other settings fixed. Compare each section for strands, consistent surfaces and sound layer bonding. A cooler section may show less oozing but weaker bonding or a rougher finish. A hotter one may bond well yet leave more wisps. Choose the best overall balance, not simply the section with the fewest hairs.
Don’t treat a temperature suggested for one printer or spool as a universal answer. For example, a forum recommendation of 255°C after a test at 220°C describes one user’s setup, not a reliable target for all PETG. If the filament maker’s range doesn’t include a suggested temperature, don’t use it just because it worked for someone else.
When should you adjust retraction or travel settings?
Once you’ve checked filament condition and chosen a suitable temperature, test retraction separately. Distance controls how far filament is pulled back; speed controls how quickly it moves. Direct-drive and Bowden extruders can respond differently, so use your printer profile or manufacturer guidance as a starting point rather than copying values from another machine.
Excessive retraction can cause new problems, including grinding or under-extrusion. Change one retraction value at a time, then compare the test print. If strands cluster around long moves, review the slicer’s travel paths too. Keep the model and other settings unchanged so you can tell whether the adjustment helped.
Symptom: Fine strands across most gaps. First variable to test: Nozzle temperature within the filament maker’s range. Observe: Whether strands decrease without rough surfaces or poor layer bonding.
Symptom: Stringing remains after temperature is dialled in. First variable to test: Retraction distance, then speed in a separate test. Observe: Whether strands shorten without grinding or gaps in extrusion.
Symptom: Strands appear mainly along particular routes. First variable to test: Travel paths. Observe: Whether changing the route reduces wisps without affecting the rest of the model.
Use the comparison as a guide, not a diagnosis on its own. Record each test result and keep the adjustment that reduces stringing while preserving print quality. That’s more dependable than raising the temperature or increasing retraction by guesswork.
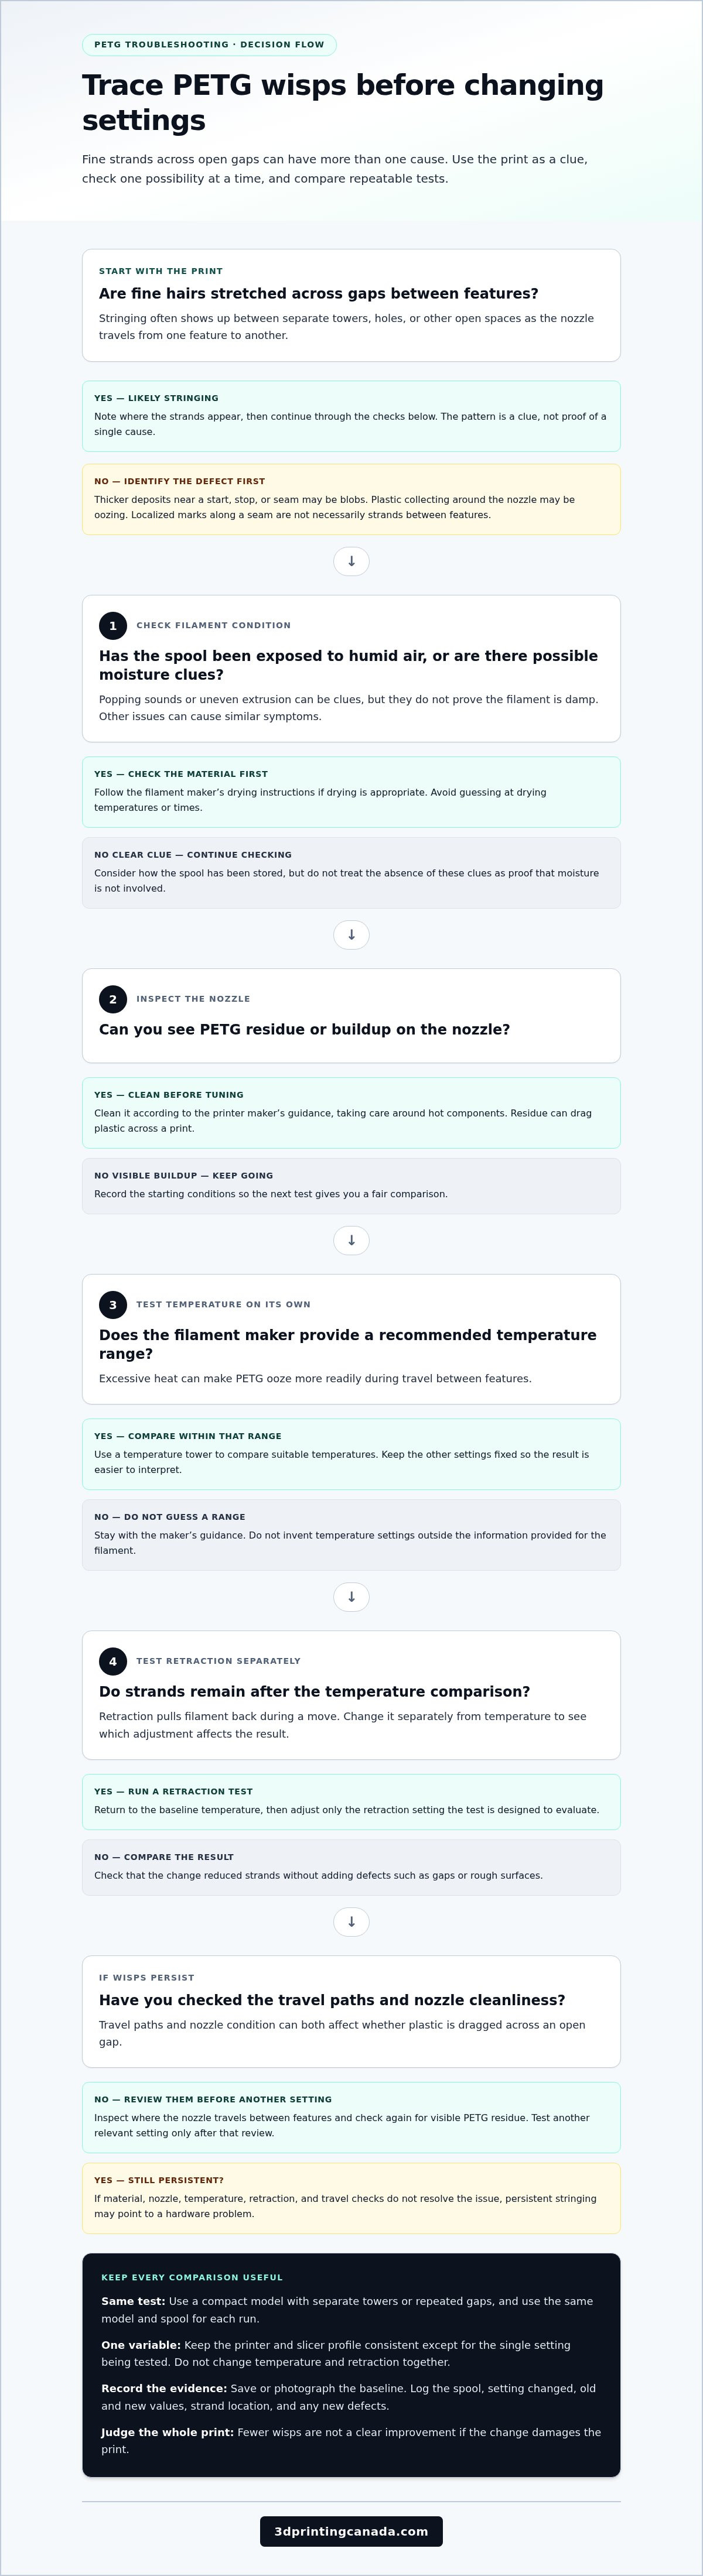
A repeatable PETG stringing test: refine settings and check the result
A small, repeatable test helps you judge changes without using the time and filament a full-size print would take. Choose a compact model with clear travel gaps, then use it as your comparison print. Follow the same sequence each time: prepare the filament if needed, check temperature, test retraction, then review travel paths and nozzle cleanliness. Change one setting per print so you can connect the result to the adjustment.
- Prepare: If the filament may be damp, dry it only according to the manufacturer’s guidance. Check the nozzle for residue and clean it as directed by the printer maker.
- Check temperature: Use the filament maker’s recommended range and compare results without changing other settings.
- Test retraction: Adjust one retraction value at a time, then print the same test again.
- Review travel: If wisps remain, look at the nozzle condition and travel paths before testing another relevant setting.
How to compare test prints fairly
Keep the same model, spool, build plate and slicer profile for every comparison. Change only the parameter being tested, and record its previous and new values alongside the result. Photograph each print under similar lighting and from the same angle. A simple log helps you see whether strands are fewer or shorter instead of relying on memory or a quick glance.
Also note any trade-offs. A test with fewer wisps may still have a poor surface finish, uneven extrusion or weak layer bonding. Tracking these alongside stringing helps you avoid choosing a setting that solves one symptom by creating another.
How to know when the tuning is working
Look for a consistent reduction in the number or length of strands while the print remains smooth, evenly extruded and well bonded. If an adjustment worsens another aspect of print quality, restore your last known-good profile before continuing. Once the small test shows a reliable improvement, try a representative model with the features and travel moves that matter in your usual prints.
When the result is satisfactory, save the profile with a clear PETG label and, if useful, the filament brand or spool type. That gives you a dependable starting point next time, while leaving room to retest if the material or printer setup changes. This measured approach turns how to eliminate stringing on petg prints into a repeatable process rather than a sequence of guesses.
If controlled tests still leave unexplained stringing, 3D Printing Canada’s professional 3D printer repair service can investigate whether a hardware issue is affecting print quality.
Prevent recurring PETG stringing and know when to seek printer support
Once you’ve improved a test print, protect that result with consistent filament storage and basic nozzle care. PETG can absorb moisture from the air, so a spool left exposed between prints may behave differently the next time you use it. Keep notes on storage and print conditions, too. If wisps return, you’ll have useful context for deciding whether to revisit material preparation, profile settings or the printer itself.
How can you reduce PETG moisture exposure?
After printing, place opened PETG in a sealed container with suitable desiccant to limit exposure to ambient moisture. Keep the spool enclosed during storage, and note how long it sits out during printing or handling. If you suspect it needs drying before another test, follow the filament maker’s material-specific instructions rather than relying on a general temperature or time.
Make storage part of your normal print routine:
- Return the spool to its sealed container when you’re finished.
- Keep desiccant with the filament and replace or refresh it according to its instructions.
- Record whether the spool was exposed for an extended period if stringing changes between prints.
These habits won’t replace proper tuning, but they make test results easier to interpret. If one print uses freshly prepared filament and the next uses a spool left exposed, you’re no longer comparing like with like.
When might stringing point beyond slicer settings?
Consider a hardware check if stringing continues across suitable profiles and filament you know has been stored and prepared correctly. Look for other repeatable clues, such as inconsistent extrusion, unusual nozzle buildup or travel-related problems that persist across test prints. These signs don’t identify a specific fault on their own, but they suggest the issue may need more than another slicer adjustment.
Before seeking support, note what you’ve already tested: filament condition, nozzle temperature, retraction changes, nozzle cleaning and whether the same pattern appears across prints. Clear observations can help narrow down the problem. Stop making large setting changes if each one introduces new defects without resolving the original strands.
If stringing remains unexplained after these checks, use the 3D printer repair services guide for a practical next step. Persistent mechanical or extrusion issues can be difficult to isolate through profile tuning alone. Knowing when the evidence points beyond the settings helps you focus troubleshooting where it’s most useful.
Make your next PETG print a confident one
Let each successful test become a useful starting point for future projects. Save your tuned settings with the filament details, and you’ll have a clearer baseline when you switch spools or revisit a print. That small habit makes it easier to tell whether a new wisp calls for a fresh material check or a different kind of troubleshooting.
Learning how to eliminate stringing on petg prints is less about finding one perfect setting and more about making informed adjustments you can repeat. If persistent extrusion or motion issues remain after careful testing, professional printer repair services can help investigate the hardware.
Ready for your next project? Explore 3D printing filaments and supplies from 3D Printing Canada and keep building with confidence.
Frequently Asked Questions
Can PETG stringing happen even when the filament is dry?
Yes. Dry filament can still string if the temperature, retraction, travel path or material profile doesn’t suit your printer. Drying rules out one possible contributor, not every cause. If a dry spool still leaves wisps, note whether they appear across all gaps or mainly after particular moves. That pattern can help you decide which setting to test next as you work out how to eliminate stringing on petg prints.
How do I know if PETG filament is wet?
Popping sounds, uneven extrusion or a rougher surface can suggest moisture, but none confirms it on its own. If you have another spool of the same material that’s been stored properly, a small comparison print may help you spot a difference. Check the filament maker’s drying guidance and the dryer manufacturer’s instructions before drying. Don’t rely on a generic temperature or duration, since material requirements can vary.
Can too much retraction cause problems with PETG?
Yes. Excessive retraction can reduce strands but may also lead to grinding, gaps or inconsistent extrusion. Watch the print after travel moves: if thin sections or missing lines appear where extrusion resumes, the retraction change may be too aggressive. Make a small adjustment and inspect the same area on the next test. The suitable amount depends on the extruder, filament and profile, so another printer’s setting may not transfer.
Should I lower the nozzle temperature to stop PETG stringing?
Not automatically. Lowering temperature may reduce oozing, but printing below the filament maker’s recommended range can affect layer bonding and extrusion. Use the maker’s range as your boundary, and judge a temperature test by more than strand count. For example, a tower section with fewer wisps may still be a poor choice if its layers separate easily or its surface becomes rough. Forum settings are examples, not universal targets.
Why does PETG string more after a filament change?
A new PETG spool may need a different profile, even if it has the same material label as the previous one. Check that the slicer is using the intended material profile, and confirm its temperature guidance before printing. After loading the new spool, make sure the old material has cleared from the nozzle before judging a test. This helps distinguish a profile mismatch from a transition between two materials.
Can a dirty nozzle cause strings on PETG prints?
Yes, residue around the nozzle can pick up molten PETG and drag it onto the print, though moisture or settings can produce similar marks. Inspect the nozzle after the printer has cooled or reached a safe state according to its manufacturer’s instructions. Clean it using the recommended procedure, then compare the same test print. If buildup returns quickly or extrusion looks uneven, record those details for further diagnosis.
Does a larger layer height eliminate PETG stringing?
No, changing layer height isn’t a reliable standalone way to stop travel strands. Keep it unchanged while troubleshooting so you can compare prints fairly. Once stringing is under control, adjust layer height separately if you want to change the balance between surface detail and print time. Then check that the new layer height still suits the model’s features, especially small openings or fine details that may be affected.