
Your 3D printer's high-speed nozzle and premium filament don't matter if your first layer decides to peel off halfway through a twelve-hour job. If you are tired of struggling with 3D printer bed adhesion Canada makers can finally find a permanent solution to warping. We have all felt that sinking feeling when a large functional part starts to curl at the edges, turning a potential success into a pile of wasted filament and lost time.
We understand the frustration of failed prints and the confusion that comes with choosing the right build surface for specific materials. This 2026 guide is here to help you eliminate warping for good. Learn how to ensure your prints stick perfectly every time by mastering the specific techniques and materials required for a flawless start. Stop wasting filament and start printing with confidence.
We are going to explore the critical balance between bed temperature and chemical interfaces. Discover everything from professional levelling to selecting the best adhesives like Magigoo or Vision Miner. Whether you are using a hobbyist machine or professional Bambu Lab accessories, this guide provides the practical knowledge you need for consistent first-layer success and smooth bottom finishes.
Key Takeaways
- Understand the "squish" factor and how proper first-layer compression creates the essential bond between thermoplastic and your build plate.
- Master the mechanical levelling and Z-offset adjustments needed to ensure your nozzle is at the perfect height for consistent success.
- Learn to match specific filaments with the right surface, comparing the benefits of textured PEI against the precision of glass beds.
- Discover the most effective solutions for 3D printer bed adhesion Canada makers use to stop warping, including specialized adhesives like Magigoo and Vision Miner.
- Fine-tune your slicer settings by adjusting first-layer speeds and using brims or rafts to stabilize large, complex parts.
Why Your 3D Prints Won’t Stick: The Science of Bed Adhesion
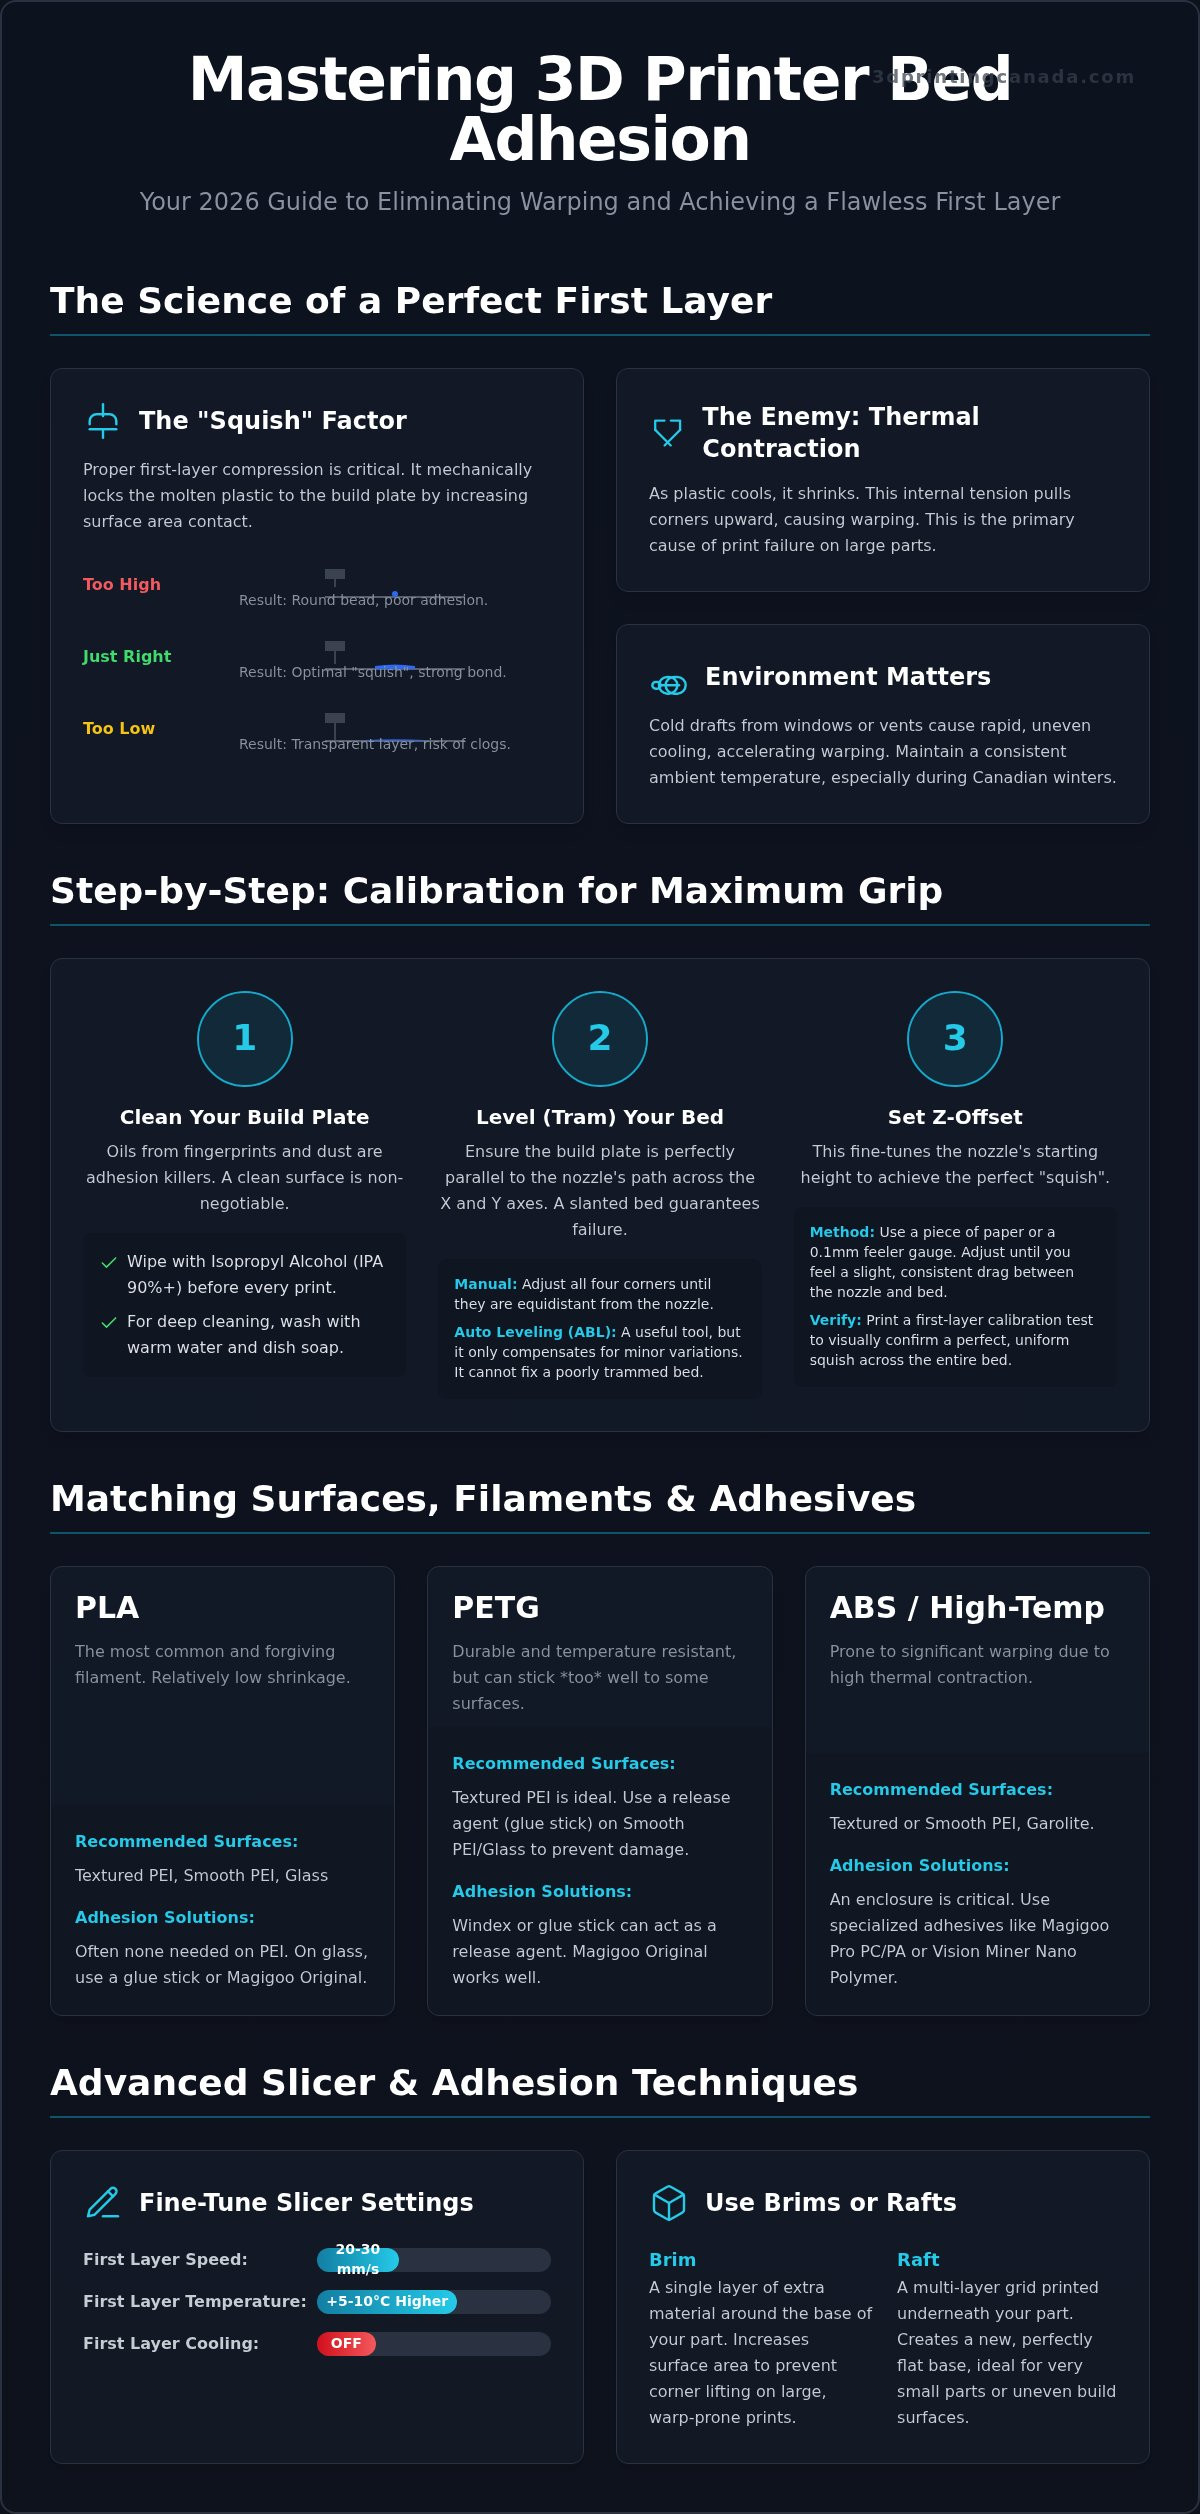
Bed adhesion is the foundation of every successful print. It is the bond between the hot, extruded thermoplastic and your build surface. Without a solid connection, the nozzle's movement will eventually snag the part, leading to a "spaghetti" mess. Achieving perfect 3D printer bed adhesion Canada depends on understanding the "squish" factor. When the nozzle lays down the first layer, it must slightly compress the plastic against the plate. This increases the contact surface area, creating a mechanical lock. If the nozzle is too high, the plastic stays cylindrical and barely touches the bed. If it's too low, you risk damaging your build plate or clogging the extruder.
Thermal contraction is the enemy of a flat print. As plastic cools, it shrinks. For large parts, this internal tension pulls the corners upward, a process we call warping. Different filaments have different surface energy levels. This dictates how they interact with surfaces like PEI, glass, or tape. Materials like PLA are generally forgiving, while high-performance filaments require a more aggressive chemical bond to stay put.
The Impact of Ambient Temperature
Canadian winters present a unique challenge for makers. A drafty room or a printer placed near a cold window can cause rapid cooling. This temperature shock accelerates contraction before the part has a chance to bond. Your bed temperature should generally stay near the filament's Glass Transition Temperature (Tg). This is the point where the plastic remains slightly pliable rather than turning into a brittle solid. Maintaining a consistent environment is just as vital as the heated bed itself. Consider moving your setup away from vents to avoid sudden temperature drops that can ruin a long print.
Common Adhesion Killers: Oils and Dust
The most frequent reason for a failed first layer is invisible. Finger oils are essentially a release agent. Even a single touch can prevent your filament from sticking to that specific spot. To maintain high-quality 3D printer bed adhesion Canada, make Isopropyl Alcohol (IPA) part of your daily routine. A quick wipe with 90% or higher IPA removes most contaminants. However, IPA can sometimes smear oils rather than remove them. If your PEI sheet feels slippery even after a wipe, take it to the sink. Use basic dish soap and warm water for a deep clean. This strips away the built-up grease and restores the surface's natural grip.
Step-by-Step: Calibrating Your Build Plate for Maximum Grip
Calibration is the bridge between understanding the science of polymers and achieving physical success on the build plate. Before you apply a single drop of adhesive, your printer must be mechanically sound. Tramming, commonly called levelling, ensures the build plate is perfectly parallel to the nozzle's movement across the X and Y axes. If the bed is physically slanted, even the most expensive 3D printer bed adhesion Canada has to offer won't prevent a failure. You must start by ensuring the four corners are trammed correctly to provide a flat foundation for the first layer.
Manual vs. Auto Bed Levelling (ABL)
Modern machines often feature Auto Bed Levelling (ABL) sensors like the BLTouch or the high-precision load cells found in Bambu Lab accessories. These sensors probe the surface to create a digital mesh, allowing the printer to compensate for tiny dips or warps in the plate. However, ABL is not a "set and forget" solution. It can only compensate for minor variances. If your bed mesh reveals extreme deviations, you likely have a hardware issue, such as a loose eccentric nut or a bent lead screw. If you find yourself struggling with persistent mechanical levelling problems, our team provides expert 3D printer repair services to get your hardware back in peak condition.
The "Paper Test" and Beyond
The classic "paper test" remains a reliable starting point for setting your Z-offset. Slide a standard piece of office paper between the nozzle and the bed. You should feel a slight, consistent drag as you move the paper. For those seeking professional-level precision, use a 0.1mm feeler gauge instead. This removes the guesswork associated with varying paper thicknesses. The goal is to achieve the "perfect squish," which we define as a translucent but solid layer where individual lines of plastic melt together without leaving gaps or creating rough, raised ridges.
Once your physical height is set, run a dedicated first-layer calibration print. This usually involves printing a series of flat squares across the bed surface. Inspect these squares closely. If the lines are rounded and don't touch, your nozzle is too high. If the nozzle is digging into the plastic and creating "plough" marks, you are too close. You can also adjust your "First Layer Flow" in your slicer settings. Increasing this to 103% or 105% can help fill in minor bed irregularities and improve the overall bond of your 3D printer bed adhesion Canada projects.
Matching Filament Materials to the Correct Bed Surface
Selecting the right surface is about chemistry as much as heat. A mismatch can lead to parts that won't stick or, worse, parts that stick so well they destroy your bed. Achieving reliable 3D printer bed adhesion Canada requires pairing the specific properties of your filament with a compatible build plate. Smooth PEI is the gold standard for a glass-like finish on PLA, while textured PEI provides a rugged look that masks layer lines. Glass remains a favourite for its unmatched flatness, though it often requires a chemical interface to manage the bond. For engineering-grade materials like Nylon or Polycarbonate, Garolite (G10) is the top choice due to its durability and natural affinity for these tough polymers.
PLA and PETG: The Most Common Pairings
PLA is the most straightforward material. It generally releases easily from PEI once the temperature drops below 30°C. PETG is more aggressive. If you print PETG directly onto bare glass, it can bond so strongly that it pulls "chunks" out of the surface upon cooling. This happens because the polymer creates a molecular bond with the silica in the glass. Always use a release agent like a glue stick or specialized liquid on glass for PETG. Textured plates are ideal here. The peaks and valleys of a textured sheet reduce the total contact area just enough to allow for easy removal while still providing the grip needed during the print process.
ABS, ASA, and High-Temp Filaments
ABS and ASA are notorious for warping. These materials need bed temperatures of 100°C or higher to stay in their pliable state. An enclosure is mandatory to keep the ambient air warm and prevent the edges from lifting as the plastic cools. This is especially true for a fast 3D printer Canada setup. High-speed machines often use aggressive cooling fans that can accidentally trigger premature contraction. In these environments, you need a surface that can handle extreme heat without losing its adhesive properties.
Legacy options like Kapton tape or Blue Painter’s tape still have their place for cold-bed printing or specific TPU blends, but they lack the longevity of modern spring steel sheets. Kapton is particularly useful for high-temp applications where you need a thin, heat-resistant barrier. However, for most modern users, the convenience of a magnetic PEI sheet outweighs the cost of older tape-based methods. Understanding these pairings ensures your 3D printer bed adhesion Canada efforts result in successful, flat parts every time.
Top Adhesion Solutions and Adhesives Available in Canada
Once you have trammed your bed, the chemical interface becomes your final line of defence against failed prints. In the fast-paced world of 2026 printing, relying on luck isn't an option. Professional-grade adhesives like Magigoo and Vision Miner have changed the game by offering material-specific formulations. These aren't just generic glues. They are engineered to provide maximum grip when the bed is hot and release the part automatically once it cools. For those using high-speed machines, having the right Bambu Lab accessories Canada makers trust ensures your hardware can keep up with the aggressive movements that often threaten 3D printer bed adhesion Canada projects.
Choosing between liquid adhesives and traditional glue sticks depends on your desired finish. Liquid glues are designed for high-speed applications. They apply in a thin, streak-free layer that leaves the bottom of your print looking pristine. Standard purple glue sticks are a budget-friendly staple, but they tend to build up over time. This creates an uneven surface that can actually interfere with your Z-offset. If you prefer spray-on solutions, always remove the build plate from the printer before applying. Over-spraying inside the machine can gum up your gantry, fans, and delicate electronics.
Specialty Adhesives for Professional Materials
Engineering filaments like Polypropylene (PP) are notoriously difficult to bond. Standard adhesives won't work because PP has very low surface energy. You need a PP-specific primer to create a reliable bond. Similarly, bare steel surfaces often require high-strength options like the "Socks edition" or other "Supergrip" formulations. To get a streak-free bottom layer with liquid adhesives, apply them in a cross-hatch pattern while the bed is cold. This ensures even coverage without the clumping that occurs when glue is applied to a hot surface.
DIY Solutions: Hairspray and Slurry
Many makers still rely on "Aquanet" style hairspray. It works because of the copolymers in the formula, but be careful. Many modern sprays have removed these essential ingredients, making them useless for printing. ABS slurry, made by dissolving scrap ABS filament in acetone, remains an old-school favourite for perfect ABS adhesion. However, DIY methods carry risks. Slurry is messy and hairspray particles can settle on your lead screws or belts. For consistent, professional results without the cleanup headache, browse our curated collection of 3D printer adhesives today.
Advanced Troubleshooting for High-Performance Prints
When you have mastered the basics of levelling and adhesives, you might still encounter stubborn parts that refuse to stay flat. High-performance prints often require advanced slicer-level adjustments to overcome the physics of thermal contraction. If you are struggling with 3D printer bed adhesion Canada enthusiasts recommend slowing down your first layer speed to 15 or 20mm/s. This gives the molten plastic extra time to settle and bond with the build surface before the next movement occurs. For parts with sharp corners, use the "Mouse Ears" technique. By adding small, single-layer discs to the corners of your model, you create a larger surface area that resists the leverage of warping.
Brims and rafts are your last line of defence for part stability. A brim increases the footprint of your part, while a raft creates a completely new sacrificial foundation. While these use more filament, the cost is negligible compared to the price of a failed twelve-hour print. Use a brim for most functional parts, but switch to a raft if your build plate has minor surface damage or if you are printing extremely tall, thin objects that are prone to wobbling.
Slicer Settings for Success
Your slicer is a powerful tool for improving mechanical grip. Set your first-layer line width to 120% or even 140%. This forces more plastic into the build plate, ensuring every microscopic valley is filled. Cooling is another critical factor. Disable your part cooling fan for at least the first 3 to 5 layers. This prevents the plastic from shrinking too quickly, which is the primary cause of corner lifting. For sensitive materials like ABS or Nylon, use "Draft Shields." These act as a temporary mini-enclosure by printing a thin wall around your part, trapping heat and blocking cold air currents.
Maintenance for Long-Term Adhesion
Build plates aren't permanent. Over hundreds of hours, PEI sheets can lose their texture. You can refresh a tired PEI sheet by lightly scuffing the surface with fine steel wool or a Scotch-Brite pad. This creates fresh microscopic "teeth" for the plastic to grab. However, sometimes the issue is deeper than the surface. Aluminium beds can eventually warp or "taco," meaning no amount of adhesive will fix the physical dip in the centre. Regularly perform PID tuning on your bed to ensure the heater isn't fluctuating. Stable temperatures are essential for consistent 3D printer bed adhesion Canada makers rely on for professional results.
If your bed mesh shows a permanent bowl shape or your heater block is no longer reaching target temperatures, it is time to look at professional hardware support. Hardware-related levelling issues often require component replacement or precision machining. Our team offers dedicated 3D printer repair services Canada makers can trust to restore their machines to factory specifications. Don't let a warped bed limit your creative potential when expert help is just a click away.
Ready for Flawless First Layers?
Mastering your first layer isn't just about one setting; it's about the synergy between mechanical precision, thermal control, and the right chemical bond. By tramming your build plate, selecting the correct surface for your filament, and applying high-performance adhesives, you can finally eliminate the frustration of warping. Consistent 3D printer bed adhesion Canada makers need for professional results is within your reach when you treat your printer as a complete system.
Don't let a failed print slow down your next big project. We are here to help you navigate the technical hurdles of 2026 printing technology. As an authorized Bambu Lab accessory retailer with experienced technicians ready to provide technical support, we have everything you need to ensure every print sticks perfectly. Shop our full range of 3D printer bed adhesives and build plates today and take advantage of our fast shipping across Canada. With the right materials and a bit of calibration, your creative potential is limitless. Happy printing!
Frequently Asked Questions
Is hairspray really safe to use on my 3D printer bed?
Hairspray is safe for your build plate, but it can be hazardous for your printer's internal components. The fine mist often settles on lead screws, belts, and cooling fans, causing them to become sticky and attract dust. Always remove the plate from the machine before spraying. Use an "extra hold" variety that contains vinyl acetate copolymers. If you want a cleaner alternative for 3D printer bed adhesion Canada projects, consider a dedicated liquid adhesive instead.
How do I get my 3D prints off the bed if they are stuck too well?
Start by letting the build plate cool down completely to room temperature. Most materials will naturally release as they contract. If it's still stuck, place the removable plate in your freezer for about 10 minutes. The rapid temperature drop causes the plastic to shrink faster than the metal, breaking the bond. You can also carefully drip a small amount of Isopropyl Alcohol around the base of the print to help dissolve the adhesive bond safely.
Do I need to clean my build plate after every single print?
You should ideally clean your build plate before every print to ensure the best results. Finger oils and microscopic dust particles are the primary causes of failure. A quick wipe with a lint-free cloth and Isopropyl Alcohol takes only seconds but significantly increases your success rate. If you are using a textured PEI sheet and notice a drop in performance, a deep clean with warm water and dish soap every few weeks will restore its original grip.
What is the best bed temperature for PLA filament?
The ideal bed temperature for most PLA filaments is between 55°C and 65°C. This range keeps the plastic just above its glass transition temperature, allowing it to stay pliable and bonded to the surface. If you set the temperature too high, you might encounter "elephant's foot" where the bottom layers bulge outward. If it's too low, the part will likely warp or detach entirely. Always check your filament manufacturer's specific recommendations for the best results.
Why does my 3D print warp only on one specific corner?
Warping on a single corner usually indicates an uneven bed or a localized draft. Check your mechanical levelling in that specific area first. If the bed is level, look for external factors like a nearby window or an air conditioning vent blowing on the printer. Even a small breeze can cause one side of the part to cool faster than the rest. Using a draft shield in your slicer settings can often solve this problem without needing hardware changes.
Can I use a glue stick on a textured PEI sheet?
You can use a glue stick on textured PEI, but it's rarely necessary for standard materials like PLA. The main reason to use it on a textured surface is as a release agent for PETG or TPU. These materials can bond too aggressively to the PEI coating, potentially tearing it during removal. A thin layer of glue creates a barrier that makes it easier to pop the part off once the print is finished and cooled down.
Is there a difference between 70% and 99% IPA for cleaning?
There is a significant difference, and 99% Isopropyl Alcohol is the superior choice for 3D printer bed adhesion Canada maintenance. The 70% version contains more water and can leave behind a thin residue or take longer to evaporate. 99% IPA dissolves finger oils instantly and evaporates almost immediately, leaving a perfectly clean surface. If you can't find 99%, 70% will work in a pinch, but you must ensure the plate is completely dry before heating.
What should I do if my nozzle is dragging through the first layer?
If your nozzle is dragging through the plastic, your Z-offset is too low. This creates rough ridges and can eventually clog your nozzle. Immediately stop the print and increase your Z-offset in small increments, usually 0.02mm or 0.05mm at a time. You want the nozzle high enough to lay down a flat, smooth line without digging into the material. Re-running a first-layer calibration square is the best way to visually confirm the correct height after making adjustments.