
What if your 3D printer bed leveling issues aren't actually about the bed being level? It's a question that haunts every maker after their fifth failed first layer of the afternoon. We've all felt that specific brand of frustration when you've meticulously adjusted every knob, yet the nozzle still ploughs into the build plate or hovers uselessly in mid-air. It's exhausting to waste time and expensive filament on a machine that refuses to cooperate, especially when you've done everything by the book.
We understand that a successful print starts long before the plastic hits the plate. You deserve a setup that works as hard as you do. In this guide, we'll help you master the mechanical and software nuances of your printer so you can achieve a perfect first layer every time. We'll demystify the difference between Z-offset and physical leveling, troubleshoot gantry sag, and look at how modern firmware like Klipper v0.13.0 or Marlin 2.1.2.5 can help you realize a reliably flat printing surface. Whether you're upgrading a Bambu Lab machine or tuning a custom rig, it's time to stop guessing and start printing with confidence.
Key Takeaways
- Understand why "tramming" is the technical heart of a perfect first layer and how to achieve nozzle consistency across the entire build plate.
- Diagnose hidden mechanical culprits like X-gantry sag that create recurring 3D printer bed leveling issues despite your best calibration efforts.
- Compare manual tramming with software-based mesh compensation to determine which method provides the most reliable results for your specific hardware.
- Learn to identify warped build plates by testing the centre of the plate and why modern PEI spring steel surfaces are the new standard for adhesion.
- Adopt a proactive maintenance schedule and the "Don't Touch" rule to preserve your mechanical settings and ensure long-term print success.
What are 3D Printer Bed Leveling Issues and Why Do They Occur?
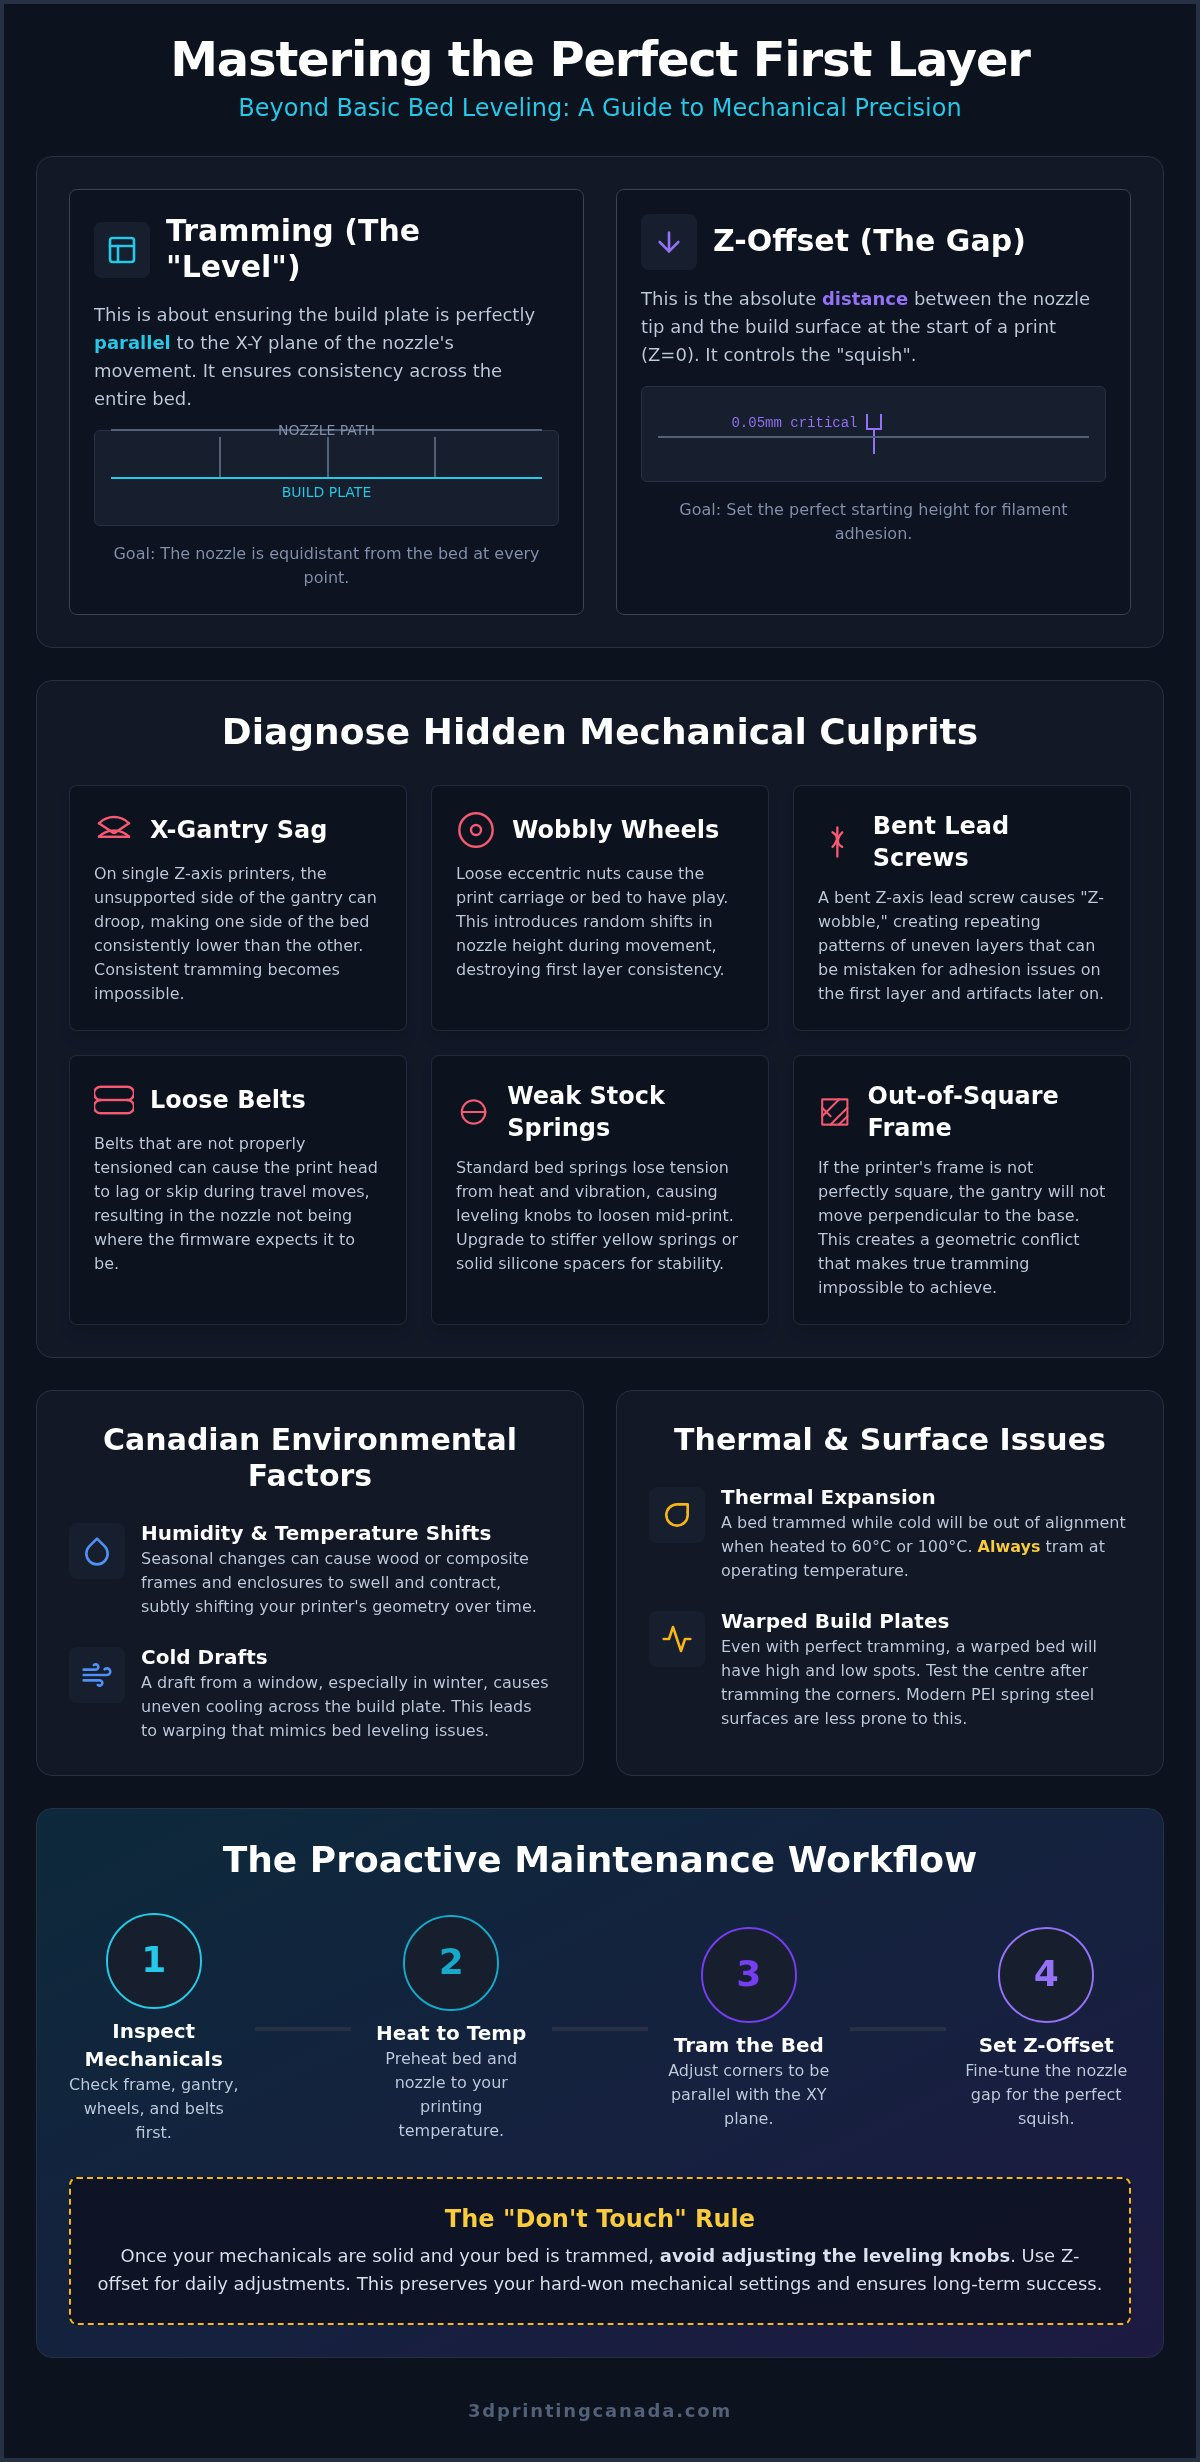
In Fused Deposition Modeling (FDM), your first layer is the foundation of every successful project. If that initial pass doesn't bond perfectly to the surface, the rest of the print is doomed. This is why 3D printer bed leveling issues are the most common hurdle for makers. To get it right, we look at "tramming." Tramming is the process of making the build plate parallel to the X and Y axes. This ensures the nozzle remains exactly equidistant from the bed across the entire XY plane, allowing for a consistent squish of filament.
Physics often works against your calibration. Thermal expansion is a major factor that many beginners overlook. As your bed heats up to 60°C or 100°C, the metal or glass expands and can change shape. A bed calibrated while cold will almost certainly be out of alignment once it reaches operating temperature. You'll recognize these issues through several frustrating symptoms. Peeling corners usually mean the nozzle is too far away, while a nozzle dragging through the plastic indicates it's too close. You might also see elephants foot, where the bottom layers bulge because they're being pressed too hard against the plate.
The Difference Between Leveling and Z-Offset
It's easy to confuse these two settings, but they serve different purposes. Leveling is about parallelism; it ensures the bed is flat relative to the nozzle's movement. Z-offset is about the absolute gap between the nozzle tip and the build surface at the start of a print. You can have a perfectly trammed bed, but if your Z-offset is off by even 0.05mm, the print will fail. Beginners often make the mistake of adjusting their leveling knobs to fix a height issue that should actually be solved in the software. This leads to a cycle of frustration where the bed is never truly "level" because the starting height is wrong.
Environmental Factors in Canada
Living in Canada presents unique challenges for your hardware. Our seasonal humidity and temperature shifts can significantly affect printer enclosures, especially those made from wood or composite materials. These materials swell and contract, subtly shifting the printer's frame over time. Cold drafts are another silent killer. A draft from a window in January can cause uneven cooling across the build plate. This leads to warping that looks like 3D printer bed leveling issues but is actually just a temperature imbalance. Keep your printer in a stable environment to minimize these external variables.
Mechanical Culprits: Frame and Gantry Failures
Have you ever spent an hour chasing a perfect level only to find the nozzle is too high again two minutes later? We call this "Ghost Leveling." It feels like the machine is gaslighting you, but the reality is usually a mechanical failure. Many 3D printer bed leveling issues aren't actually about the bed knobs. They often stem from the frame or gantry. If your printer uses a single Z-axis lead screw, X-gantry sag is a likely culprit. When the right side of the gantry isn't supported by a second screw, it can droop or bounce as the print head moves, making consistent tramming impossible.
Check your eccentric nuts and wobbly wheels before you touch the bed again. If the print carriage has any play, the nozzle height will shift randomly during the print. You should also verify that your frame is perfectly square. A tilted upright or a leaning vertical extrusion creates a geometric nightmare. If the gantry doesn't move perfectly perpendicular to the base, one side of the bed will always feel impossible to level. For a comprehensive overview of bed leveling and how it interacts with these mechanical systems, it's helpful to look at the physics of the entire motion system.
Inspecting Your Lead Screws and Belts
Bent lead screws are a common source of Z-wobble, which can mimic adhesion problems or uneven layers. If you see repeating artifacts in your prints, your lead screw might be the bottleneck. Don't ignore your belts either. A loose belt can cause the print head to skip or lag during rapid travel. This often mimics a tilted bed because the nozzle doesn't land exactly where the software expects. Ensure your belts are tight enough to pluck like a guitar string to maintain accuracy during high-speed movements.
Spring Tension and Bed Stability
Stock springs are notoriously weak. They lose their tension over time, especially during long, hot prints. This causes the leveling knobs to vibrate loose, ruining your hard work. Upgrading to high-tension yellow springs or solid silicone spacers provides much better stability for your build plate. If you've checked everything and your frame still seems warped or out of alignment, our team offers professional 3D printer repair services Canada to get your hardware back to factory specifications. Solid hardware is the only way to ensure your calibration actually sticks.
If you realize your machine needs more than just a quick turn of a knob, don't hesitate to reach out for expert support. Sometimes a fresh set of eyes on a bent gantry is all it takes to get you back to printing.
Troubleshooting Auto Bed Leveling (ABL) vs. Manual Leveling
Many makers treat Auto Bed Leveling (ABL) as a magic wand that eliminates all 3D printer bed leveling issues, but that isn't quite how it works. ABL doesn't actually level your bed. Instead, it uses software-based mesh compensation to adjust the Z-height in real-time as the nozzle moves across the plate. While this is incredibly helpful for minor dips, it isn't a substitute for a physically trammed machine. If your bed is tilted by more than 2mm from one corner to the other, the ABL system will struggle to compensate, often resulting in distorted geometry or failed adhesion.
ABL systems are also prone to their own specific hardware failures. A dirty sensor or a loose mounting bracket can lead to inconsistent readings that confuse your printer's brain. Magnetic interference from the heated bed can also play havoc with certain induction sensors. Even if the hardware is perfect, software conflicts often get in the way. A common mistake is failing to include the correct command in your Start G-code. If you don't use M420 S1 or a fresh G29 after the homing command (G28), your printer might simply ignore the saved mesh and print on a "flat" plane that doesn't exist.
Manual Leveling: The Paper Test and Beyond
Manual leveling, or tramming, remains a foundational skill. The classic paper test is a great start, but you can improve your accuracy by using a 0.1mm feeler gauge for a more repeatable result. Always perform your final check while the nozzle and bed are at printing temperature to account for heat expansion. If you're still seeing minor gaps, try the "live level" technique. Slowly turn your leveling knobs while the skirt or brim is printing. This allows you to visually dial in the perfect squish before the actual model begins.
Mastering ABL Mesh Calibration
Interpreting your bed mesh map is the best way to find warped spots that manual leveling can't fix. Most modern firmware will show you a visual representation where red spots are too high and blue spots are too low. High-speed machines like the Bambu Lab A1 and P1S have specific leveling sequences that check for resonance and bed tilt before every print. If your sensors aren't giving you consistent data, you might need to look at Bambu Lab accessories Canada for replacement probes or updated mounting parts. Keeping these sensors clean and secure is vital for high-speed success.
Solving Persistent Adhesion and Warped Build Plates
You have checked your gantry and dialed in your ABL, but the centre of your print still won't stick. This is often where physical hardware warping becomes the primary suspect. To confirm this, perform a "straight edge" test by placing a machinist's square or a metal ruler across the centre of your build plate. Shine a light behind the ruler; if you see light peeking through the middle while the edges are flush, your bed is physically concave. These types of 3D printer bed leveling issues are frustrating because they persist even when your corner knobs are perfectly adjusted.
Build surfaces have evolved significantly. While glass was once the standard for flatness, it's falling out of favour because it's heavy and prone to chipping. PEI spring steel is the modern choice. It is flexible, handles thermal expansion better, and makes part removal effortless. However, even the best surface fails if it's dirty. Dust and skin oils from your fingers are the silent killers of adhesion. Always wipe your plate with 90% isopropyl alcohol between every print to keep the surface pristine and ready for plastic.
Your choice of material also dictates your leveling strategy. PLA loves a close, tight squish to the bed for that perfect first layer. In contrast, PETG requires a slightly larger Z-gap. If you squish PETG too hard, it can bond permanently to PEI or glass, potentially tearing the surface when you try to remove the part. Using high-quality filament Canada ensures that your extrusion remains consistent, so you aren't fighting diameter fluctuations while trying to solve adhesion problems.
Build Plate Materials and Their Quirks
Textured PEI is excellent for hiding minor leveling inaccuracies because the peaks and valleys of the texture provide more surface area for the plastic to grab. Satin sheets offer a middle ground, providing a smooth finish with reliable grip for various materials. If you're still struggling with stubborn parts, a thin layer of glue stick or specialized 3D printing spray can bridge the gap between a "good" level and a successful print. These adhesives act as both a bonding agent and a release layer.
Fixing Warped Beds Without Replacement
Thermal stress can permanently warp thin aluminium beds over time. If you find a low spot in the centre of your plate, you don't always need to buy a new one immediately. You can use small squares of aluminium foil as shims underneath your magnetic base or glass plate to "lift" the low areas manually. The "Glass Overlay" method is another option, where you clip a mirror or glass sheet on top of the warped aluminium. This provides a flat surface, though it adds weight to the Y-axis and increases your heat-up times.
Ensure your next project has the best start possible by stocking up on premium 3D printing filaments today.
Proactive Maintenance: Keeping Your Bed Level for the Long Haul
Achieving a perfect first layer is a massive win, but the real challenge is making that success repeatable. Most 3D printer bed leveling issues return because of neglected maintenance rather than sudden hardware failure. By treating your printer like a precision tool and following a consistent schedule, you can spend more time creating and less time twisting knobs. Consistency in your environment and your habits is what separates a hobbyist from a pro maker.
One of the most important habits to adopt is the "Don't Touch" rule. It is tempting to pry a finished print off the build plate while it's still attached to the machine, but the force required to pop a stubborn model can easily compress your bed springs or shift your gantry. This physical stress undoes your careful tramming instantly. If you're using a PEI spring steel sheet, always remove the sheet from the printer before flexing it to release your parts. This simple change preserves your mechanical alignment for dozens of prints at a time.
Don't overlook the digital side of maintenance. Firmware developers are constantly refining how machines handle bed data. Updating to the latest stable releases, such as Marlin 2.1.2.5 or Klipper v0.13.0, can provide better mesh interpolation and more reliable probe accuracy. These updates often include safety features that detect if a sensor is failing, preventing the nozzle from crashing into your bed during the leveling sequence.
A 5-Step Weekly Leveling Audit
Set aside twenty minutes every week to run through this checklist. It catches small shifts before they ruin a long print.
- Step 1: Clean the build plate thoroughly with 90% isopropyl alcohol to remove all oils.
- Step 2: Check the eccentric nuts on your X and Y carriages. There should be no wobble, but they shouldn't be so tight that they bind.
- Step 3: Verify your Z-offset using the paper test or a feeler gauge at the centre of the bed.
- Step 4: Run a single-layer test print that covers the corners and the middle of the plate.
- Step 5: Adjust your leveling springs only if the test print shows uneven squish.
Ensure your workspace is part of the audit too. Your printer should sit on a sturdy, level surface that doesn't vibrate or tilt. If your desk is wobbly, your gantry will struggle to maintain its position during rapid movements, leading to perceived 3D printer bed leveling issues that are actually just external vibrations.
When to Call the Professionals
Sometimes, the problem isn't a loose screw or a dirty plate. If your Z-height drifts constantly despite perfect mechanical tension, you might be dealing with a failing stepper motor driver or a glitchy mainboard. Electrical issues like these are difficult to diagnose at home and can lead to permanent hardware damage if left unchecked. Bent frames or twisted extrusions are also nearly impossible to fix without specialized tools and experience.
If you have reached the limit of DIY fixes and your prints still aren't sticking, it might be time for an expert's touch. Stymied by a stubborn printer? Book a 3D printer repair service today to get your machine back into peak operating condition. There is no shame in seeking support to ensure your creative journey stays on track.
Master Your Machine for Perfect First Layers
Solving persistent 3D printer bed leveling issues is rarely about a single adjustment. It's about understanding the mechanical harmony between your frame, gantry, and build surface. By now, you realize that a successful print starts with a square frame and ends with a pristine, well-maintained PEI plate. Whether you're fine-tuning a manual setup or optimizing a high-speed ABL sequence, your commitment to proactive maintenance is what ensures consistent results. Don't let a stubborn first layer dampen your creative spirit.
If you've followed every step but your machine still refuses to cooperate, we're here to help. As Canada’s trusted source for 3D printing support, we provide expert technicians for all major brands and fast shipping on replacement Bambu Lab parts to get you back in action quickly. Our team is invested in your success and ready to tackle the complex hardware defects that DIY fixes can't reach. Stop fighting your hardware and start realizing your designs with confidence.
Troubleshoot with the Pros: Book Your 3D Printer Repair Service
You have the knowledge and the right approach to conquer any calibration challenge. Keep your bed clean, your belts tight, and your nozzle at the perfect height. Happy printing!
Frequently Asked Questions
How often should I level my 3D printer bed?
Level your bed whenever you notice the first layer isn't consistent or after moving the printer. For machines with stock springs, a quick check every few prints is wise. If you've upgraded to silicone spacers or high-tension springs, you might only need to recalibrate once a month. Always run a test print after changing nozzles or performing any mechanical maintenance on the gantry to ensure everything remains aligned.
Why does my 3D printer bed go out of level after every print?
This usually happens because of weak bed springs or excessive force during part removal. If you're prying prints off while the plate is still on the machine, you're likely compressing the springs unevenly. Vibrations during high-speed printing can also cause leveling knobs to rotate. Consider upgrading to locking knobs or stiffer springs to resolve these recurring 3D printer bed leveling issues and maintain your calibration for much longer periods.
Can I level my bed while it is cold?
You should always level your bed while it is heated to your typical printing temperature. Metal and glass expand when they get hot, which changes the physical shape of the build plate. If you calibrate while the machine is cold, the gap between the nozzle and the bed will shift once the heaters kick in. Aim for 60°C for PLA or 100°C for ABS to ensure the highest accuracy during your setup.
What is the best way to clean a PEI build plate for better adhesion?
Use 90% or higher isopropyl alcohol (IPA) and a lint-free cloth between every print. This removes skin oils and dust that prevent filament from bonding to the surface. If you notice a significant drop in adhesion over time, wash the plate with warm water and a grease-cutting dish soap. Avoid using acetone on textured PEI sheets, as it can damage the coating and ruin the surface permanently over time.
Does auto bed leveling replace the need for manual leveling?
No, auto bed leveling (ABL) is a supplement rather than a total replacement. ABL creates a digital mesh to compensate for minor dips or warps, but it cannot fix a severely tilted bed. You should still manually tram the four corners to get the plate as parallel as possible to the nozzle. This reduces the workload on your Z-axis motors and results in much better dimensional accuracy for your finished parts.
Why is my nozzle scratching the bed even after leveling?
This is usually caused by an incorrect Z-offset or a loose Z-limit switch. Even if the bed is perfectly level, the Z-offset tells the printer exactly how far the nozzle tip is from the probe trigger point. If this value is too low, the nozzle will plough into the bed during the first layer. Check that your gantry isn't sagging on one side, as this can also cause the nozzle to dip unexpectedly during movement.
Can a warped bed be fixed with software?
Software can compensate for a warped bed through mesh leveling, but it doesn't physically fix the plate. Firmware like Marlin or Klipper uses a probe to map the surface and adjusts the Z-height in real-time. While this helps with adhesion, a severely warped bed can still cause distorted shapes in your final prints. For extreme cases, physical shimming with aluminium foil or replacing the build plate is the only permanent solution for your machine.
What should I do if my leveling knobs are too loose?
Loose knobs often mean your Z-limit switch is set too high, preventing you from compressing the springs enough to create tension. Lower the Z-limit switch slightly so you can tighten the knobs further while still reaching the nozzle. If the knobs still vibrate loose during prints, try adding a small drop of removable thread locker or switching to stiffer, high-tension yellow springs. This provides the stability needed to prevent 3D printer bed leveling issues during long jobs.