
You have just loaded a brand new spool of PETG, but instead of the smooth hum of a perfect first layer, you hear a sharp, rhythmic crackling coming from your nozzle. This unsettling noise often signals that your material has absorbed moisture from the air, leading you straight into the weeds of wet filament popping sound troubleshooting. It is a common frustration for makers across Canada, especially when a "factory sealed" bag arrives with enough humidity to ruin a high-stakes project. You are likely staring at a rough surface finish and wondering if those tiny steam explosions are actually damaging your hardware.
We know how discouraging it feels to waste expensive filament on a failed print. This guide will show you exactly how to identify moisture issues and resolve them using professional drying protocols that won't melt your spools. You will learn why certain materials like Nylon or TPU are so thirsty for water and how to build a reliable storage setup that keeps your workshop ready for action regardless of the season. From understanding glass transition temperatures to choosing the right dry box, we have the practical steps you need to get back to printing with confidence.
Key Takeaways
- Learn how to recognize the "snap, crackle, pop" of moisture-laden material and use our wet filament popping sound troubleshooting steps to confirm the issue before it ruins your prints.
- Understand the science of hygroscopy and why even "factory sealed" spools can absorb enough water to cause significant surface defects and extrusion issues.
- Master the "Dry Weight" method to track moisture loss accurately so you can realize when your filament has reached its optimal printing state.
- Discover why dedicated filament dryers are a safer, more reliable alternative to home ovens, which often suffer from dangerous temperature spikes that can fuse your spool.
- Implement a long-term storage strategy using airtight bins and rechargeable desiccants to protect your investment from Canada's seasonal humidity swings.
Identifying the Popping Sound: Is Your Filament Truly Wet?
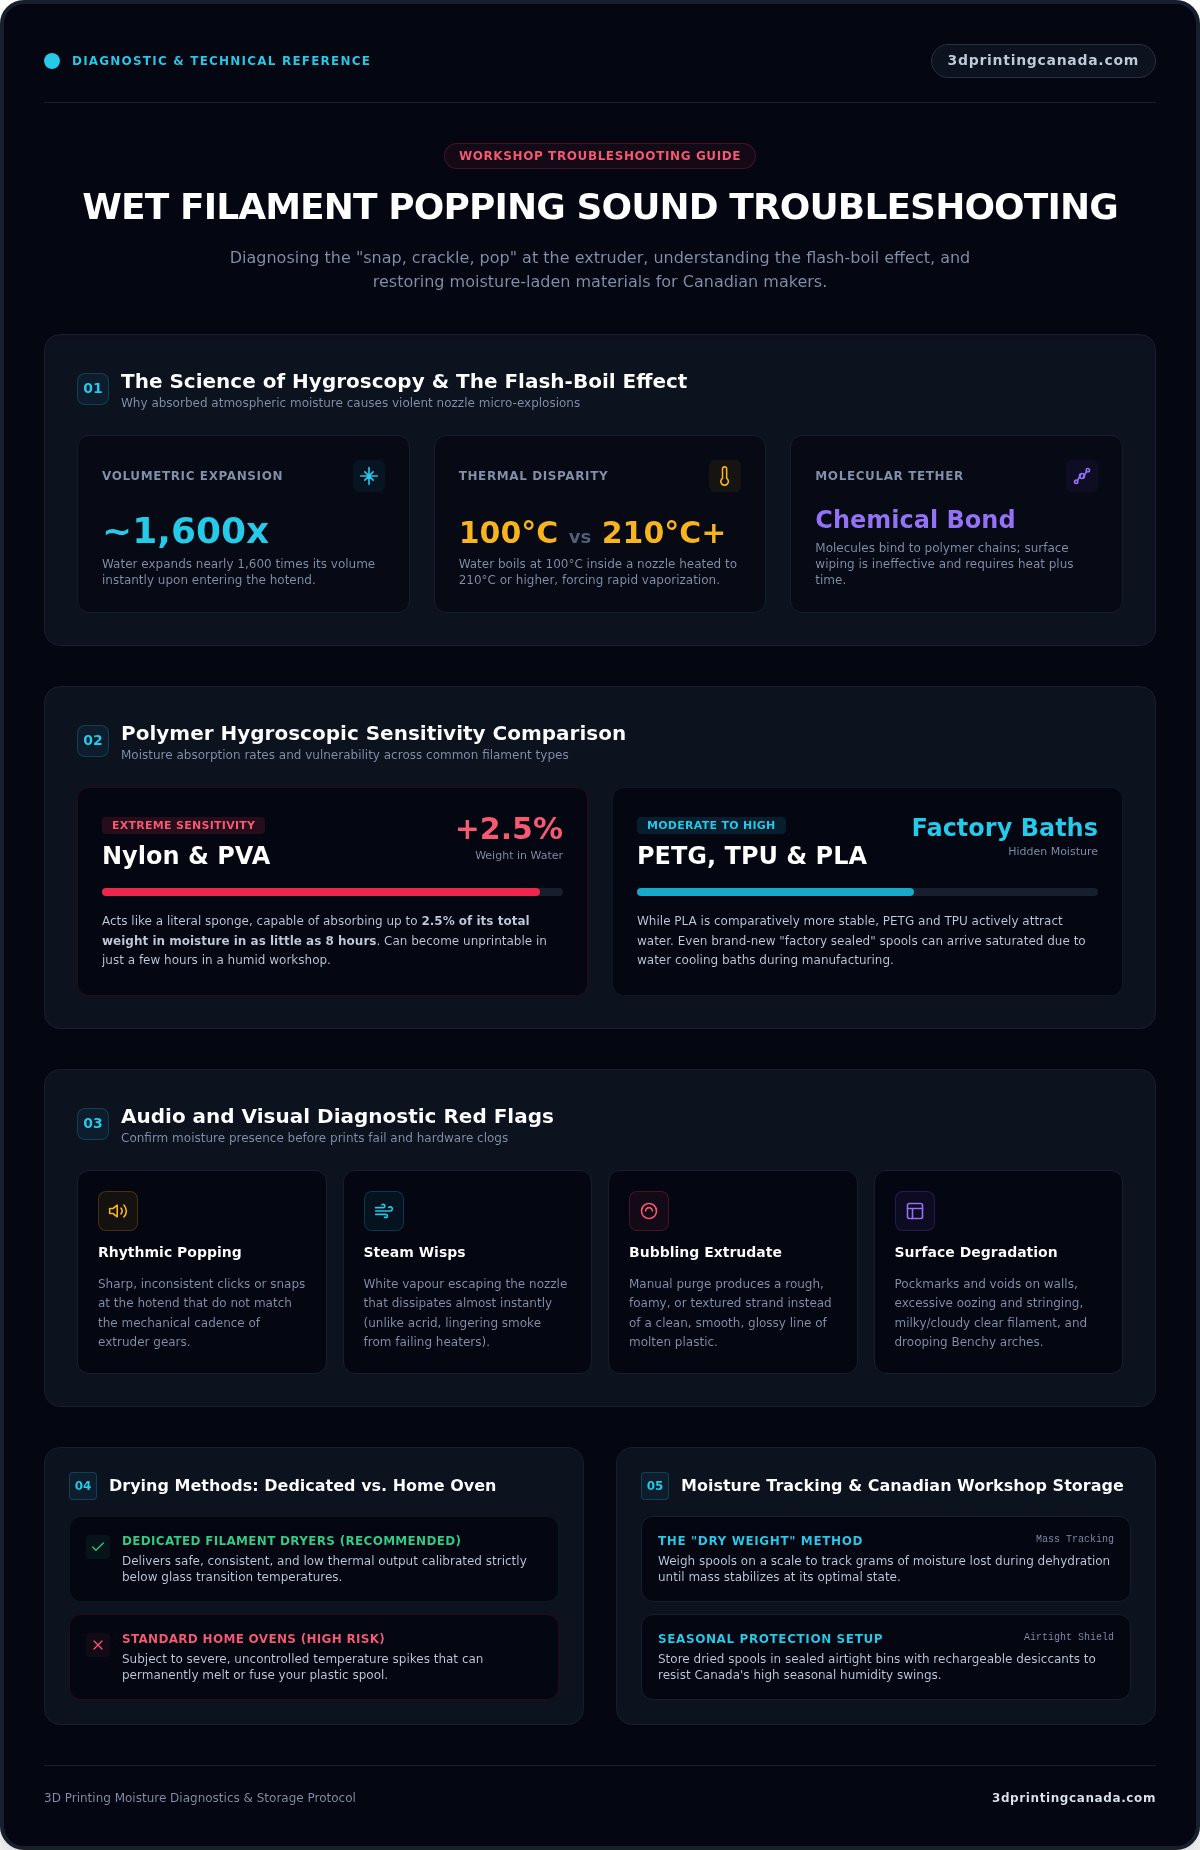
Hearing a rhythmic popping or crackling at the extruder is often the first sign that your print is headed for the bin. It sounds remarkably like a miniature bowl of breakfast cereal inside your hotend. This happens because water absorbed into the plastic expands nearly 1,600 times its volume as it hits the heater block. This rapid expansion creates tiny steam explosions that force their way out of the nozzle. When you start your wet filament popping sound troubleshooting, don't just focus on the noise. You need to look for the physical evidence left behind by these micro-explosions to confirm the diagnosis.
You might see thin wisps of vapour rising from the nozzle during a print. Local makers often mistake this for smoke from a burning heater, but it's usually just steam escaping the molten plastic. The hygroscopic properties of polymers mean that materials like PLA, PETG, and especially Nylon actively pull moisture from the Canadian air. Even a brand-new spool isn't safe. Manufacturers often cool filament in water baths before vacuum sealing it. If the drying process at the factory wasn't perfect, you are starting with a "wet" spool right out of the box.
Audio and Visual Red Flags
- Rhythmic popping: Listen for inconsistent clicks or snaps that don't match the mechanical movement of your extruder gears.
- Steam wisps: Watch for white vapour that disappears almost instantly into the air; smoke from a failing component will linger and smell acrid.
- Bubbling extrudate: If you manually purge filament, look for a rough, foamy texture instead of a smooth, glossy strand. These tiny bubbles represent the voids that will eventually ruin your wall finish.
Surface Finish Degradation
Moisture doesn't just make noise; it wreaks havoc on your aesthetics. As steam pockets exit the nozzle, they leave behind "pockmarks" or tiny voids on the outer walls of your print. This results in a "fuzzy" or matte surface texture where there should be a clean, uniform finish. You will also notice a massive increase in stringing and oozing. Because the internal pressure in the nozzle is unstable due to steam, your retraction settings won't work properly. Transparent filaments are especially telling, as they often turn cloudy or milky when they've absorbed environmental water.
If you aren't sure, run a quick Benchy. A Benchy printed with wet material usually shows severe drooping on the arches, inconsistent hull lines, and a cabin that looks like it was printed in a sandstorm. If you see these signs alongside the popping noise, stop the print. Continuing will only waste material and potentially lead to a clogged nozzle that requires a deep clean or part replacement.
The Science of Hygroscopy: Why Plastic Absorbs Water
Most 3D printing filaments are hygroscopic. This means they don't just get "wet" on the surface like a glass of water; they actively attract and chemically bond with water molecules from the surrounding air. When you perform wet filament popping sound troubleshooting, you are dealing with moisture that has integrated into the polymer structure itself. These water molecules "tether" themselves to the polymer chains in materials like PLA, PETG, and TPU. This bond makes the moisture impossible to remove with a simple towel; it requires heat and time to break those molecular ties.
When this trapped water hits your hotend, the "Flash-Boil Effect" occurs. Water boils at 100°C, but your nozzle is likely sitting at 210°C or higher. This causes the water to expand nearly 1,600 times its volume as it flashes into steam instantly. This violent expansion is why the material will bubble and pop while printing, creating internal voids that ruin your part's structural integrity. Some materials are far more sensitive than others. While PLA is relatively stable, Nylon acts like a literal sponge, capable of absorbing up to 2.5% of its total weight in moisture in as little as 8 hours.
The Molecular Tug-of-War
Humidity in your workshop acts like constant pressure on your filament. In a humid basement or during a sticky Canadian summer, the air is packed with water molecules looking for a place to land. Nylon and PVA can become unprintable in just a few hours if left unprotected. There is a critical difference between surface moisture and deep-seated saturation. Surface moisture might cause a few pops at the start, but deep saturation means the entire spool is compromised, requiring a much longer drying cycle to pull water from the centre of the strand.
Impact on Structural Integrity
Moisture triggers a chemical process called hydrolysis. This is where water molecules actually break the long polymer chains that give plastic its strength. This leads to brittle filament that snaps during a long print or, worse, parts that fail under minimal stress. Layer adhesion suffers because the steam pockets prevent the molten plastic from fusing correctly with the previous layer. To ensure your projects have the strength they need, always start with high-quality filaments that have been stored in climate-controlled environments and protected from environmental humidity.
How to Dry Wet Filament: A Step-by-Step Restoration Guide
Restoring your material to a printable state requires more than just heat; it requires a systematic approach. If you have confirmed the issue through wet filament popping sound troubleshooting, your next move is to remove that moisture without compromising the polymer. Simply leaving a spool on a radiator or in a sunny window won't work. You need controlled heat and consistent airflow to break the molecular bonds water has formed with your plastic.
Start by weighing your spool with a digital kitchen scale. This "Dry Weight" method provides objective proof that moisture is leaving the plastic. As the water evaporates, the spool will literally become lighter. This process is critical because, as shown in NASA research on filament drying and moisture expansion, even microscopic amounts of water can cause internal voids and porosity that weaken your final parts. Once you have your starting weight, set your dryer to the correct temperature for the material type.
Recommended Temperature and Time Chart
- PLA: 45°C (113°F) for 4–6 hours. Be careful not to exceed 50°C, or you risk the filament softening and fusing together on the spool.
- PETG & ABS: 65°C (149°F) for 6+ hours. These materials have higher heat resistance and need deeper drying to reach the core.
- Nylon & TPU: 70°C+ (158°F+) for 12+ hours. These are the most demanding materials and often require active drying even while the print is running.
The "Weight" Test for Accuracy
Don't just guess when the drying is done. Measure the spool every few hours. You might realize that even a 2-3 gram weight loss indicates a massive amount of water removal for a standard 1kg spool. Continue the drying cycle until the weight remains stable for two consecutive hours. This stability proves that you have reached the "dry equilibrium" for your workshop's environment.
Airflow is the final piece of the puzzle. Without a fan to carry the humid air away, the moisture just sits inside the dryer, potentially re-settling on the spool as it cools. Ensure your drying setup has active ventilation. Once the cycle finishes, move the filament immediately into an airtight container or a vacuum bag. If you let it sit on the counter to cool, it will start pulling moisture back from the air before you even hit the "print" button.
Comparing Drying Methods: Dedicated Dryers vs. Home Ovens
Once you have finished your wet filament popping sound troubleshooting and confirmed that moisture is the culprit, you need to decide on a drying method. While the internet is full of DIY shortcuts, not all methods are created equal. Dedicated filament dryers are the gold standard because they provide consistent heat and active airflow. Many models even allow you to print while the material stays in the heated chamber, which ensures it doesn't re-absorb moisture during a 48-hour project.
Some makers turn to food dehydrators as a cost-effective alternative. These work well because they use a fan to circulate air, which is essential for carrying moisture away from the plastic. However, you often have to cut the trays to fit a 1kg spool, which ruins the unit for its original purpose. On the other hand, vacuum chambers are a common point of confusion. While they are great for removing air bubbles from resin, they fail to remove deep-seated moisture in solids. Without heat to break the molecular bonds, the water stays put.
Why We Don’t Recommend Home Ovens
It is tempting to use what you already have in the kitchen, but home ovens are notorious for wide temperature swings. Most domestic ovens fluctuate by 15°C to 25°C because they use a simple binary thermostat. If you set it to 50°C for PLA, the radiant heating elements might spike the local chamber temperature to 70°C. This leads to a "thermal runaway" scenario where you end up with a melted plastic puddle instead of usable 3D printer filament Canada makers can rely on. There is also the serious risk of food contamination. 3D printing plastics can release fumes when heated; you don't want those settling on the surfaces where you prepare dinner.
Investing in a Professional Dryer Box
A professional dryer box does more than just heat plastic. It provides active humidity monitoring, giving you a real-time readout of the conditions inside the chamber. This level of control is vital for high-speed machines that require perfectly dry material to maintain consistent flow. For example, the Bambu Lab AMS unit uses sealed compartments and desiccant to manage moisture, but for truly wet spools, an active dryer is still necessary. Integrating these tools with high-quality Bambu Lab accessories Canada ensures your setup is optimized for success from the first layer to the last.
If you are tired of hearing those pops and seeing ruined finishes, it is time to upgrade your workshop. Browse our full range of professional filament dryers and storage solutions to keep your materials in peak condition year-round.
Preventing Moisture: Storage Strategies for Canadian Makers
Managing your environment is the final step in mastering 3D printing quality. In Canada, we deal with massive seasonal swings that dictate how we handle our materials. A humid summer can saturate a spool of PETG in just 48 hours, while the dry, forced-air heating of a typical winter can drop indoor humidity to 15%. If you want to stop doing wet filament popping sound troubleshooting every time you start a new project, you need a proactive storage strategy. Prevention is always more efficient than a 12-hour drying cycle in a dedicated machine.
Airtight storage is your first line of defence. Don't rely on standard plastic totes from the hardware store. Most storage bins allow moisture to seep through the lid over time. Instead, choose bins with integrated rubber gaskets and heavy-duty latches to ensure a true airtight seal. Inside these bins, place a digital hygrometer to monitor the internal environment. You should aim for a Relative Humidity (RH) of less than 15% for optimal results. Use orange-to-green indicating silica gel beads or a 4A molecular sieve to pull moisture from the air. These are preferred over the older blue cobalt chloride versions for home safety. When the beads turn dark green, you can recharge them in a low-heat environment to make them reusable.
Building an Airtight Storage System
Organize your collection so you only open your dry boxes when you are ready to swap spools. This minimizes the time your dry environment is exposed to the ambient room air. For filaments you use infrequently, vacuum-sealed bags with a small desiccant pack are the most space-efficient solution. Labelling your bags with the date they were last dried helps you track which materials might need a refresh before their next use. Keeping your storage system organized ensures that your workshop remains a centre of productivity rather than a source of frustration.
Maintenance for Your Materials
A common mistake is leaving a spool on the printer holder overnight. Even if you aren't printing, the exposed strand is actively absorbing water from your room. If you experience a severe clog caused by steam pockets or degraded material that won't clear with a standard cold pull, don't risk damaging your hotend by forcing it. You can reach out to professional 3D printer repair services Canada to get your hardware back in peak condition.
Keep this final checklist in your shop to maintain quality:
- Store all spools in gasket-sealed bins immediately after every print session.
- Monitor hygrometers weekly to ensure RH stays below the 20% threshold for hygroscopic materials.
- Recharge your desiccant beads as soon as they change colour.
- Vacuum seal specialty materials like Nylon, TPU, or PVA every time you finish a project.
Take Control of Your Material Quality
You've identified the crackle, understood the science of hygroscopy, and realized that even a factory-sealed spool isn't always dry. Mastering wet filament popping sound troubleshooting is about moving from frustration to consistent, professional results. Remember that dedicated dryers and airtight storage bins are your best defence against Canada's unpredictable humidity. By weighing your spools and using precise temperature controls, you protect your hardware and ensure every layer bonds perfectly.
If moisture has already caused a stubborn clog or if you're ready to upgrade your setup, we're here to help. As an authorized Bambu Lab retailer, we provide the high-quality consumables and accessories you need to succeed. Our expert technicians are available for hardware repairs if things go wrong, and we offer fast shipping across Canada to keep your workshop running. 3D Printing Canada is your partner in solving these practical challenges with reliable support.
Shop Premium Filaments and Dryers at 3D Printing Canada and get back to creating with confidence. Your next perfect print is just a dry spool away.
Frequently Asked Questions
Can I dry my filament on the 3D printer’s heated bed?
You can use your printer's heated bed as a makeshift dryer, but it is not the most effective method. Heat rises from the bed, but without active airflow, the moisture often stays trapped within the spool's windings. If you place a box over the spool to trap heat, you inadvertently create a humid micro-climate. For reliable results, a dedicated dryer with a fan is always the superior choice to ensure water is actually removed.
Is it possible to "over-dry" filament and make it brittle?
You cannot technically remove too much water, but excessive heat can definitely damage your material. If you leave filament in a dryer at temperatures exceeding its glass transition point, the strands will soften and fuse together. This makes the spool unusable. Stick to the recommended drying times and temperatures for each specific polymer to avoid thermal degradation or "cooking" the plastic, which can lead to increased brittleness over time.
How can I tell if my filament is dry without a scale?
The most reliable way to check without a scale is a manual extrusion test. Heat your nozzle and purge a small amount of filament into the air. If the strand comes out smooth, glossy, and falls straight, it is likely dry. You might realize that if you see bubbles or hear tiny pops, you need more drying time. This is a core part of wet filament popping sound troubleshooting before starting a long print.
Does wet filament cause more nozzle clogs?
Yes, moisture is a leading cause of extrusion failures and partial clogs. When water flashes into steam inside the hotend, it creates pressure gaps that lead to under-extrusion. Over time, the chemical degradation caused by moisture can leave carbonized residue inside the nozzle. If you find that moisture has caused a persistent blockage you cannot clear, our expert technicians provide professional 3D printer repair services to get your equipment back in peak condition.
Why does my filament still pop after 4 hours of drying?
A four-hour cycle is often insufficient for highly hygroscopic materials like PETG, TPU, or Nylon. While PLA might be ready in that timeframe, "thirstier" plastics frequently require 12 to 24 hours of active heat to pull moisture from the centre of the spool. Also, ensure your dryer is actually venting the humid air. If the moisture has nowhere to go, it will simply settle back onto the filament as the unit cools down.
Are some filament brands more moisture-resistant than others?
Resistance is primarily determined by the polymer's chemical structure rather than the brand name. However, premium manufacturers often use better drying processes before sealing their products. Some specialty blends are formulated to be less hygroscopic, but all FDM filaments will eventually absorb water if left exposed. We recommend testing a variety of high-quality filaments to find which ones perform best in your specific Canadian workshop environment and local humidity levels.
How long does it take for filament to get wet in a normal room?
The speed of absorption depends on the material and your room's relative humidity. In a typical Canadian summer with humidity above 50%, Nylon can become unprintable in as little as 4 to 8 hours. PETG usually shows signs of degradation within 24 to 48 hours. Even PLA, which is more resistant, will eventually become brittle and snap if left on a spool holder for several weeks without any protection from the ambient air.
Should I dry brand-new filament straight out of the box?
It is a best practice to dry any new spool of Nylon, TPU, or PVA immediately. Many manufacturers use water baths to cool the filament during production, and if their drying line isn't perfect, moisture gets trapped inside the vacuum-sealed bag. This helps you organize your workflow and avoid the frustration of a ruined first layer. For PLA and PETG, you can usually start printing right away unless you hear audible crackling.